# Chapter 1 — Getting Started
# Unboxing the AirGradient ONE
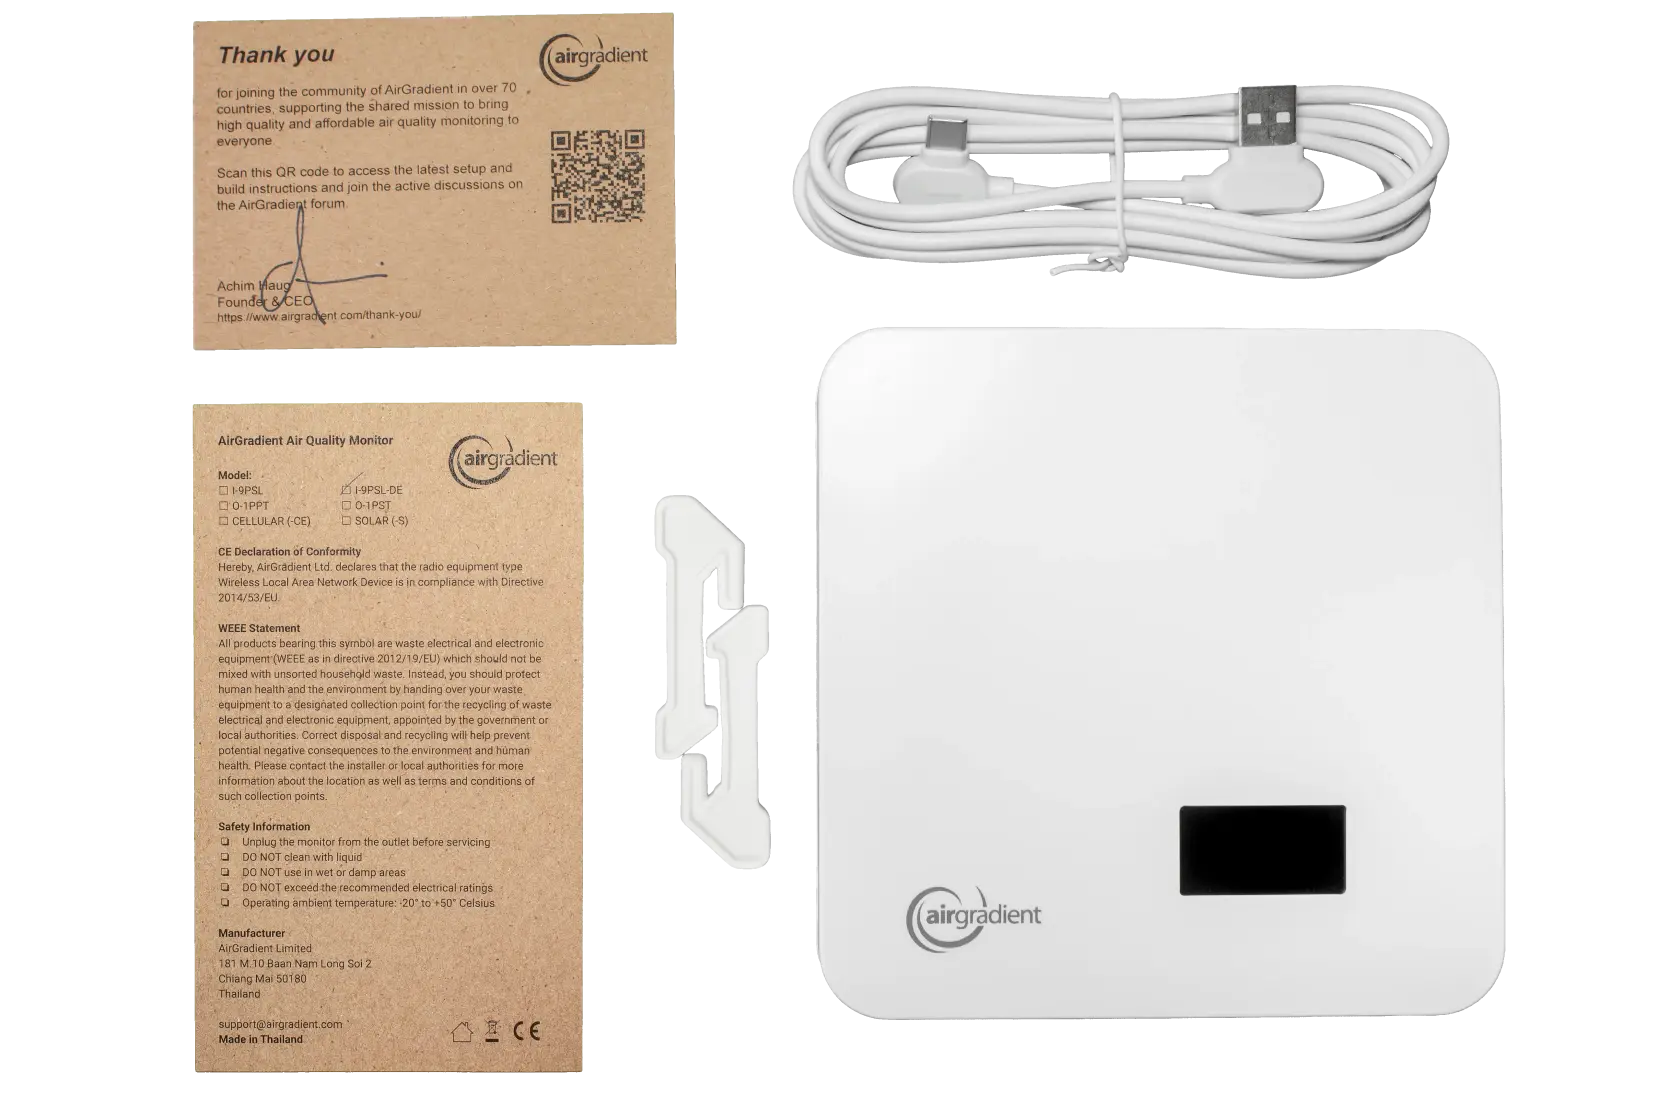
An AirGradient ONE box contains:
- 1x Fully-Assembled AirGradient ONE (Model: I-9PSL-DE)
- 2x Stands for AirGradient ONE ([How to install the stands?](https://www.youtube.com/watch?v=ywE_C8mbAKk))
- 1x 90-degree USB-A to USB-C cable (2m)
- 1x Thank You Card (QR code links to onboarding instructions)
- 1x Regulatory & Safety Insert
# Powering the AirGradient ONE
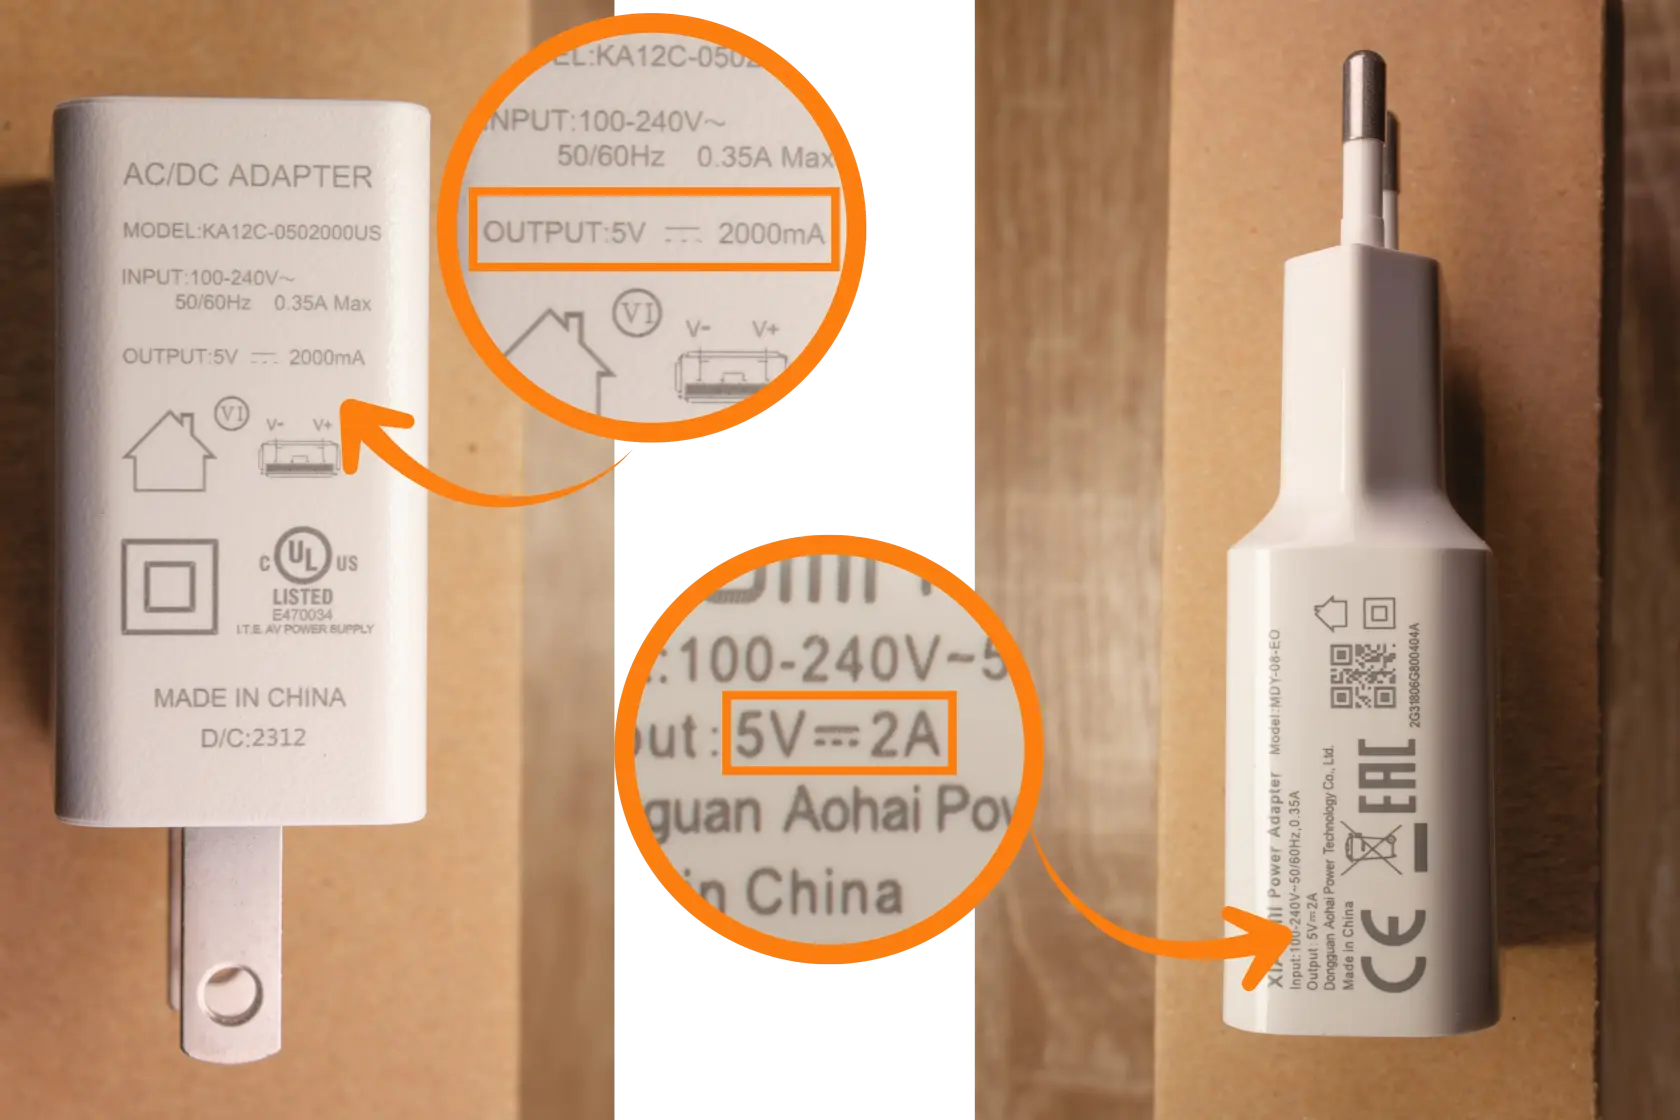
Use a standard 5V, 2A USB power supply (not included). Most phone chargers meet this requirement.
You will likely have one of these lying around your house from a smartphone or another device.
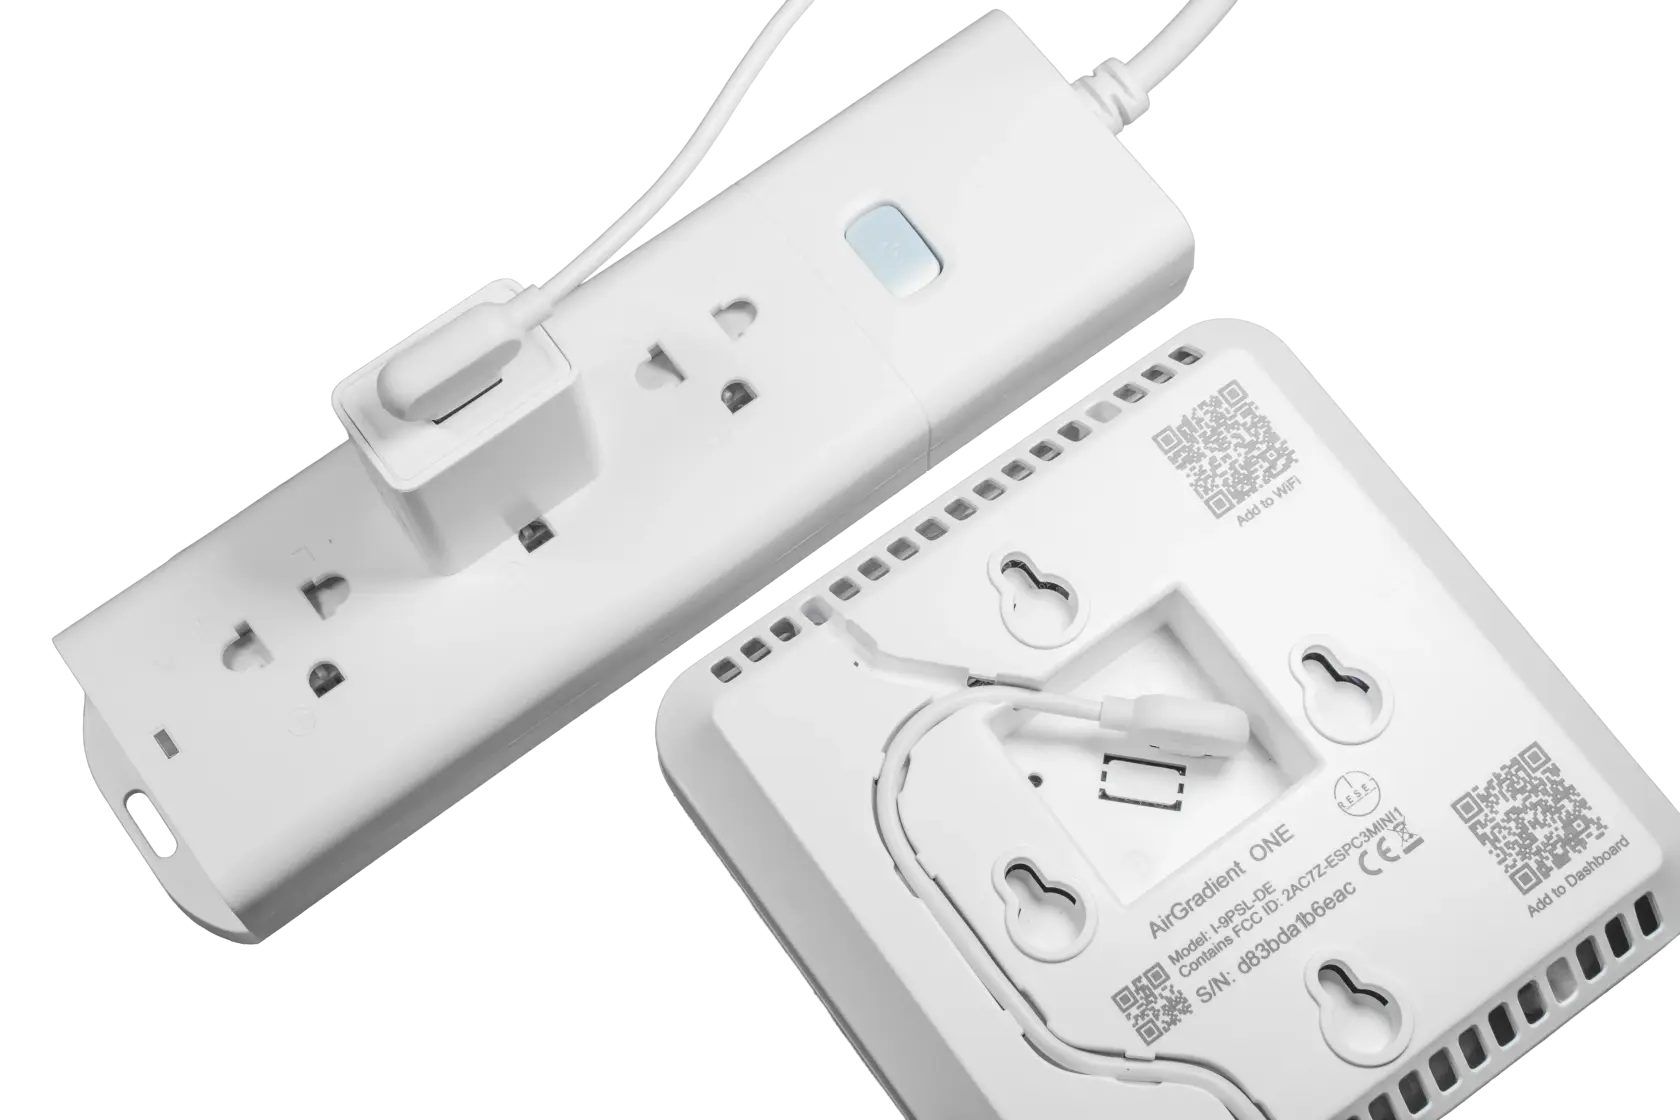
1. Connect the USB-C end of the included cable to the AirGradient ONE
2. Connect the USB-A end to the USB power supply
3. Plug the power supply into an AC outlet
#### Power-related issues
If the device does not turn on, restarts unexpectedly, or shows unstable behavior (such as sudden CO2 spikes or missing PM data), the power supply is the most likely cause.
What to do
- Try a different USB power adapter
- Avoid low-quality or low-current chargers
- Do not power the device from a computer USB port or underpowered hub
Stable power is critical for reliable operation.
# Connecting Your AirGradient ONE to WiFi
### Prerequisites
Before connecting your AirGradient ONE to WiFi, make sure you have:
#### A Compatible WiFi Network
Your WiFi network must meet the following requirements:
- 2.4GHz only (5GHz is not supported)
- Must have active internet
- No WPA Enterprise authentication
- No captive portals (hotel/guest login pages)
- No firewall blocking unknown devices (The monitor’s serial number = MAC address for whitelisting.)
#### A Smartphone, Tablet, or Laptop with WiFi
- You will use this device to connect to the monitor’s hotspot and complete WiFi configuration.
### Video Guides (Watch First if You Prefer Video Instructions)
If you’d rather follow video instructions instead of the written steps, use the one of the video guides below. These cover all onboarding methods: QR-code and manual WiFi selection.
**QR Code vs. Manual Wi-Fi Selection – What’s the Difference?**
All pre-assembled AirGradient ONE units include a printed QR code on the enclosure.
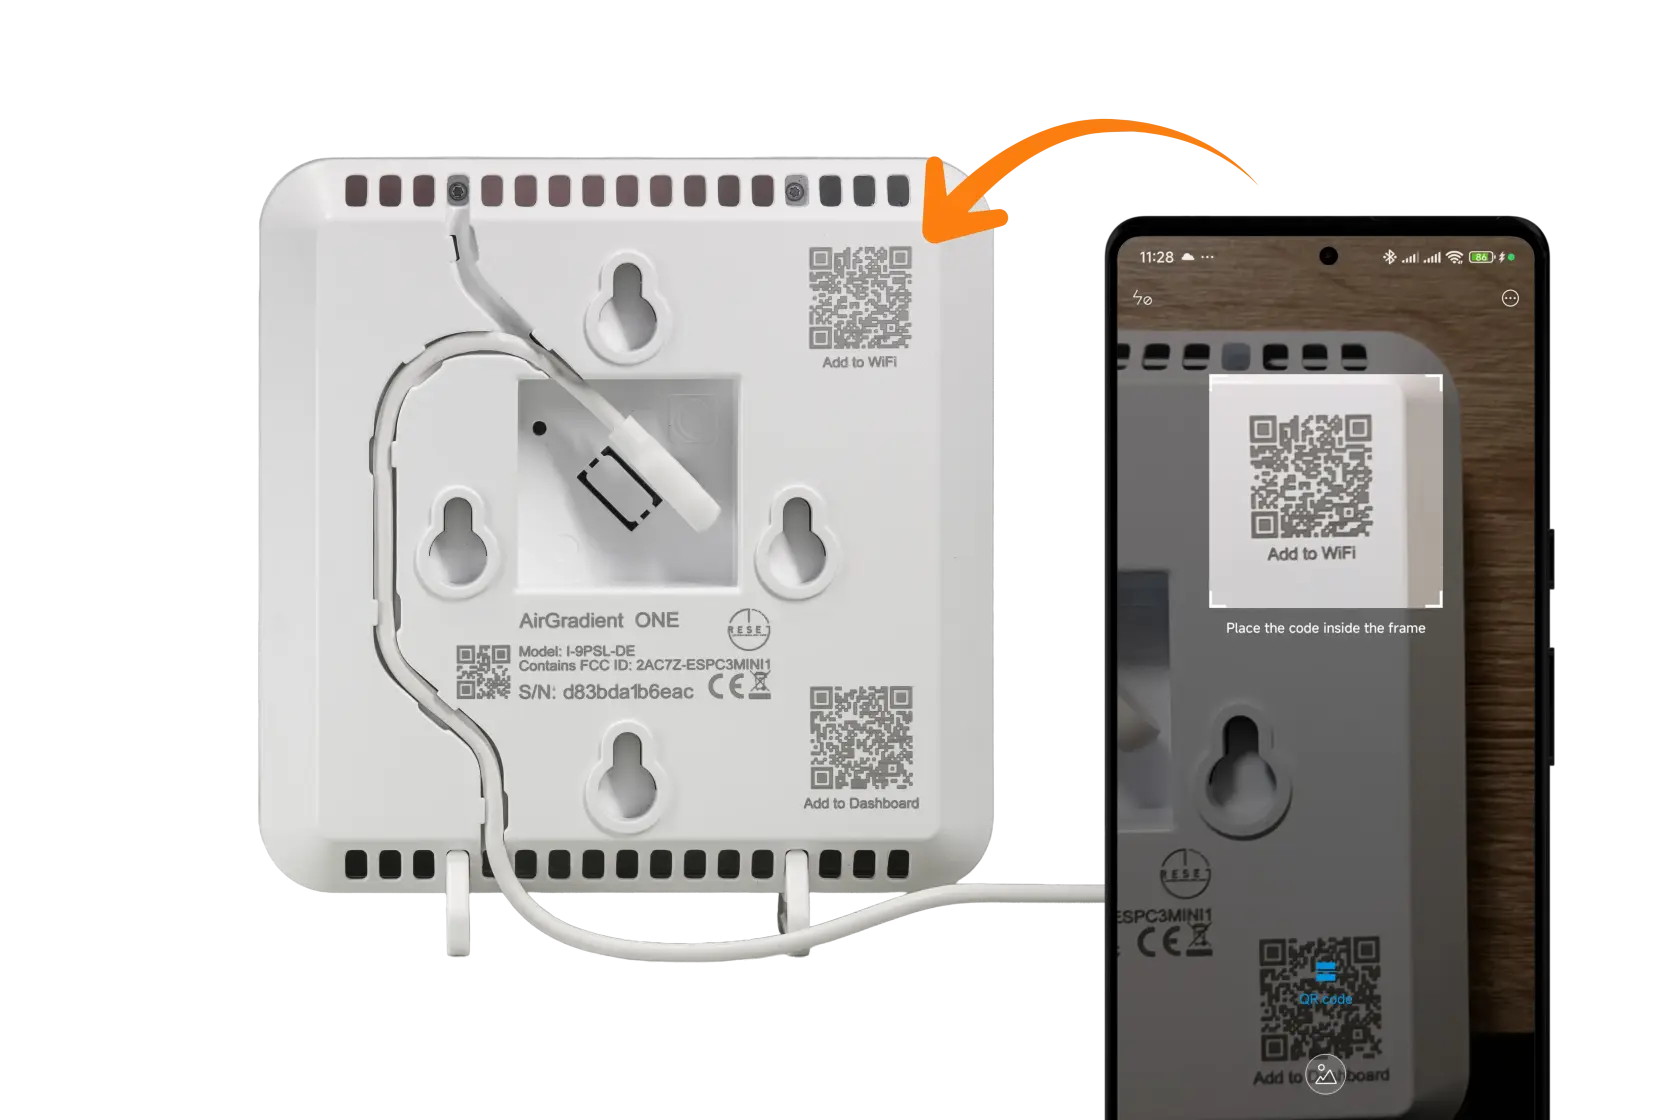
Scanning it simply skips the step of manually searching for the hotspot and connects you directly to the device’s WiFi network:
```bash
airgradient-xxxxxxxxxxxx
```
(Where xxxxxxxxxxxx is your device’s serial number. If you’re setting up a DIY kit, you may want to note down the Serial Number for dashboard onboarding later.)
DIY kit units do not have the QR code, but the setup process is identical – you just join the hotspot manually from your WiFi settings.
Regardless of which method you use, the actual WiFi configuration steps are the same, choose a video below based on your setup and preference:
Connect to WiFi – iOS
- [AirGradient ONE – Connect to Wi-Fi](https://www.youtube.com/watch?v=abNeM1dEnbY&list=PLFMNF-m4jXODNZgUNXDCt_JlV_rmeiRQi&index=2&pp=gAQBiAQB0gcJCRUKAYcqIYzv)
- [AirGradient ONE – Connect to Wi-Fi using QR Code
](https://www.youtube.com/watch?v=LGDr9dJ1VoY&list=PLFMNF-m4jXODNZgUNXDCt_JlV_rmeiRQi&index=3&pp=gAQBiAQB)
Connect to WiFi – Android
- [AirGradient ONE – Connect to Wi-Fi ](https://www.youtube.com/watch?v=Qr8J0TnBx5w&list=PLFMNF-m4jXODNZgUNXDCt_JlV_rmeiRQi&index=4&pp=gAQBiAQB)
- [AirGradient ONE – Connect to Wi-Fi using QR Code](https://www.youtube.com/watch?v=-DDeV9TZDIQ&list=PLFMNF-m4jXODNZgUNXDCt_JlV_rmeiRQi&index=5&pp=gAQBiAQB)
### 1. Connecting Your AirGradient ONE to WiFi
#### 1.1 Power On
1. Plug the ONE into a stable USB-C power source.

2. The device display will show initialization messages.
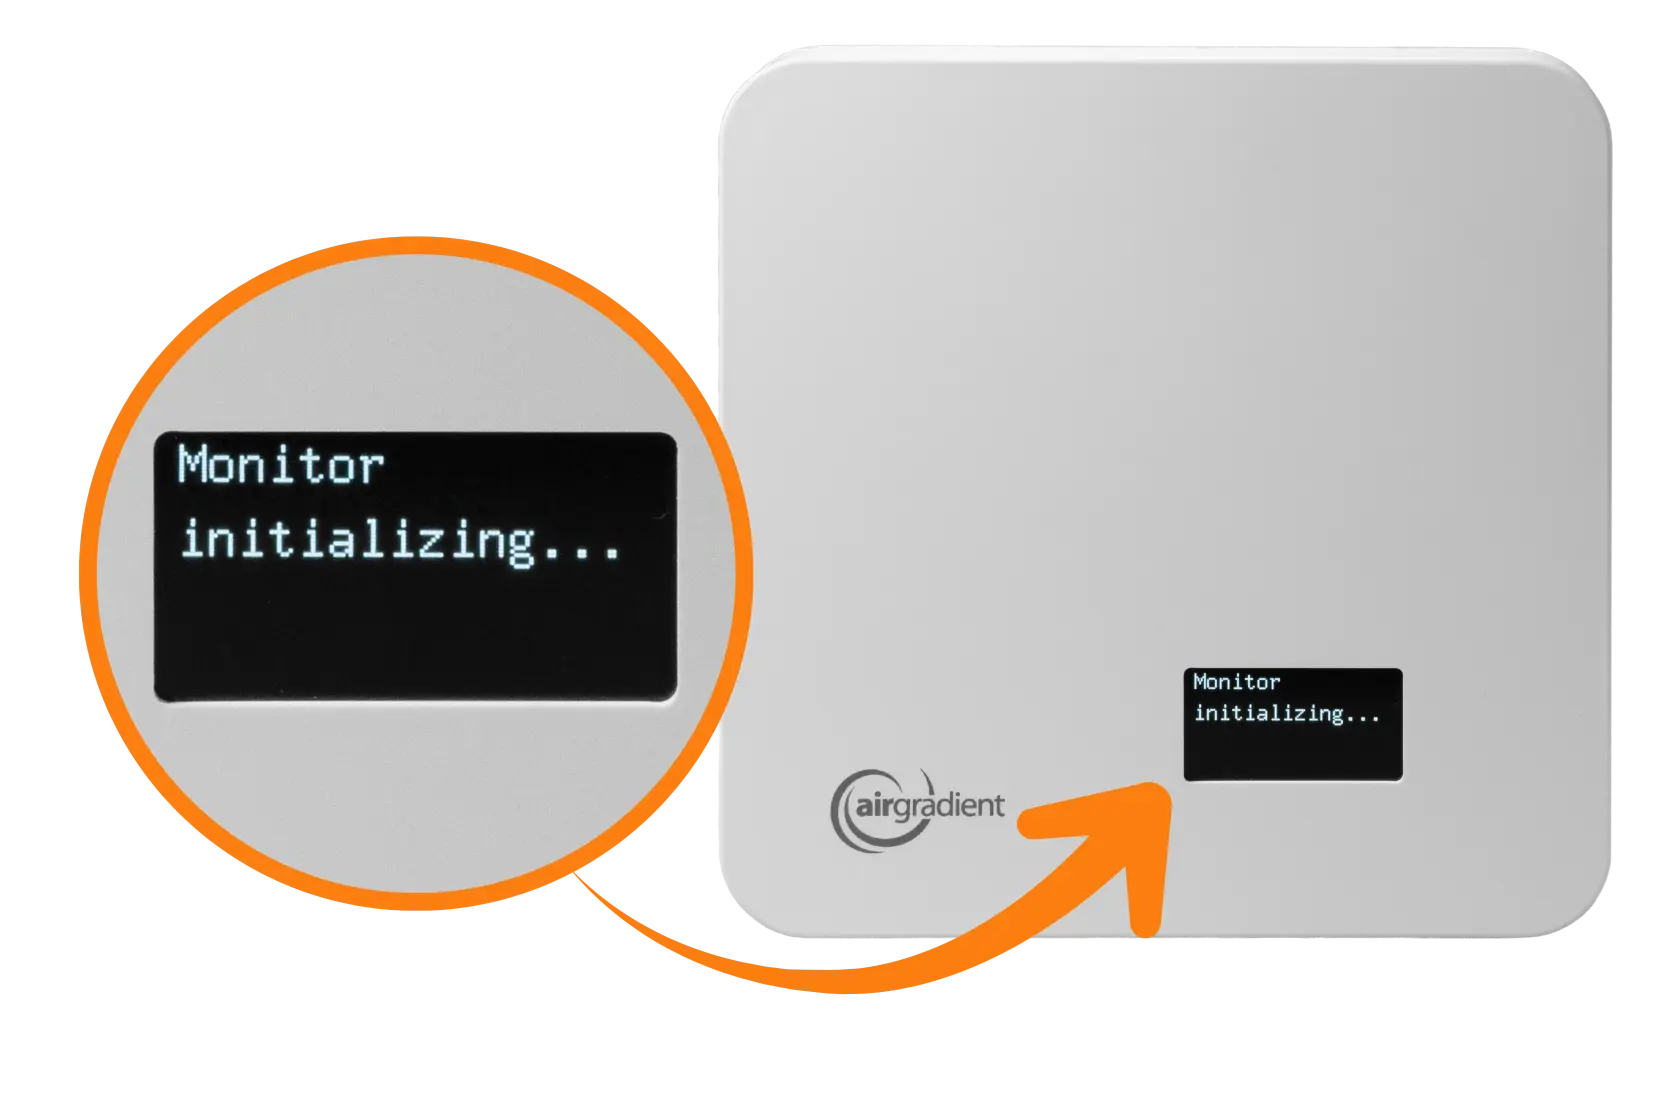
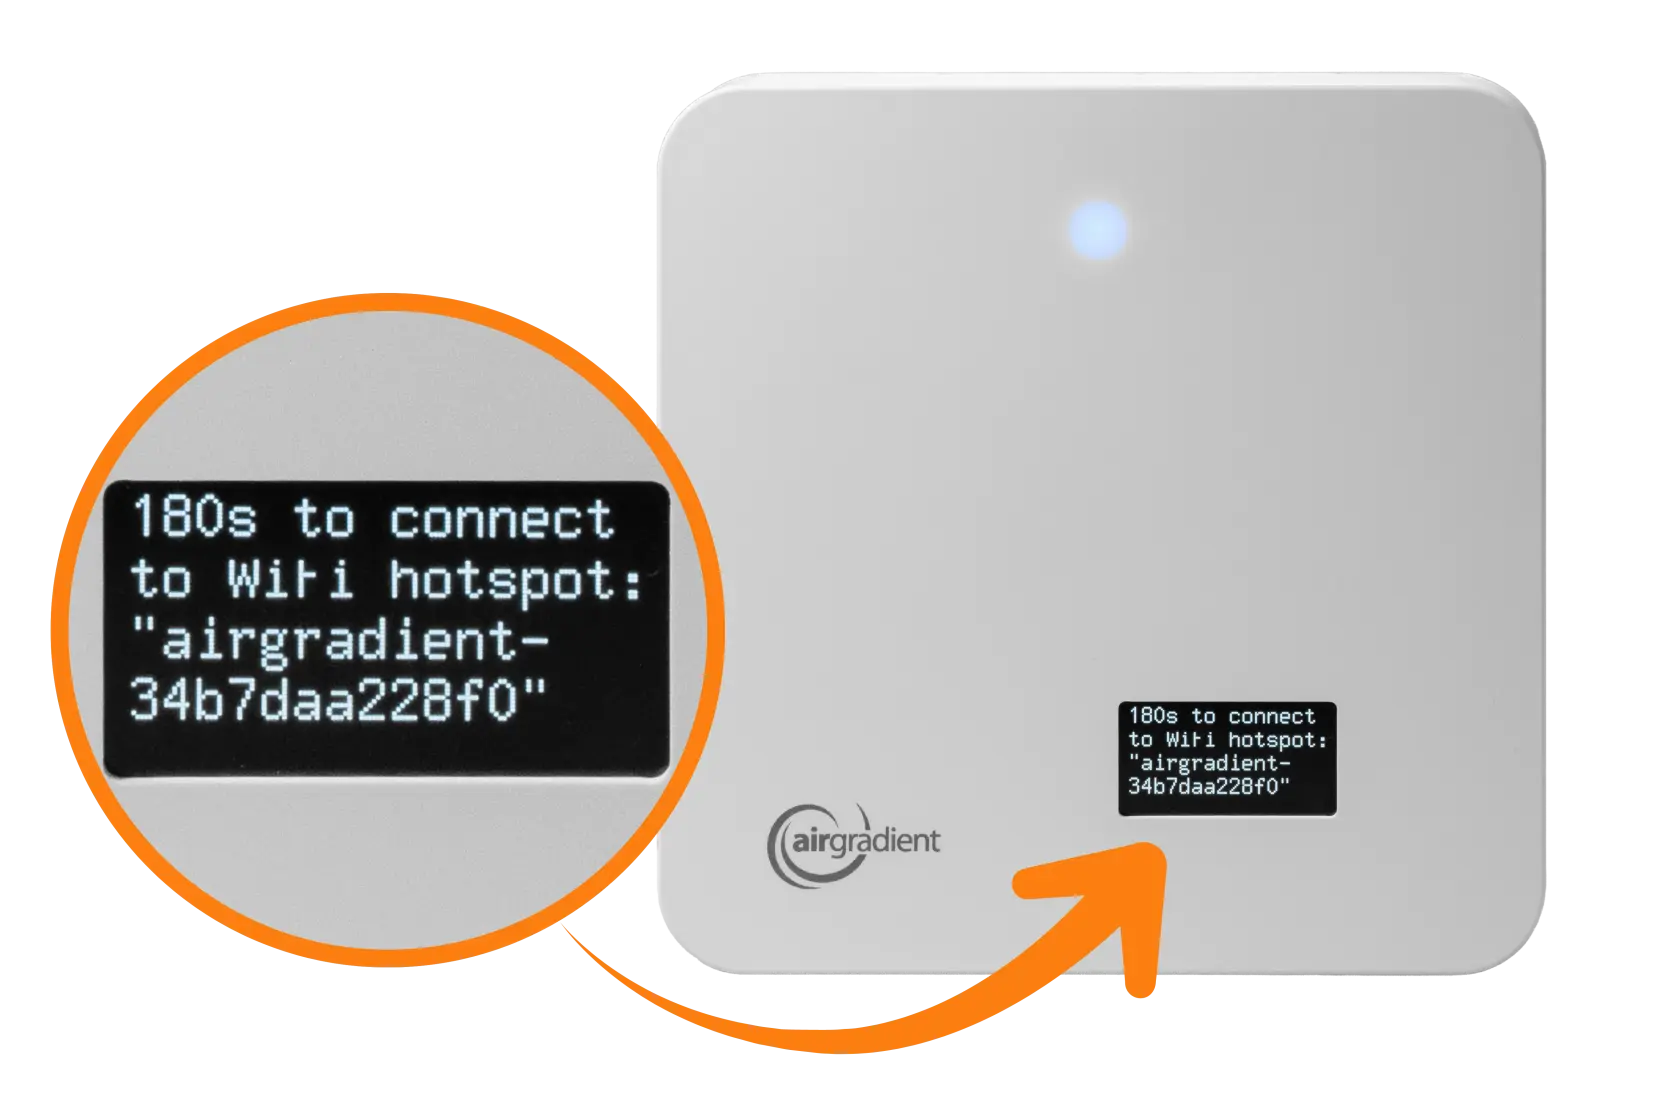
3. After booting, the screen will show the following message:
180s to connect to airgradient-xxxxxxxxxxxx
(Where xxxxxxxxxxxx is your device’s serial number. If you’re setting up a DIY kit, you may want to note down the Serial Number for dashboard onboarding later.)
This is the hotspot name.
#### 1.2 Connect to the Device Hotspot
As mentioned in the Video Guides section above: All pre-assembled AirGradient ONE units include a QR code printed on the back of the enclosure. Scanning it connects you directly to the device’s WiFi hotspot. You can still join the hotspot manually if you prefer - the setup process is otherwise identical.
#### Option A: Scan the QR Code (pre-assembled units)
1. Scan the QR code on the back of the enclosure.

2. Your phone will prompt you to join the WiFi network:
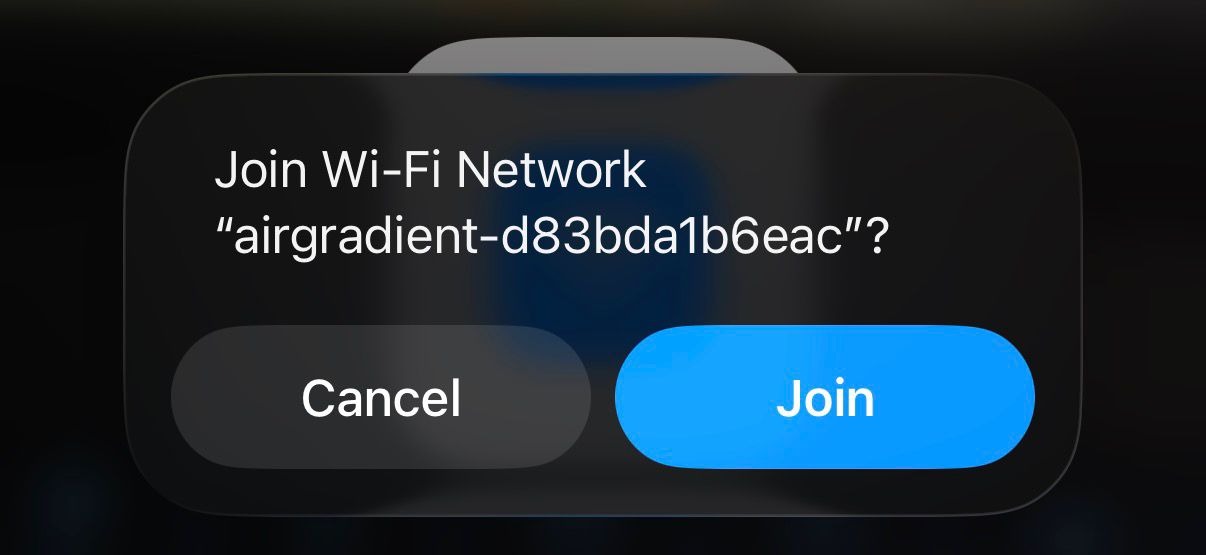
3. Tap Join. (this skips the step of manually locating the hotspot)
#### Option B: Join the Hotspot Manually (all units, including DIY kits)
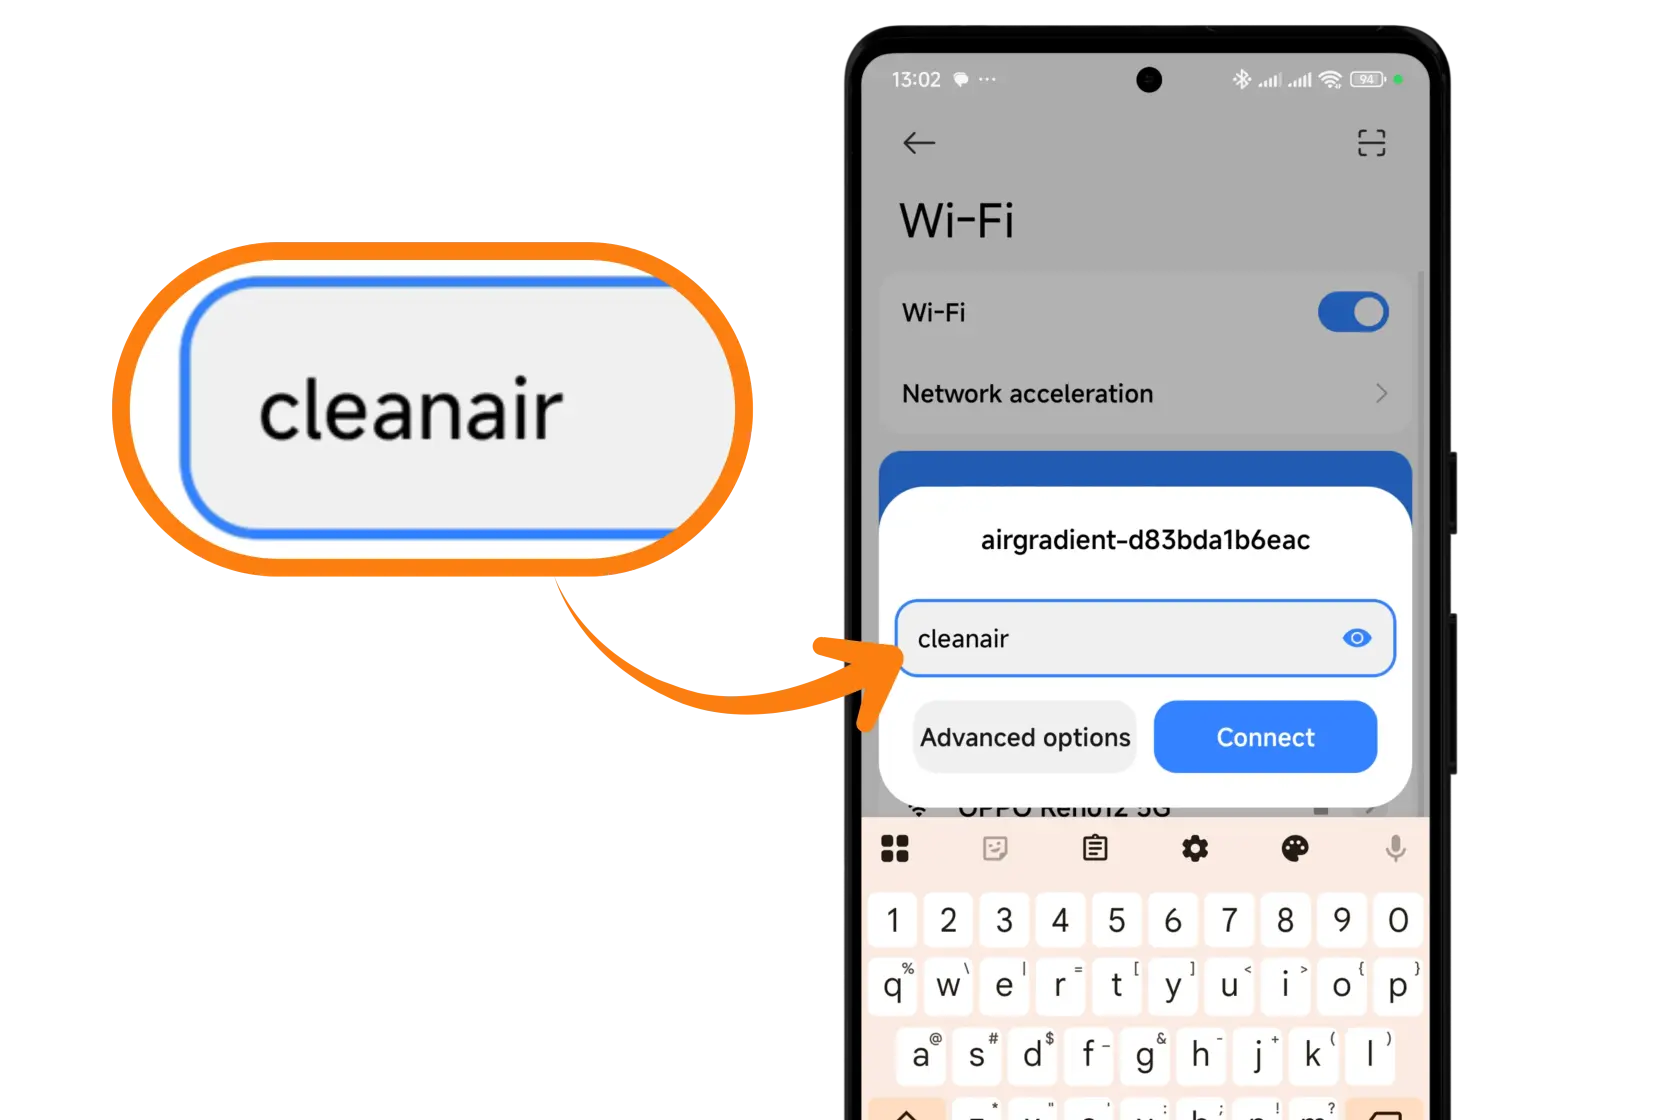
1. Open your phone, tablet, or laptop WiFi settings.
2. Look for and select the network:
```
airgradient-xxxxxxxxxxxx
```
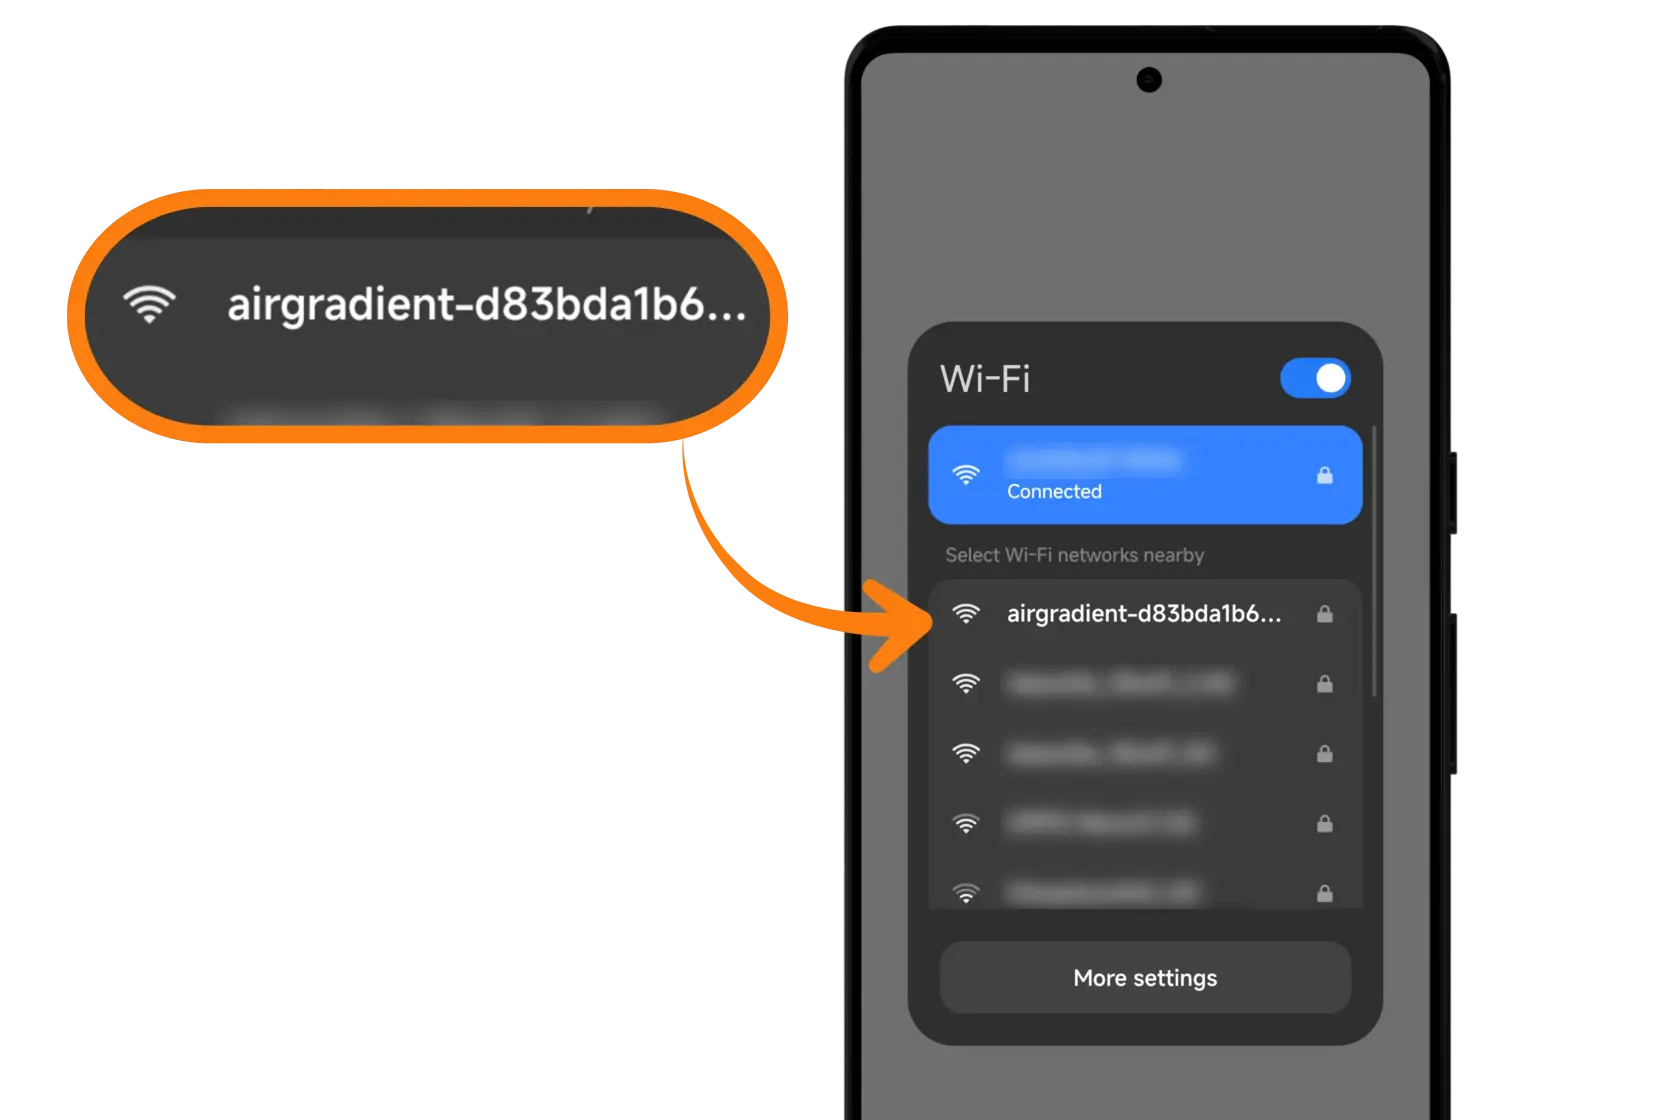
3. Enter the password:
```
cleanair
```
#### Android notes
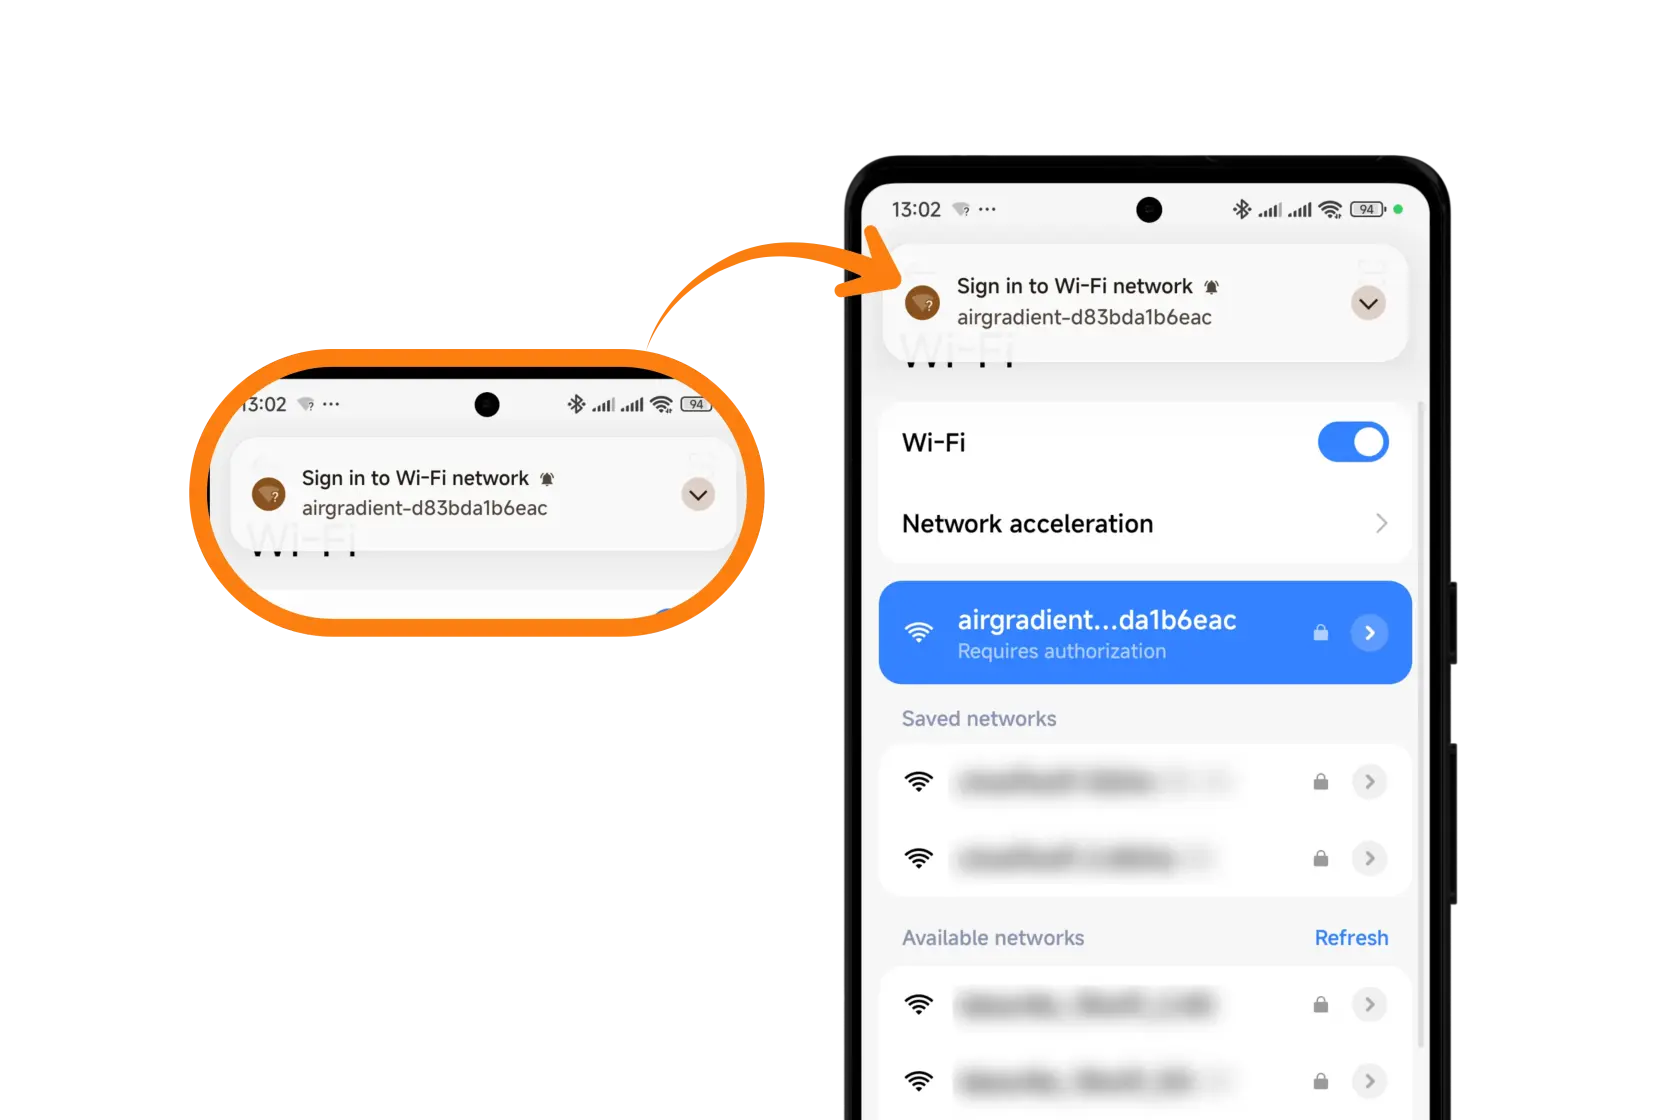
- Android 11/12 may show Manage router → tap it.
- Some versions require tapping “Tap here to sign in to network” to open the WiFi Manager.
#### 1.3 Open the WiFi Manager
Once connected to the hotspot, the WiFi Manager should open automatically within ~10 seconds.
If it doesn’t:
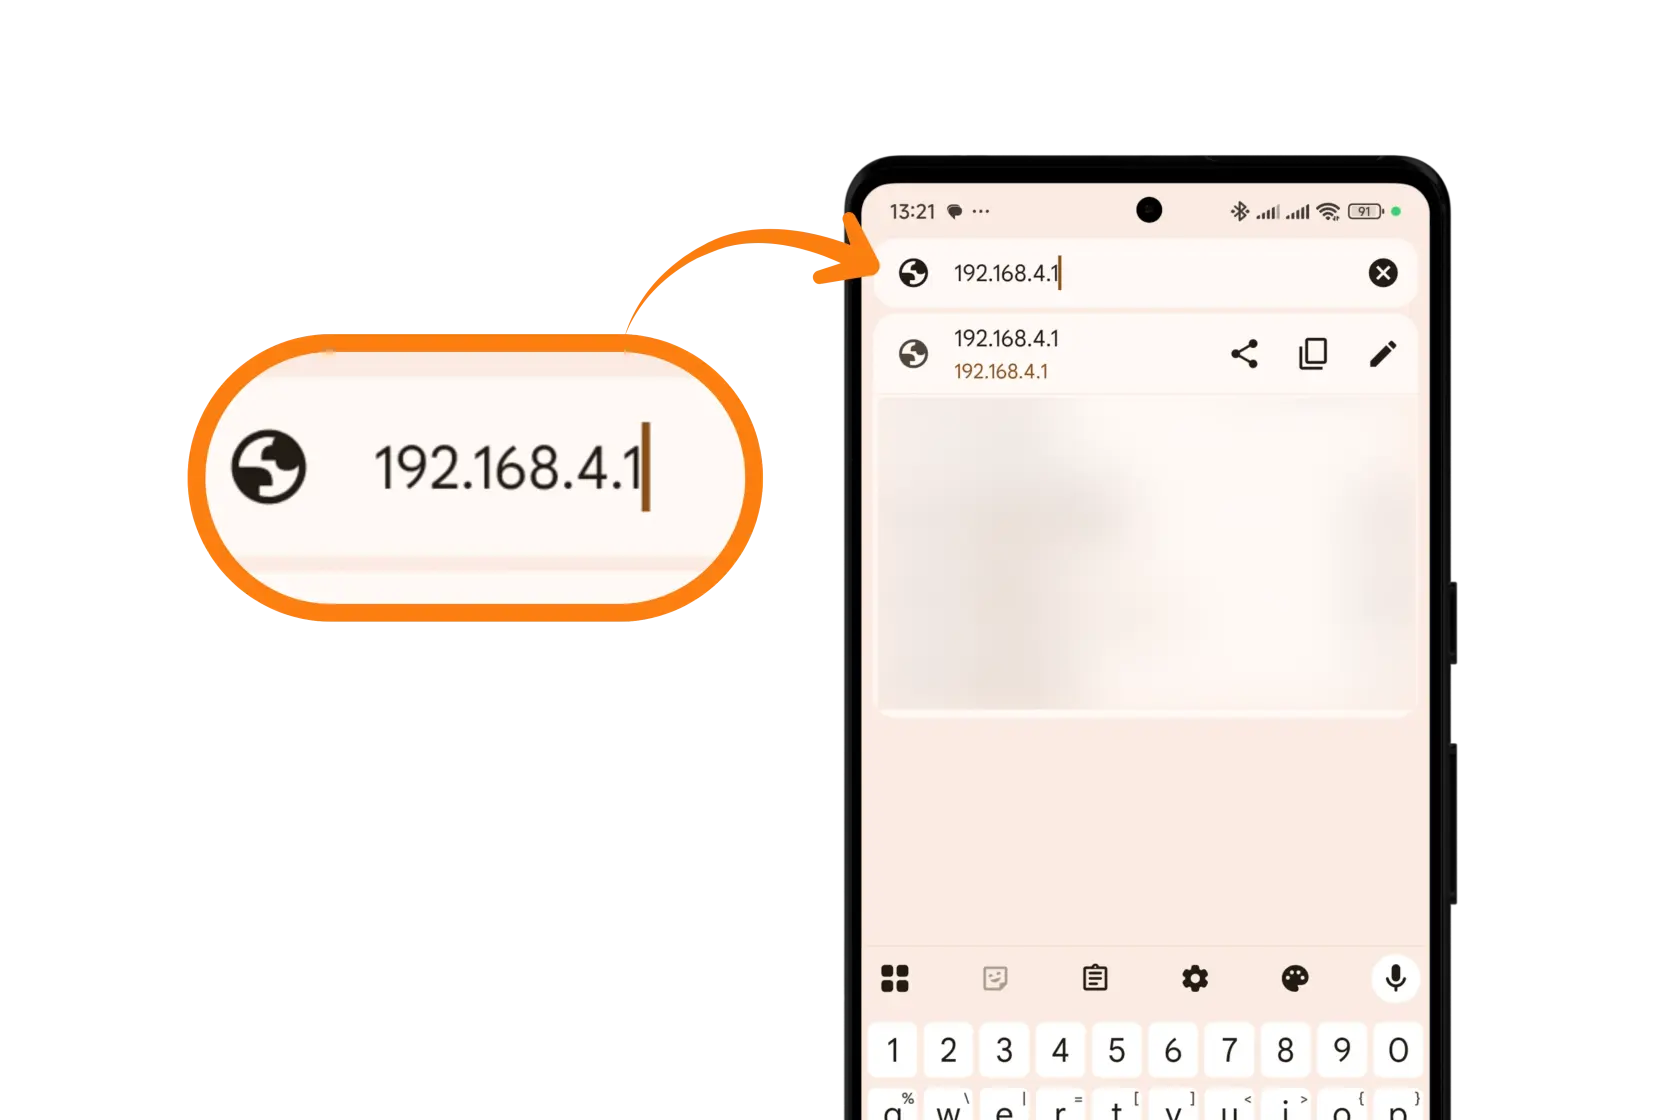
- Open a browser.
- Go to: 192.168.4.1
(Enter it in the address bar, not a search engine.)
- Make sure you are still connected to the device hotspot. Turn off mobile data while you’re connected to the device hotspot as it may cause the smartphone to temporarily switch to mobile data instead of maintaining the device hotspot connection.
#### 1.4 Configure Your WiFi Network
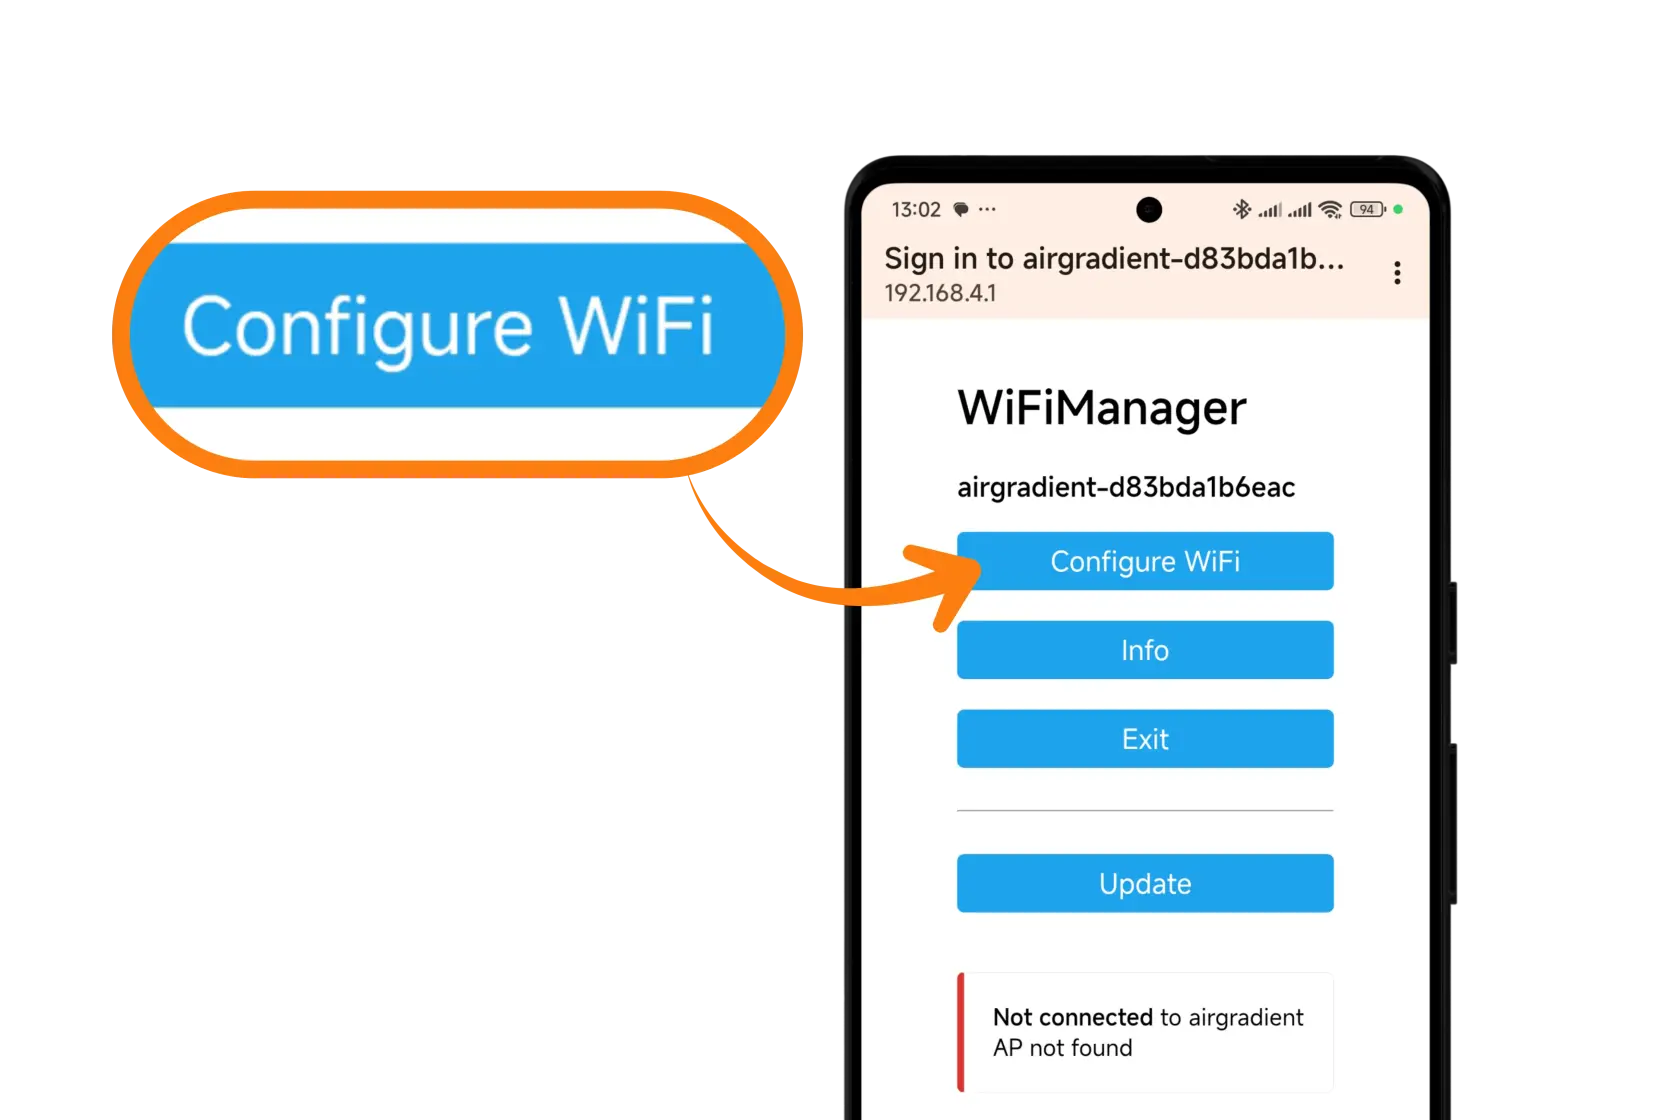
On the WiFi Manager page:
1. Tap Configure WiFi
2. Select your WiFi network
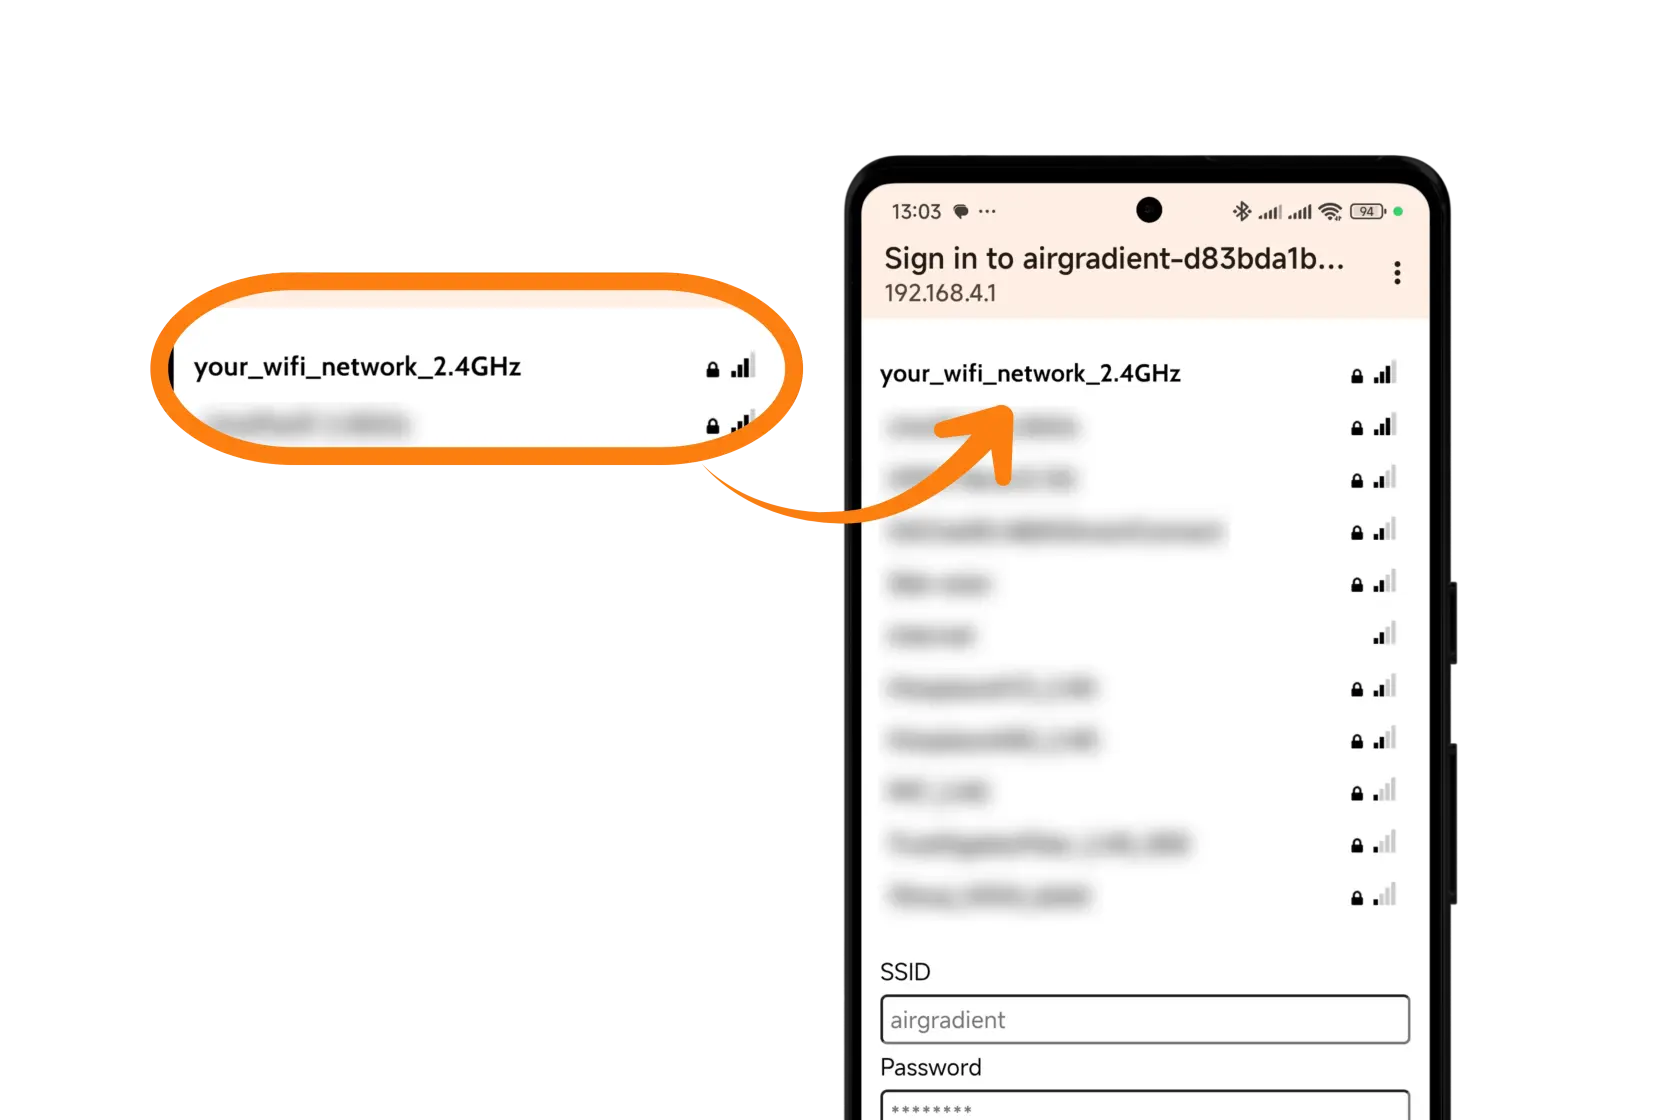
- For hidden networks, enter the SSID manually.
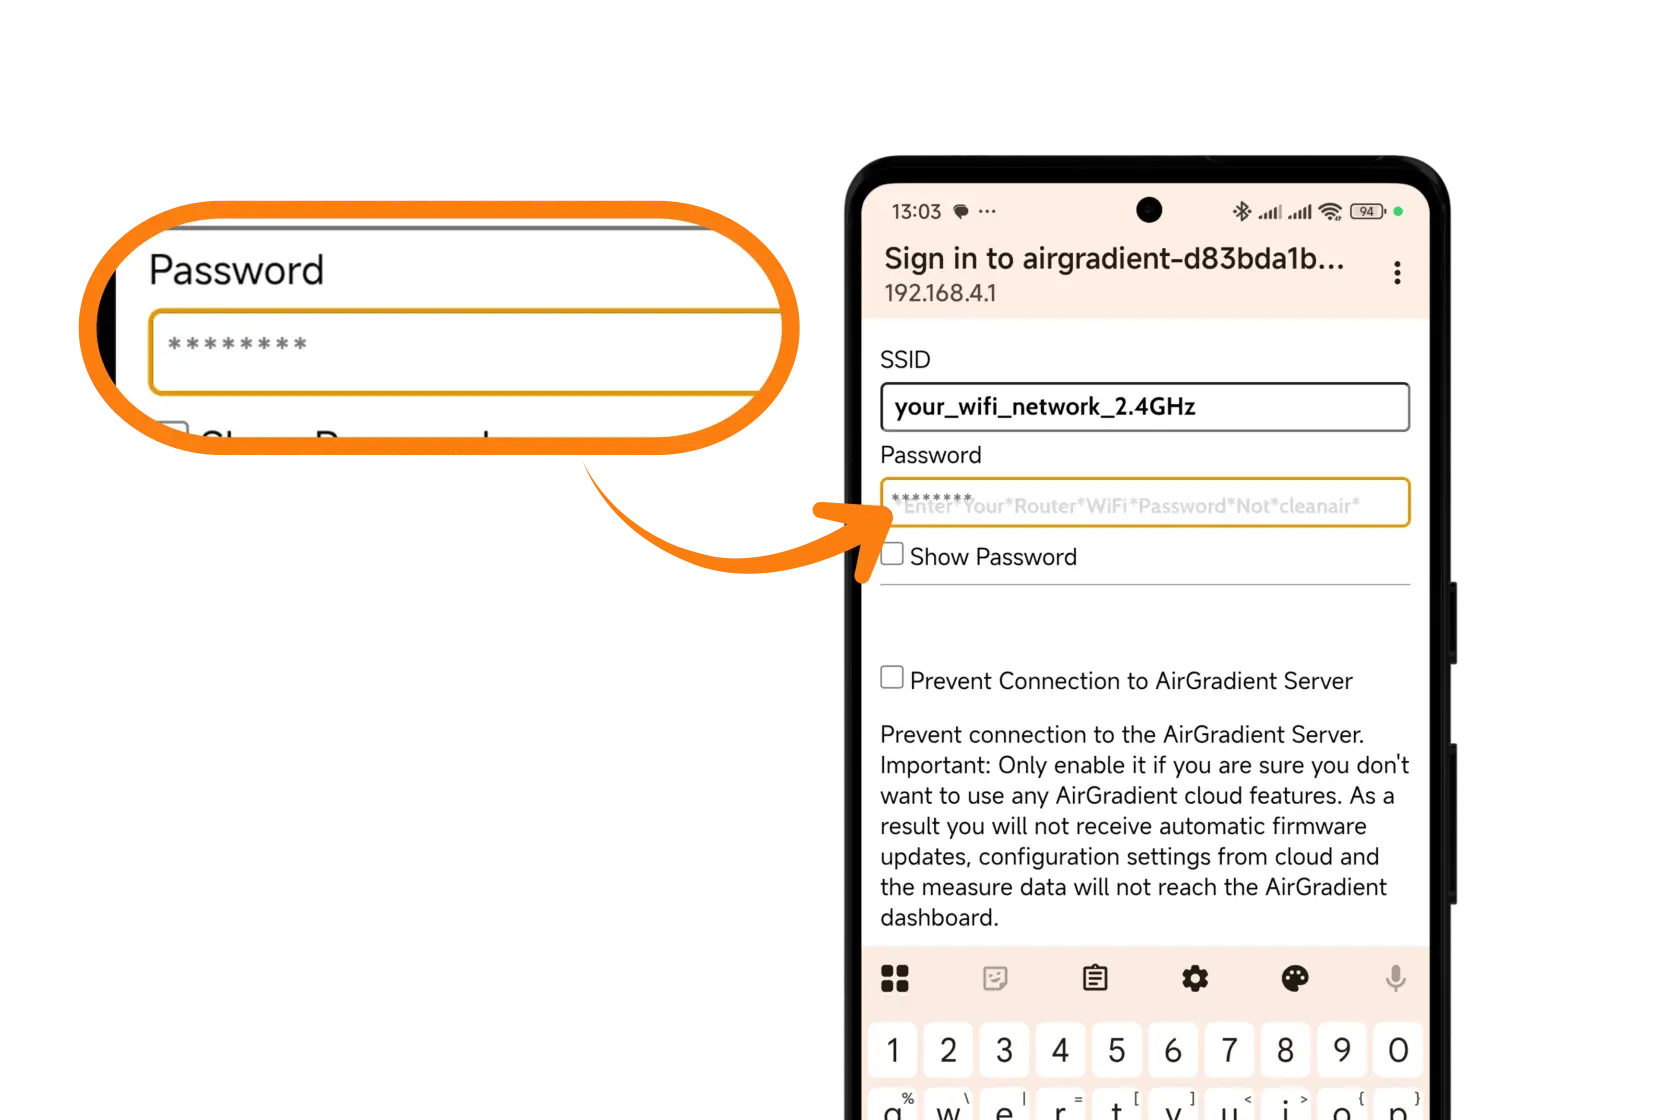
3. Enter your WiFi password
(This should be your router password, not “cleanair”.)
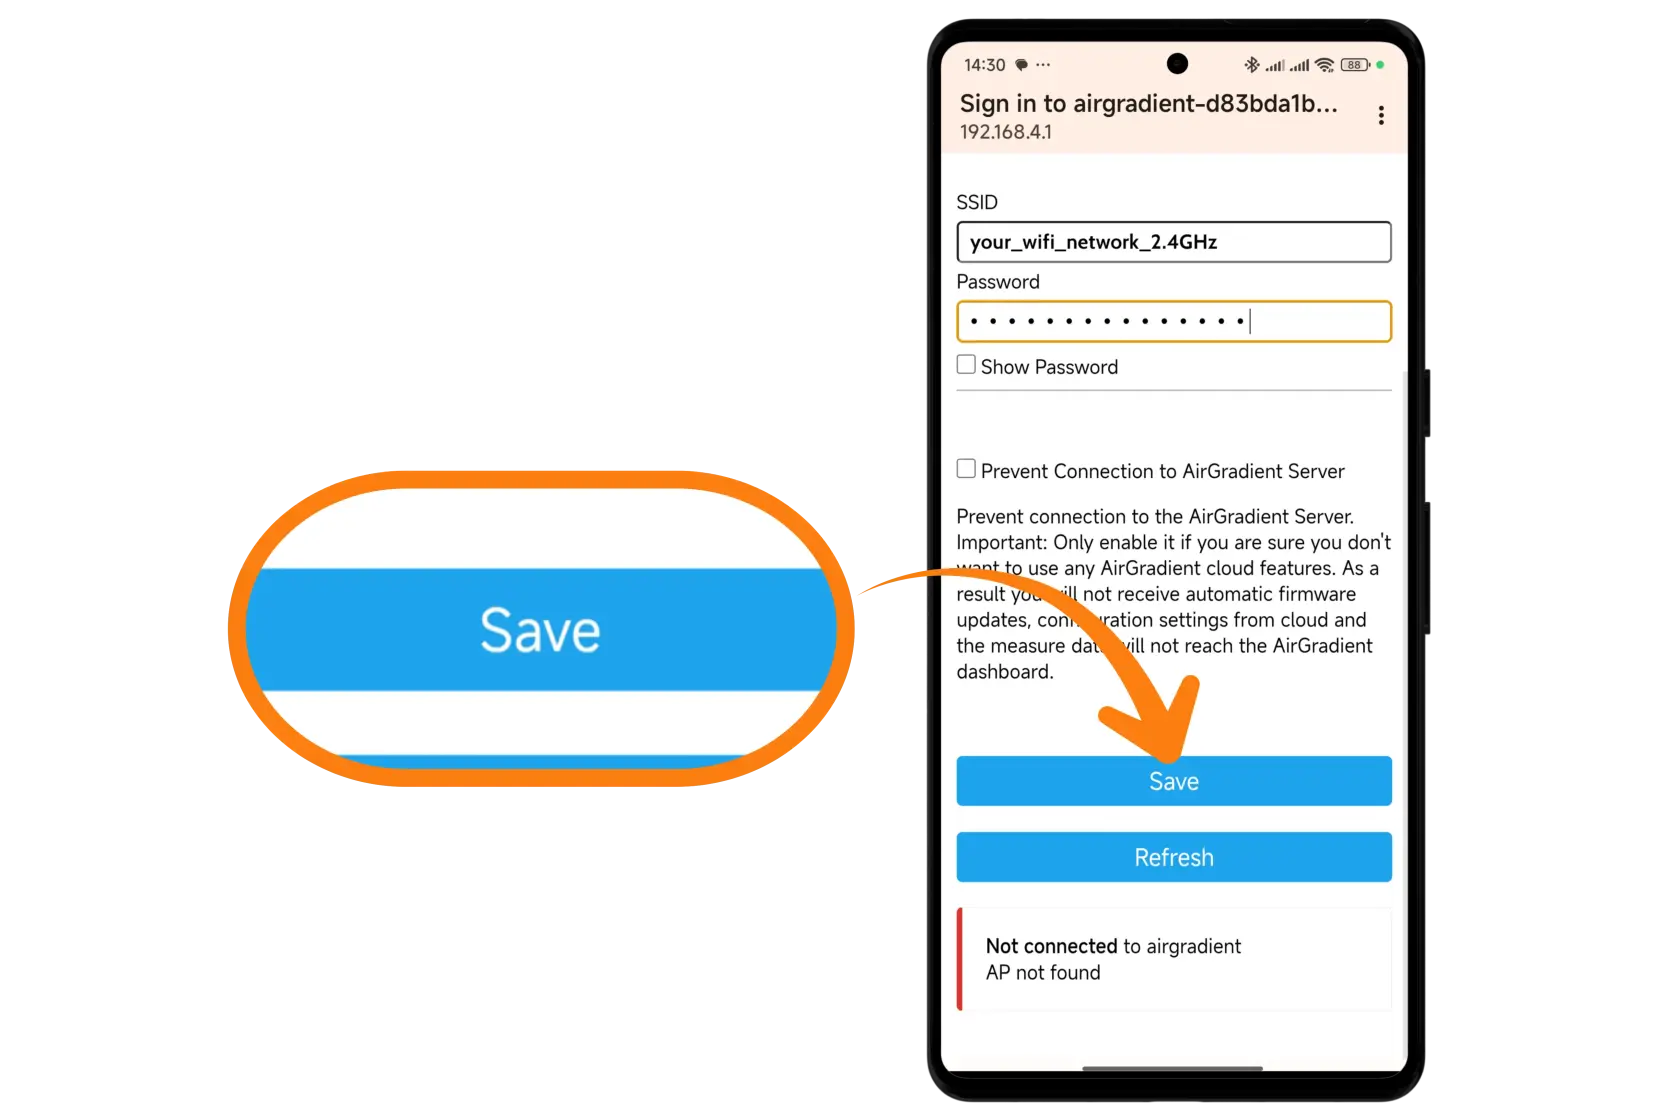
4. Ensure “Prevent connection to AirGradient servers” is unchecked, if you want the devices to connect to the AirGradient dashboard and receive automatic firmware updates.
5. Tap Save
#### 1.5 Credential Saving & Expected Behavior
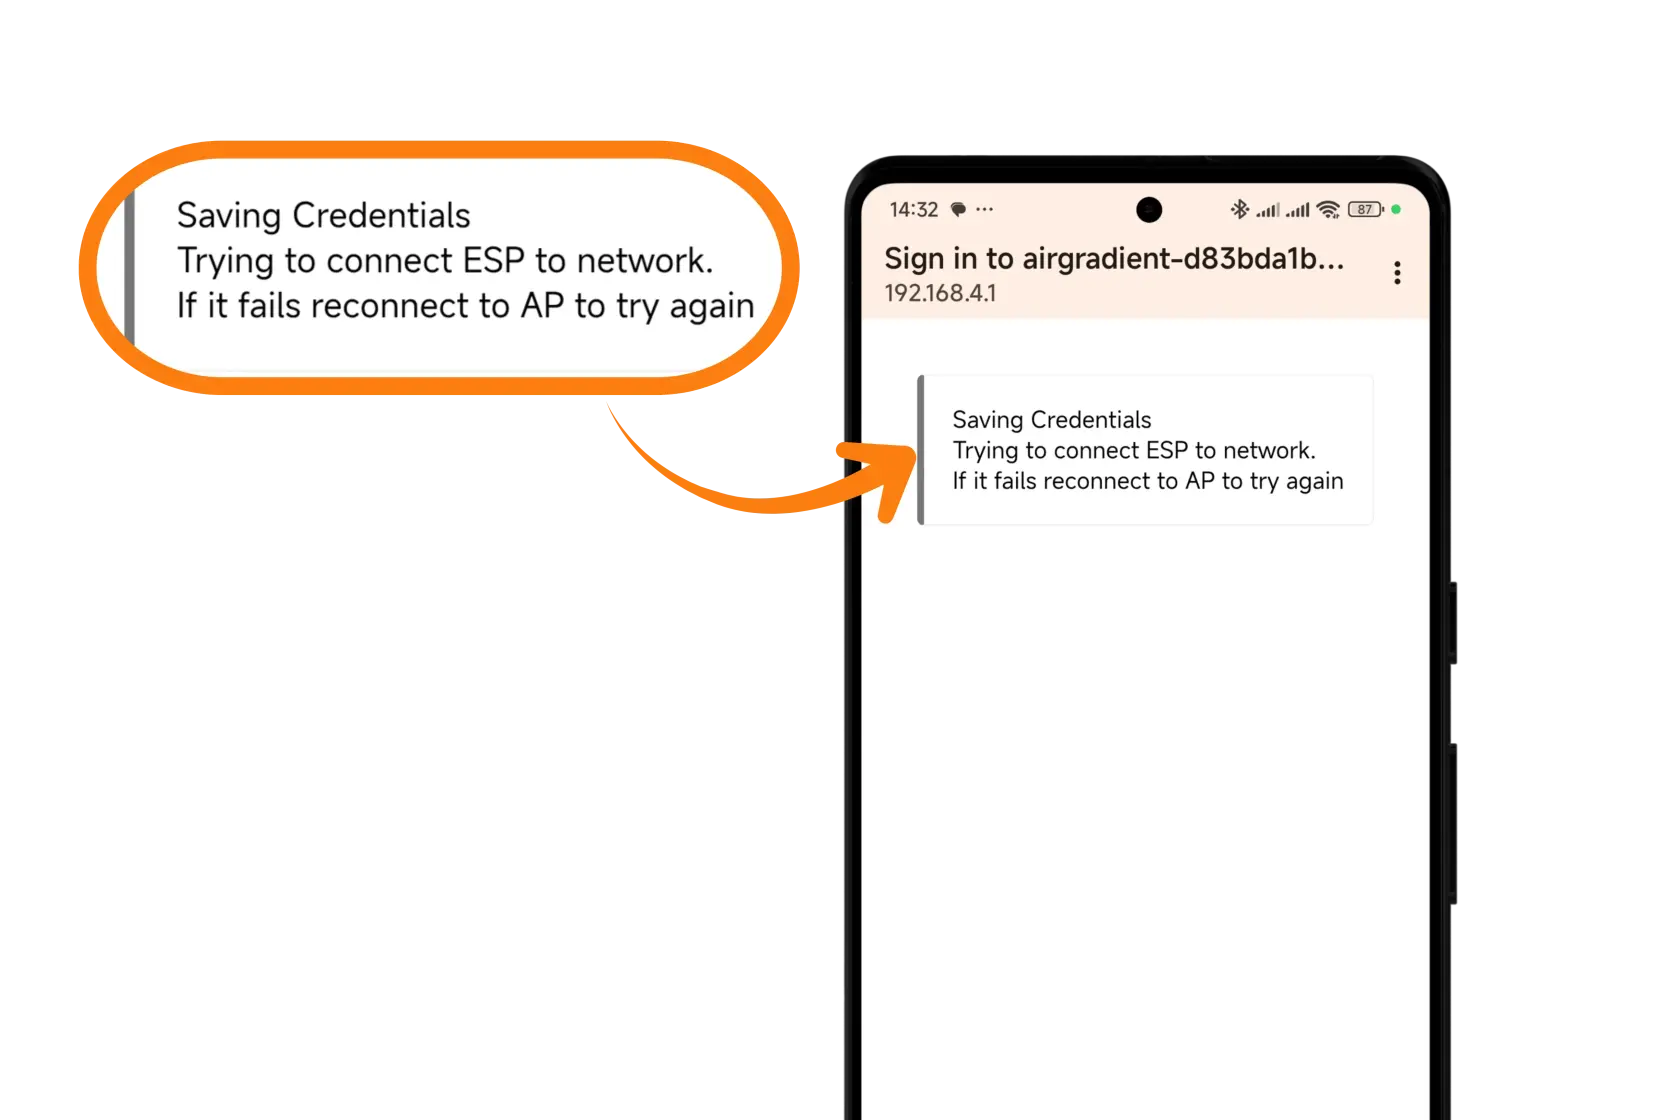
You’ll see:
“saving credentials…”
Stay on this page. Do not disconnect.
- If the password is correct → the window closes automatically.
- If incorrect → you are returned to the network list.
- If the captive portal times out → the device reboots.
Reconnect to the hotspot and start again.
- If the window closes without showing “saving credentials…” → it still means success.
“No Internet Connection” warnings: Totally normal. Stay connected to the hotspot until the process completes.
### Next Steps After Connecting
Your AirGradient ONE will now connect to WiFi and start transmitting data.
To link it to your dashboard: [How do I connect my AirGradient ONE to the AirGradient Dashboard?](https://docs.airgradient.net/books/airgradient-one/page/how-do-i-connect-my-airgradient-one-to-the-airgradient-dashboard)
### Frequently Asked Questions
#### Can the AirGradient ONE use 5GHz WiFi?
No. The ONE only supports 2.4GHz.
#### The hotspot doesn’t appear. What now?
Reset the device and try again. Ensure you are close to the monitor.
#### Which network types are not supported?
- WPA Enterprise
- Captive portals
#### What is the device hotspot password?
```
cleanair
```
#### The WiFi Manager screen didn’t appear.
Go to 192.168.4.1 in your browser (while connected to the hotspot). Turn off mobile data while you’re connected to the device hotspot as it may cause the smartphone to temporarily switch to mobile data instead of maintaining the device hotspot connection.
#### My phone says “no internet connection” when connected to the hotspot.
Ignore it. This is expected and does not affect setup.
#### The monitor won’t connect to WiFi.
Check:
- Correct WiFi password
- Network is 2.4GHz
- No firewall blocking devices
Then retry the setup.
#### The captive portal timed out.
The monitor restarts automatically. Reconnect and repeat the process.
# How do I connect my AirGradient ONE to the AirGradient Dashboard?
There are two ways to add your AirGradient ONE to the dashboard.
You can:
- [connect the monitor to Wi-Fi first ](https://docs.airgradient.net/books/airgradient-one/page/connecting-your-airgradient-one-to-wifi) or
- Follow this guide and add the monitor to the dashboard first.
The order does not matter. However, the device will not send any data to the dashboard until both steps have been completed.
### Add to dashboard using the QR code (pre-assembled units)
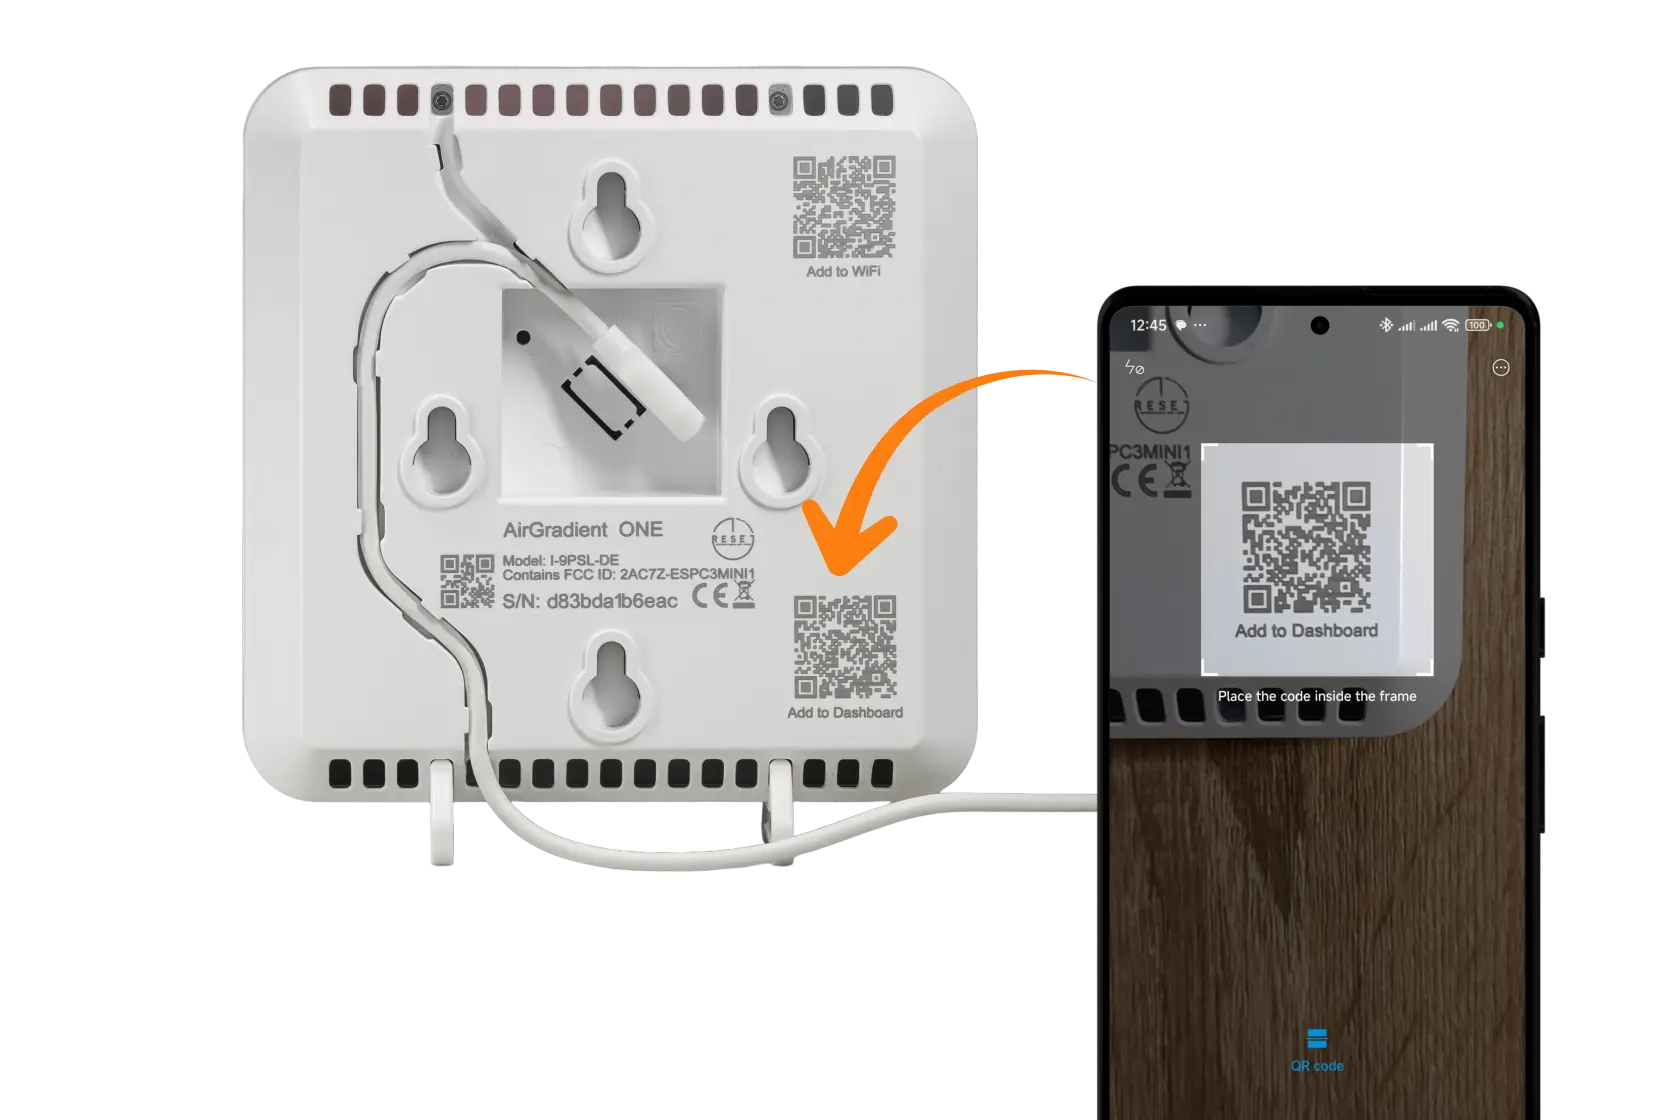
If you have a pre-assembled AirGradient ONE, you can add it using the “Add to Dashboard” QR code printed on the back of the device.
1. Scan the Add to Dashboard QR code
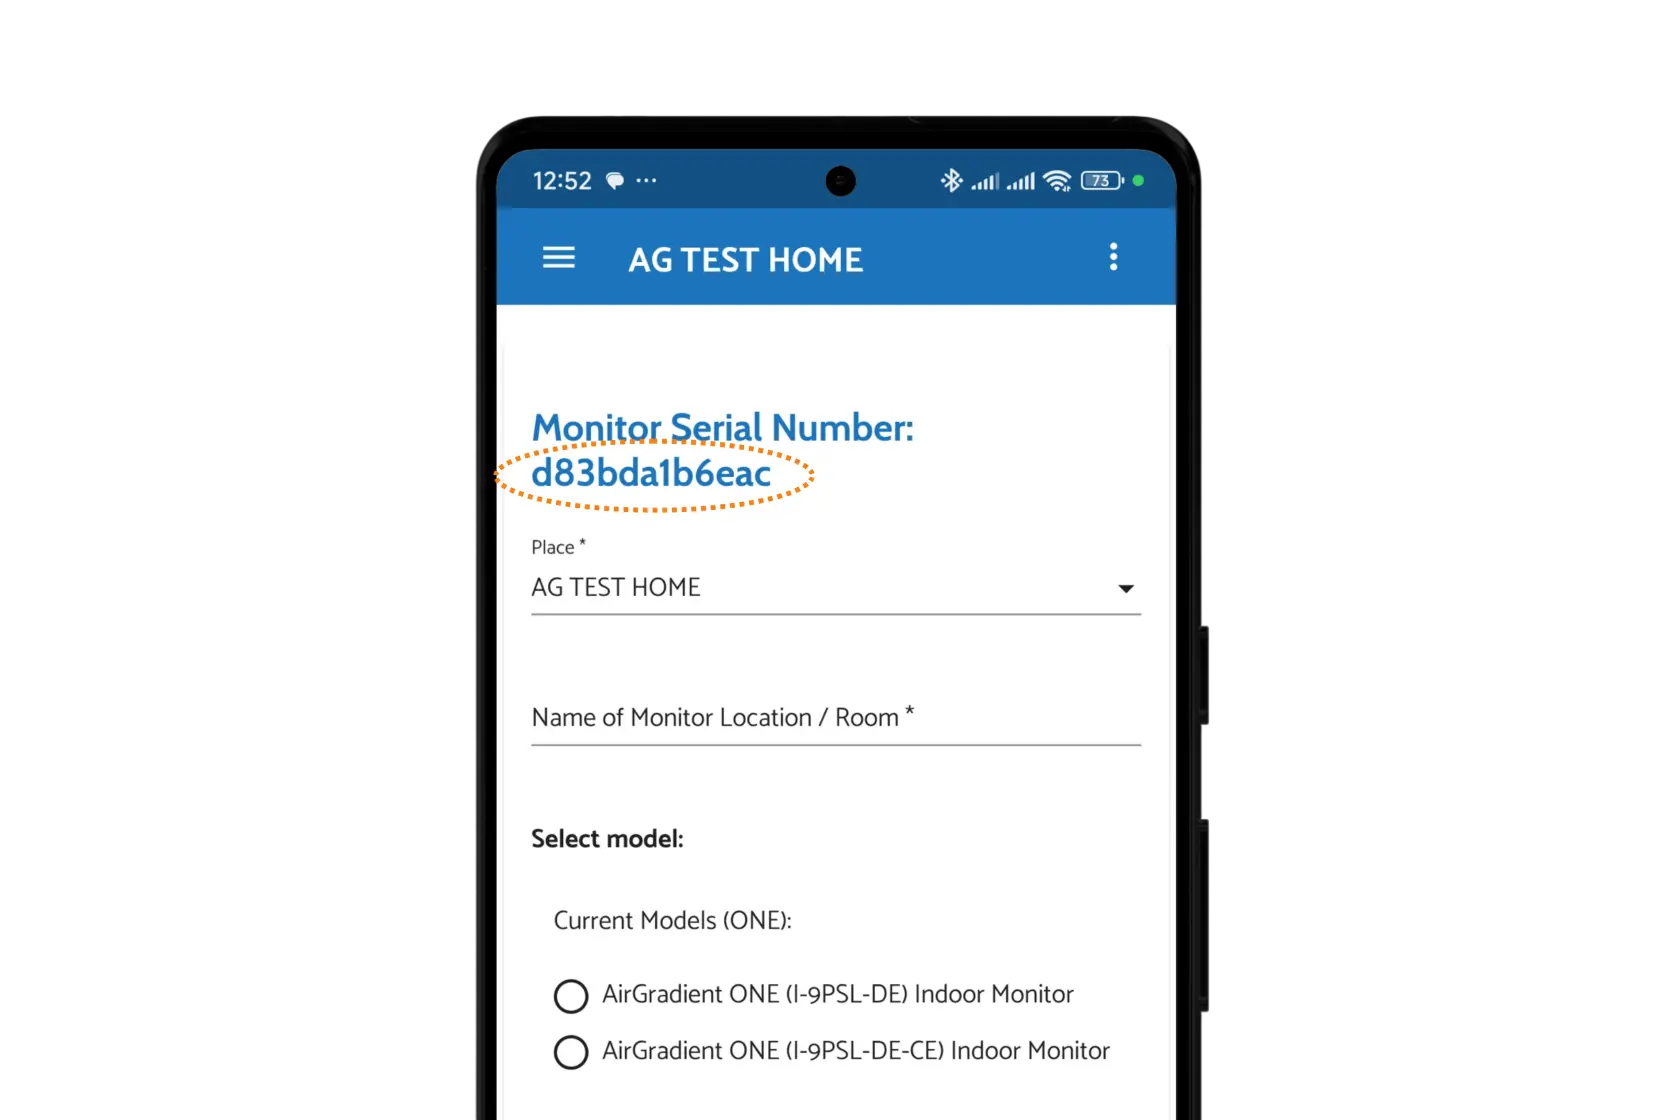
2. You will be taken to the AirGradient Dashboard: [https://app.airgradient.com/](https://app.airgradient.com/)
- Log in, or create an account if you don’t already have one
- The monitor’s serial number will be pre-filled
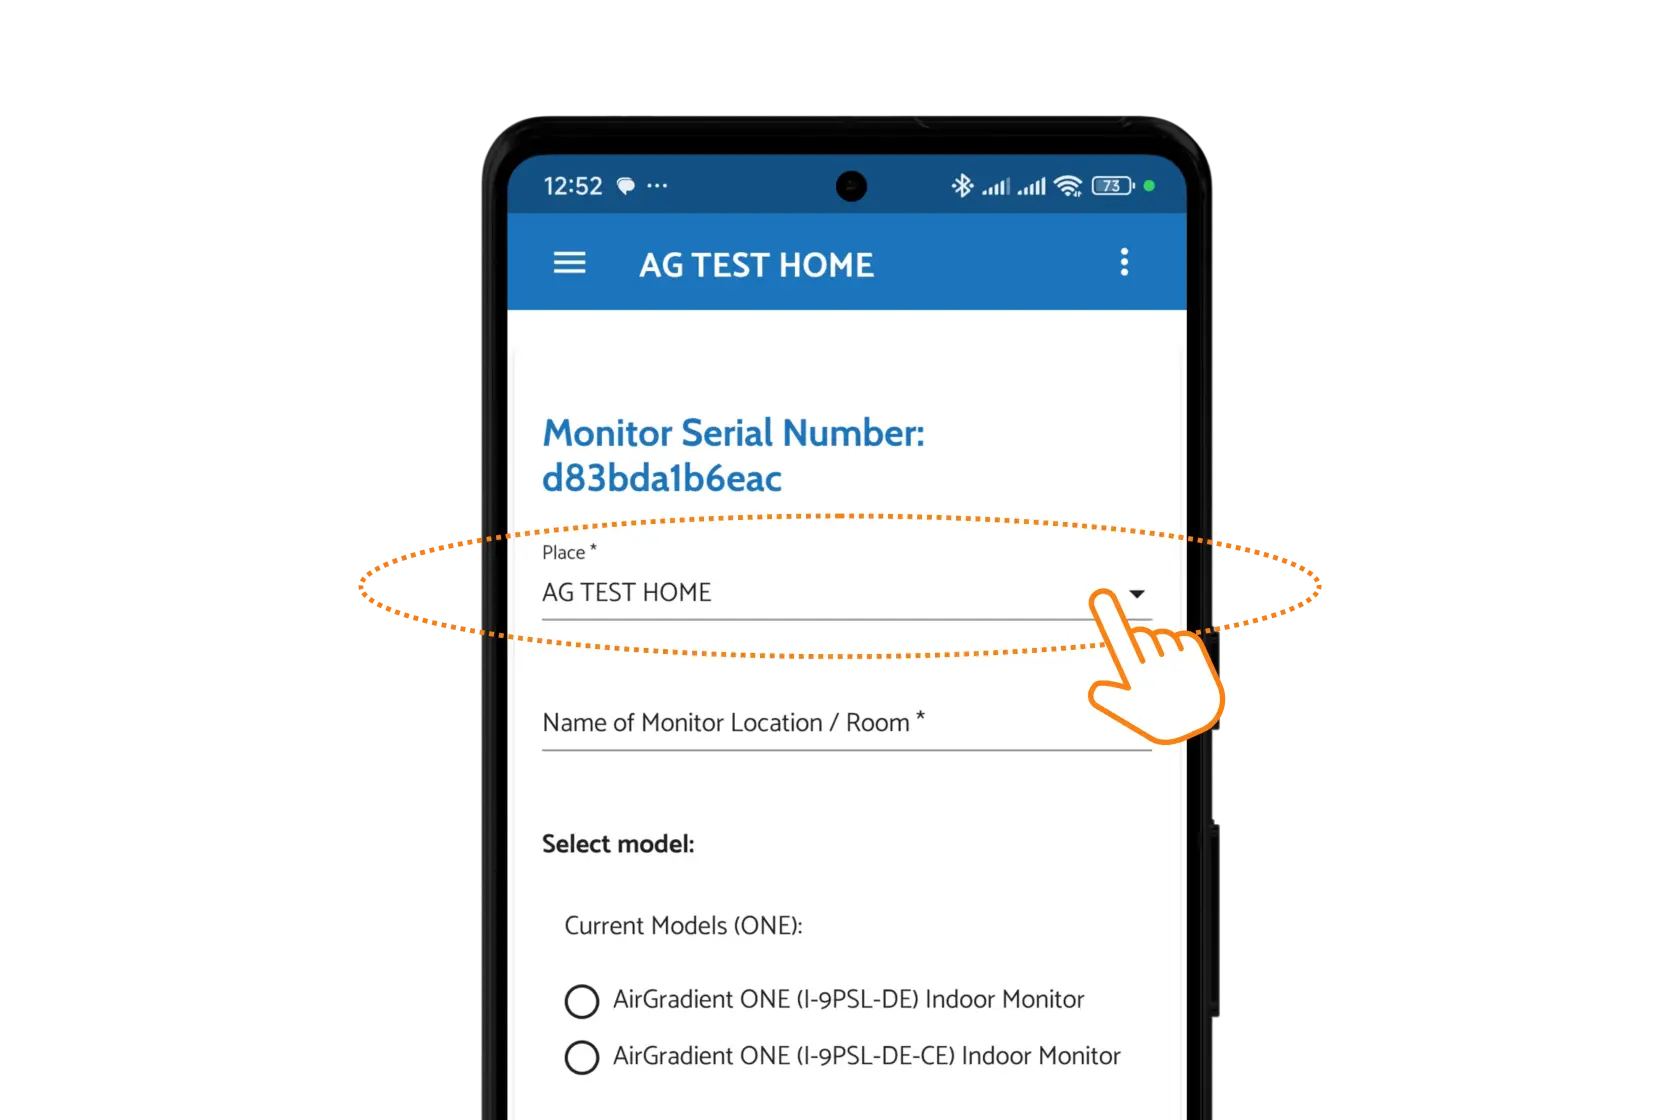
3. Pick which dashboard (Place) you want to associate the monitor with (if you have multiple) or create a new Place (Link to article on difference between Place and Location?)
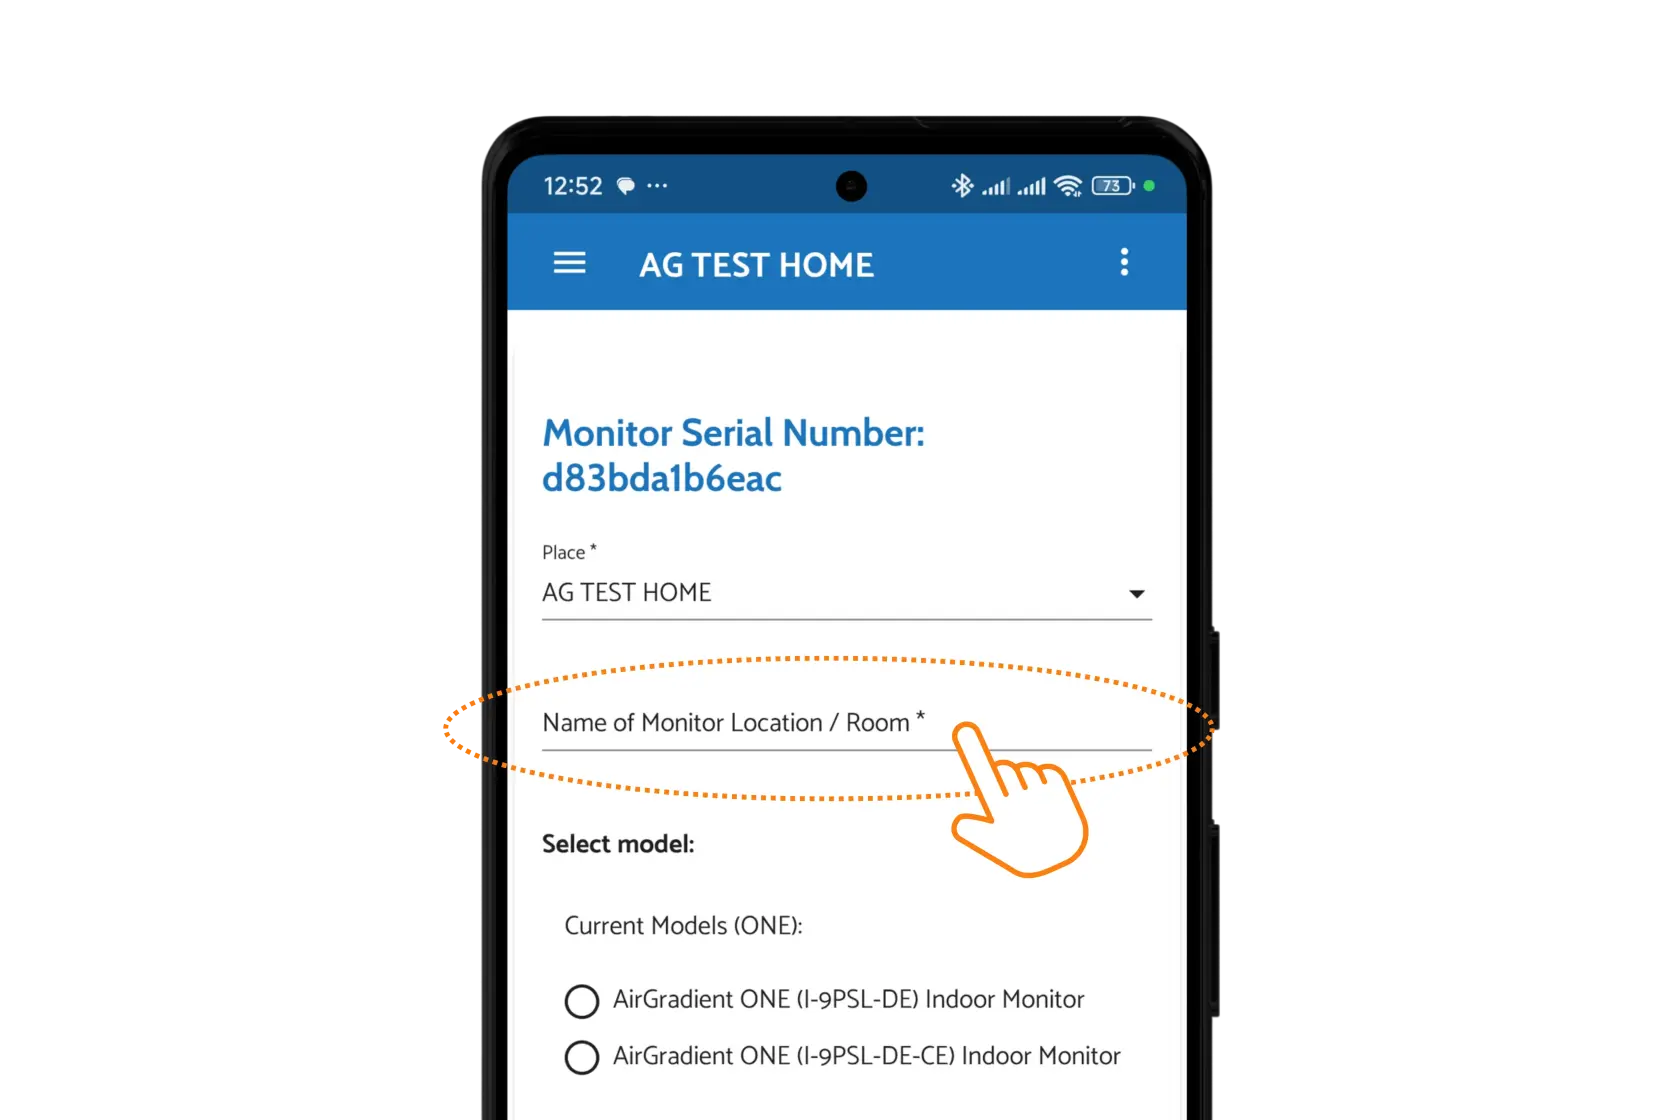
4. Enter a location name for the monitor
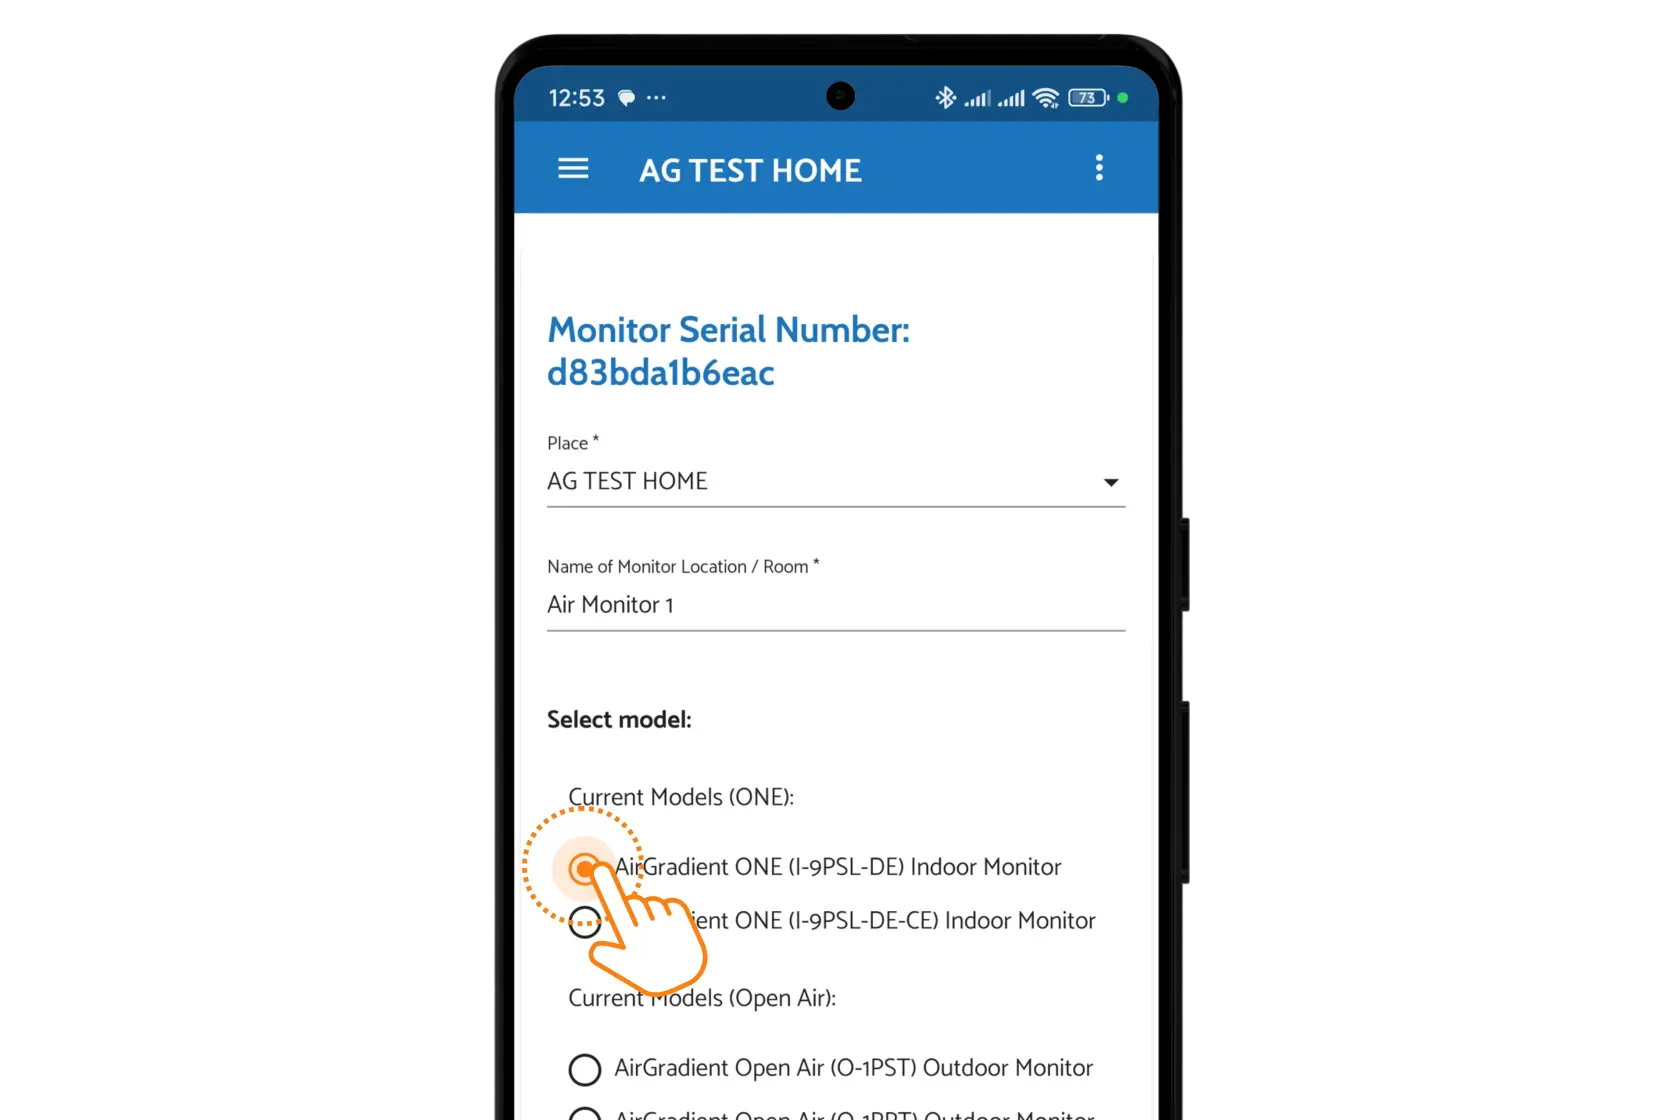
5. Select the exact model number. For assembled monitors, this is printed on the back of the monitor:
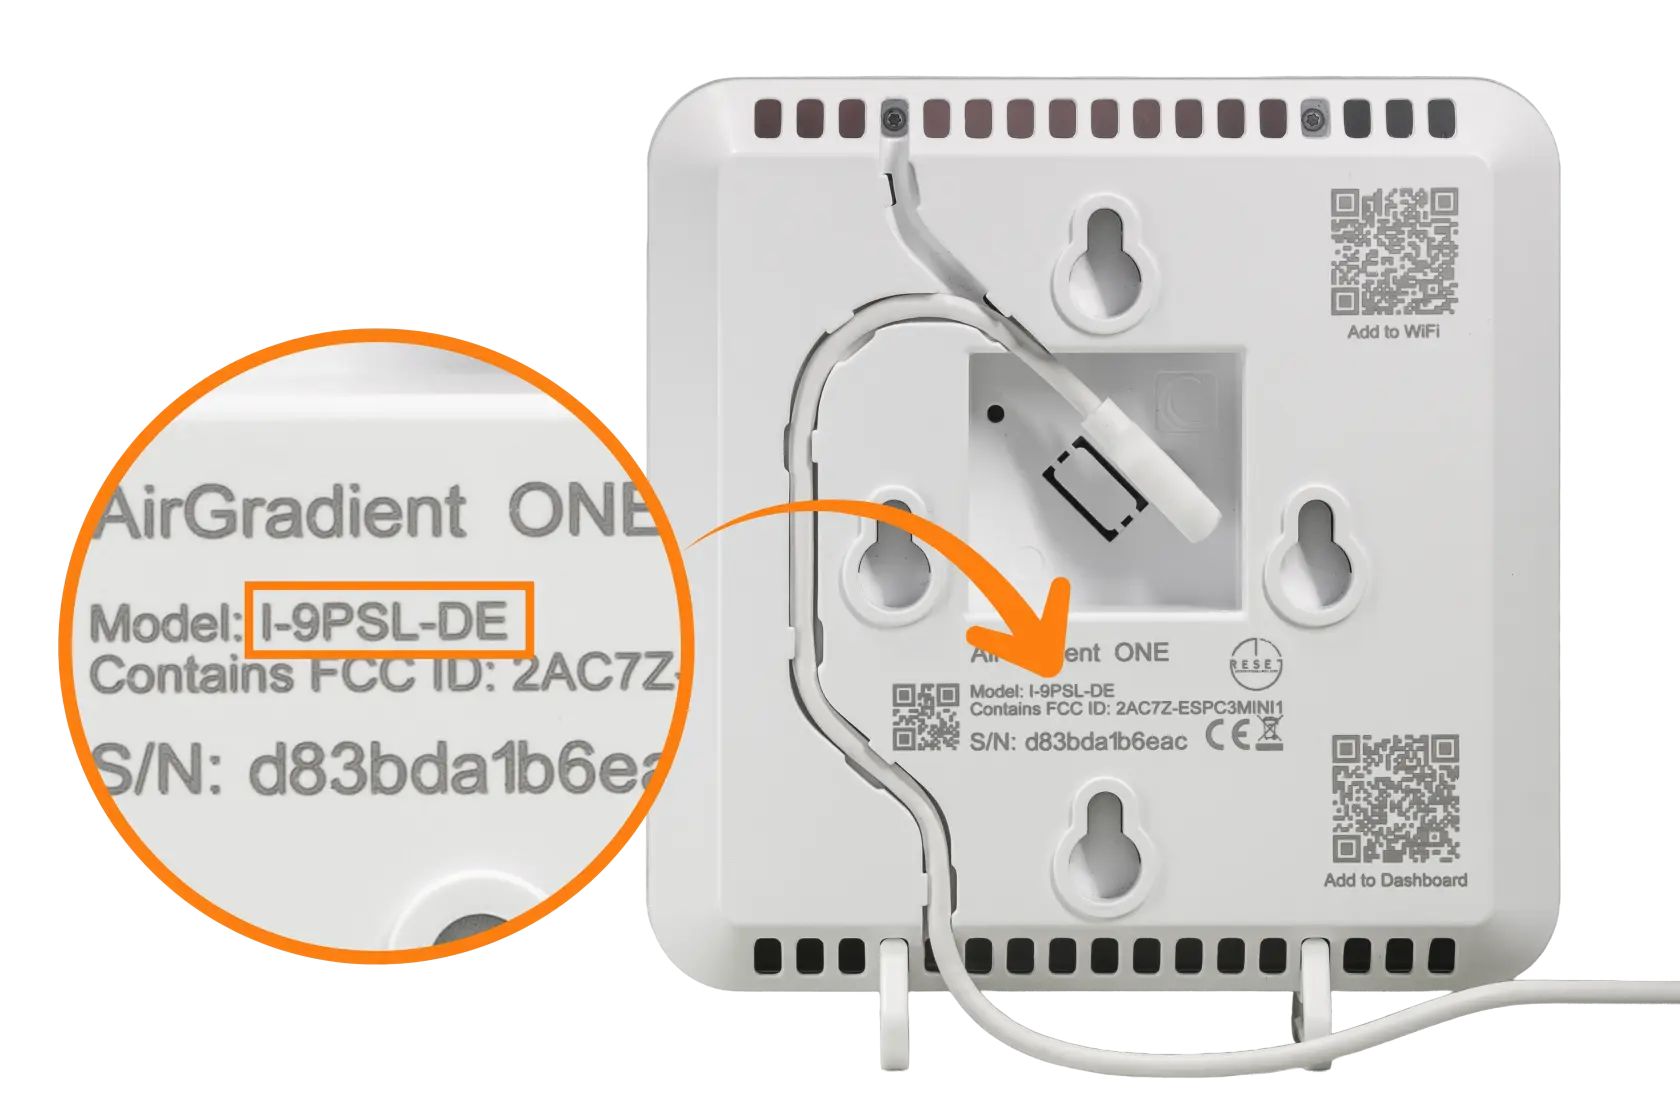
- If you’re unsure, see: [AirGradient Models](https://www.airgradient.com/documentation/ag-models/)
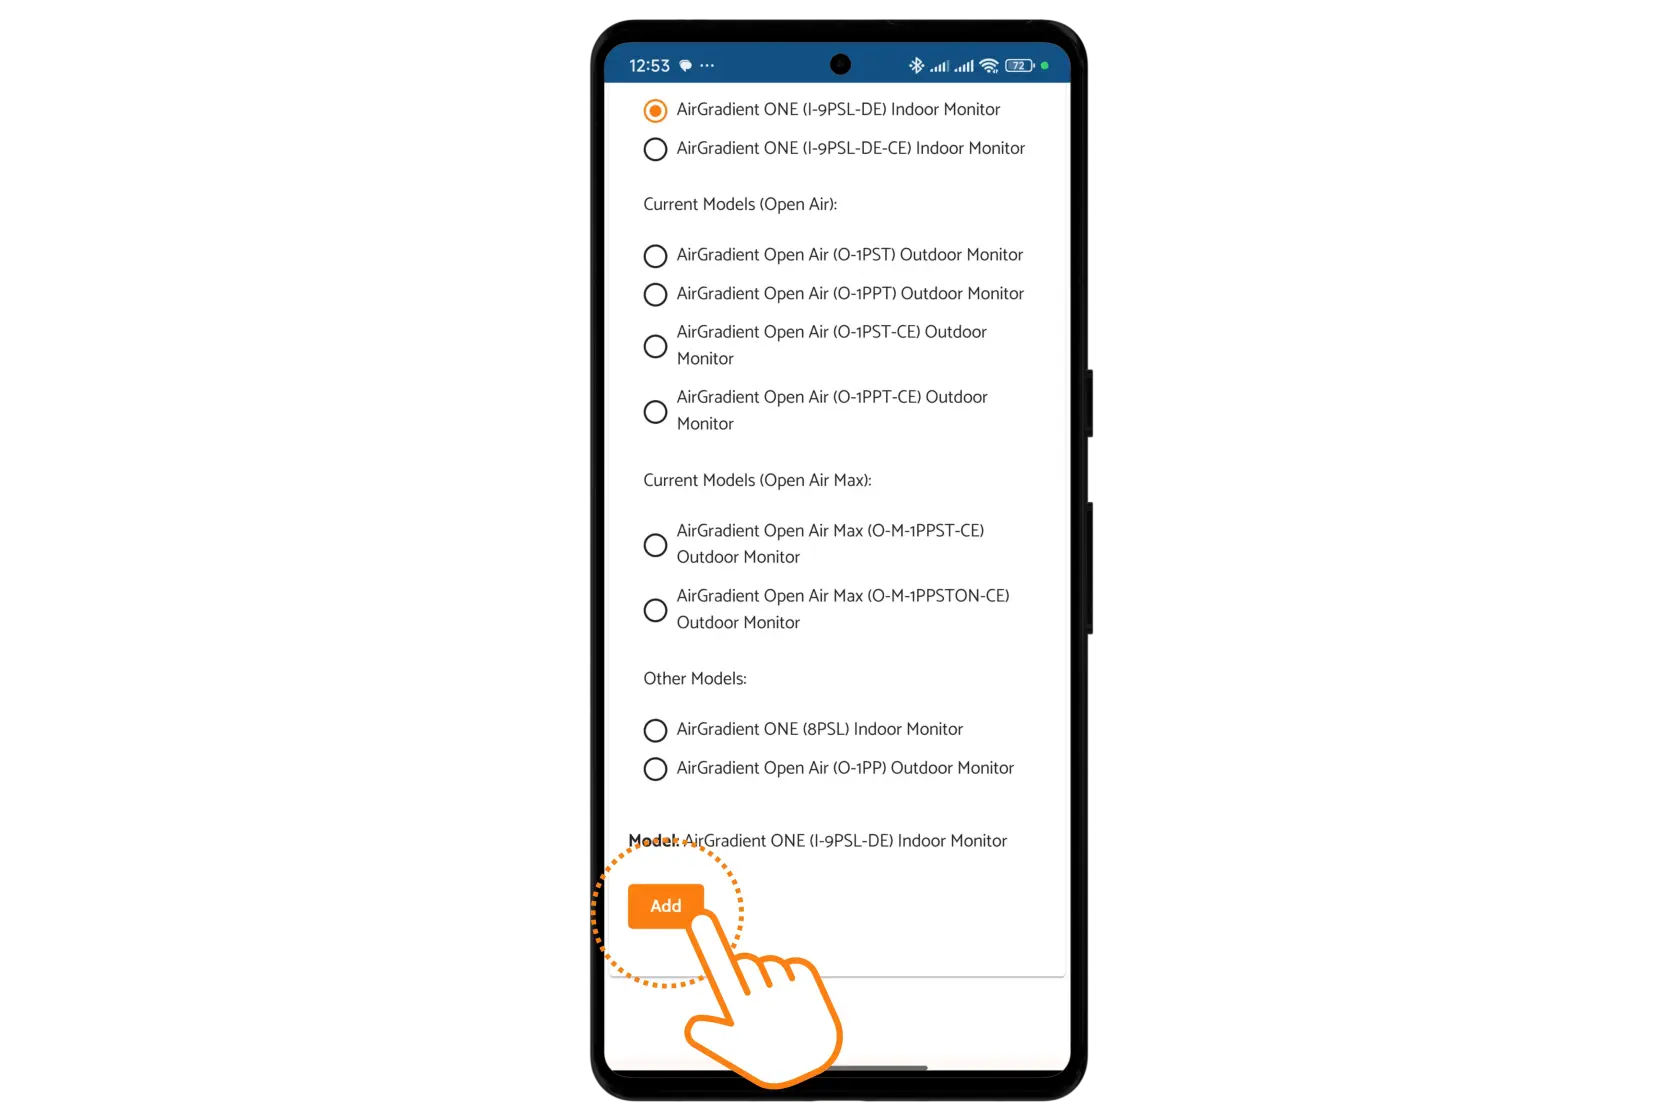
6. Click Add
[](https://docs.airgradient.net/uploads/images/gallery/2026-01/dash-click-add.webp)
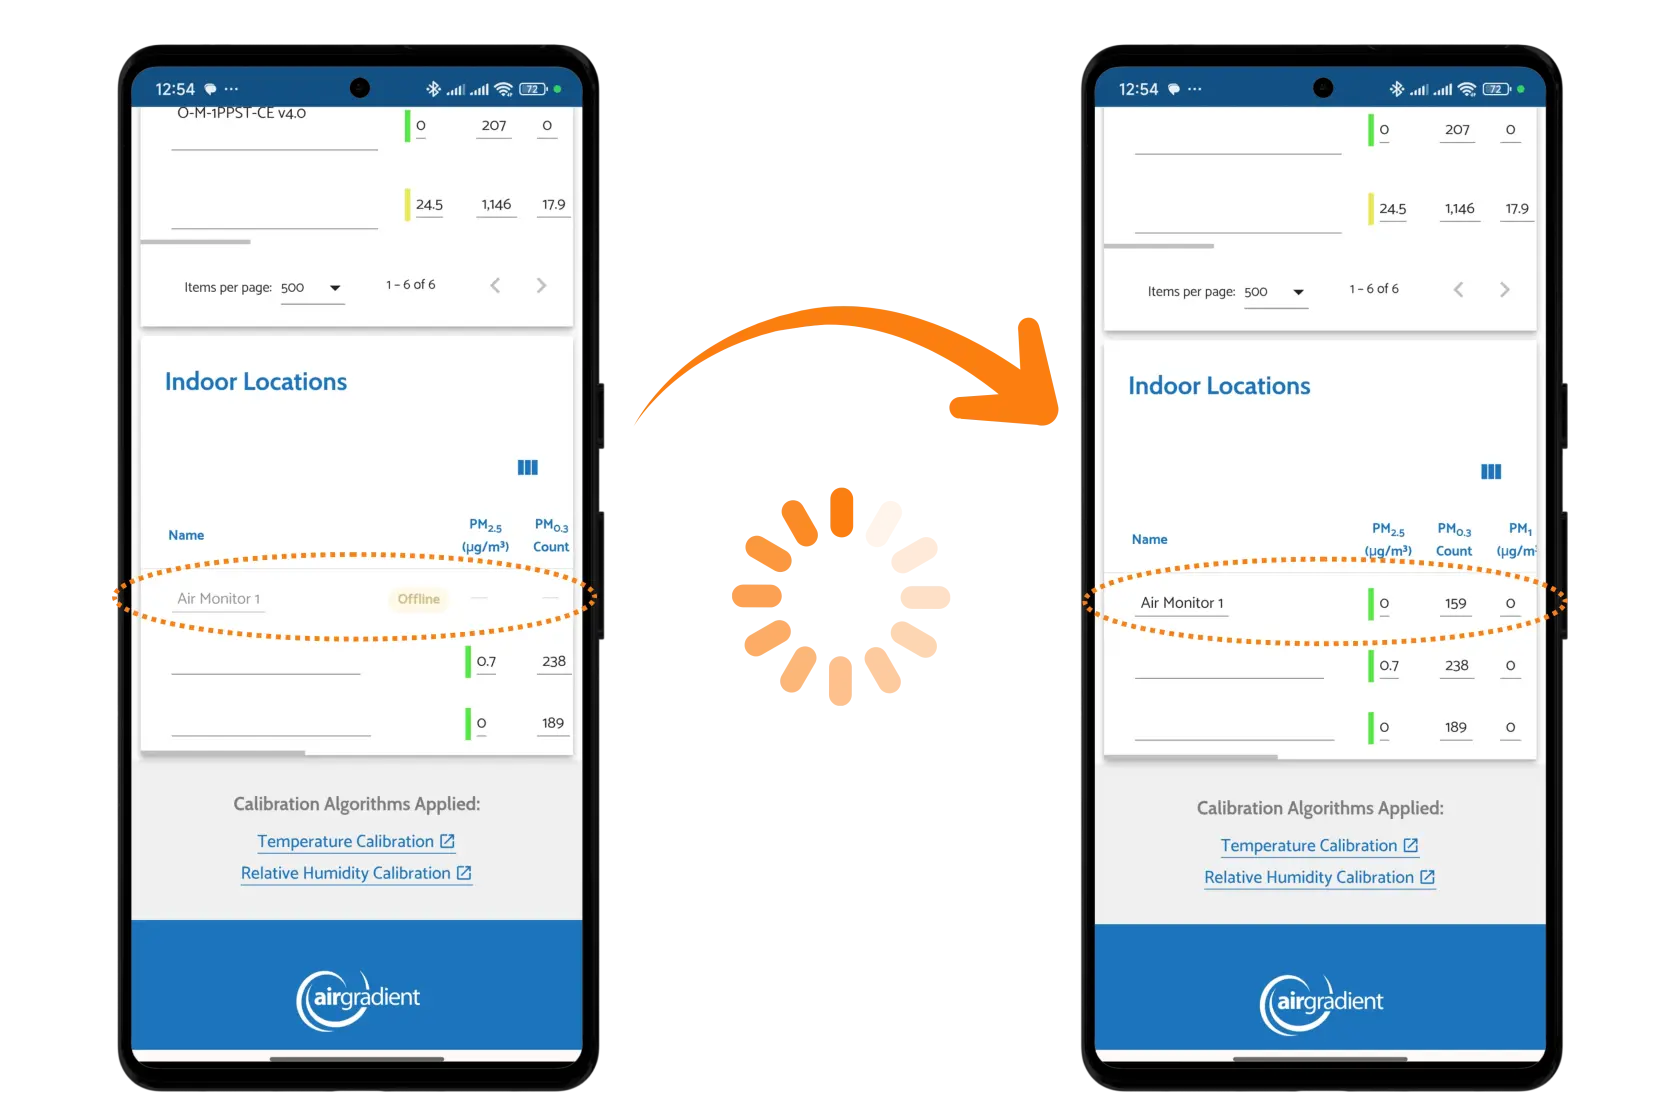
The monitor will now appear in your dashboard. You should see an entry for the monitor on your dashboard, but it will likely show as offline for the first minute or two. Please allow up to five minutes for the monitor to show as online and for the data to begin reporting.
### Add to dashboard manually (Kits or QR code not working)
If you have a DIY kit, or if the QR code does not work, you can add the device manually:
1\. Open the monitor [onboarding guide](https://app.airgradient.com/onboarding/welcome).
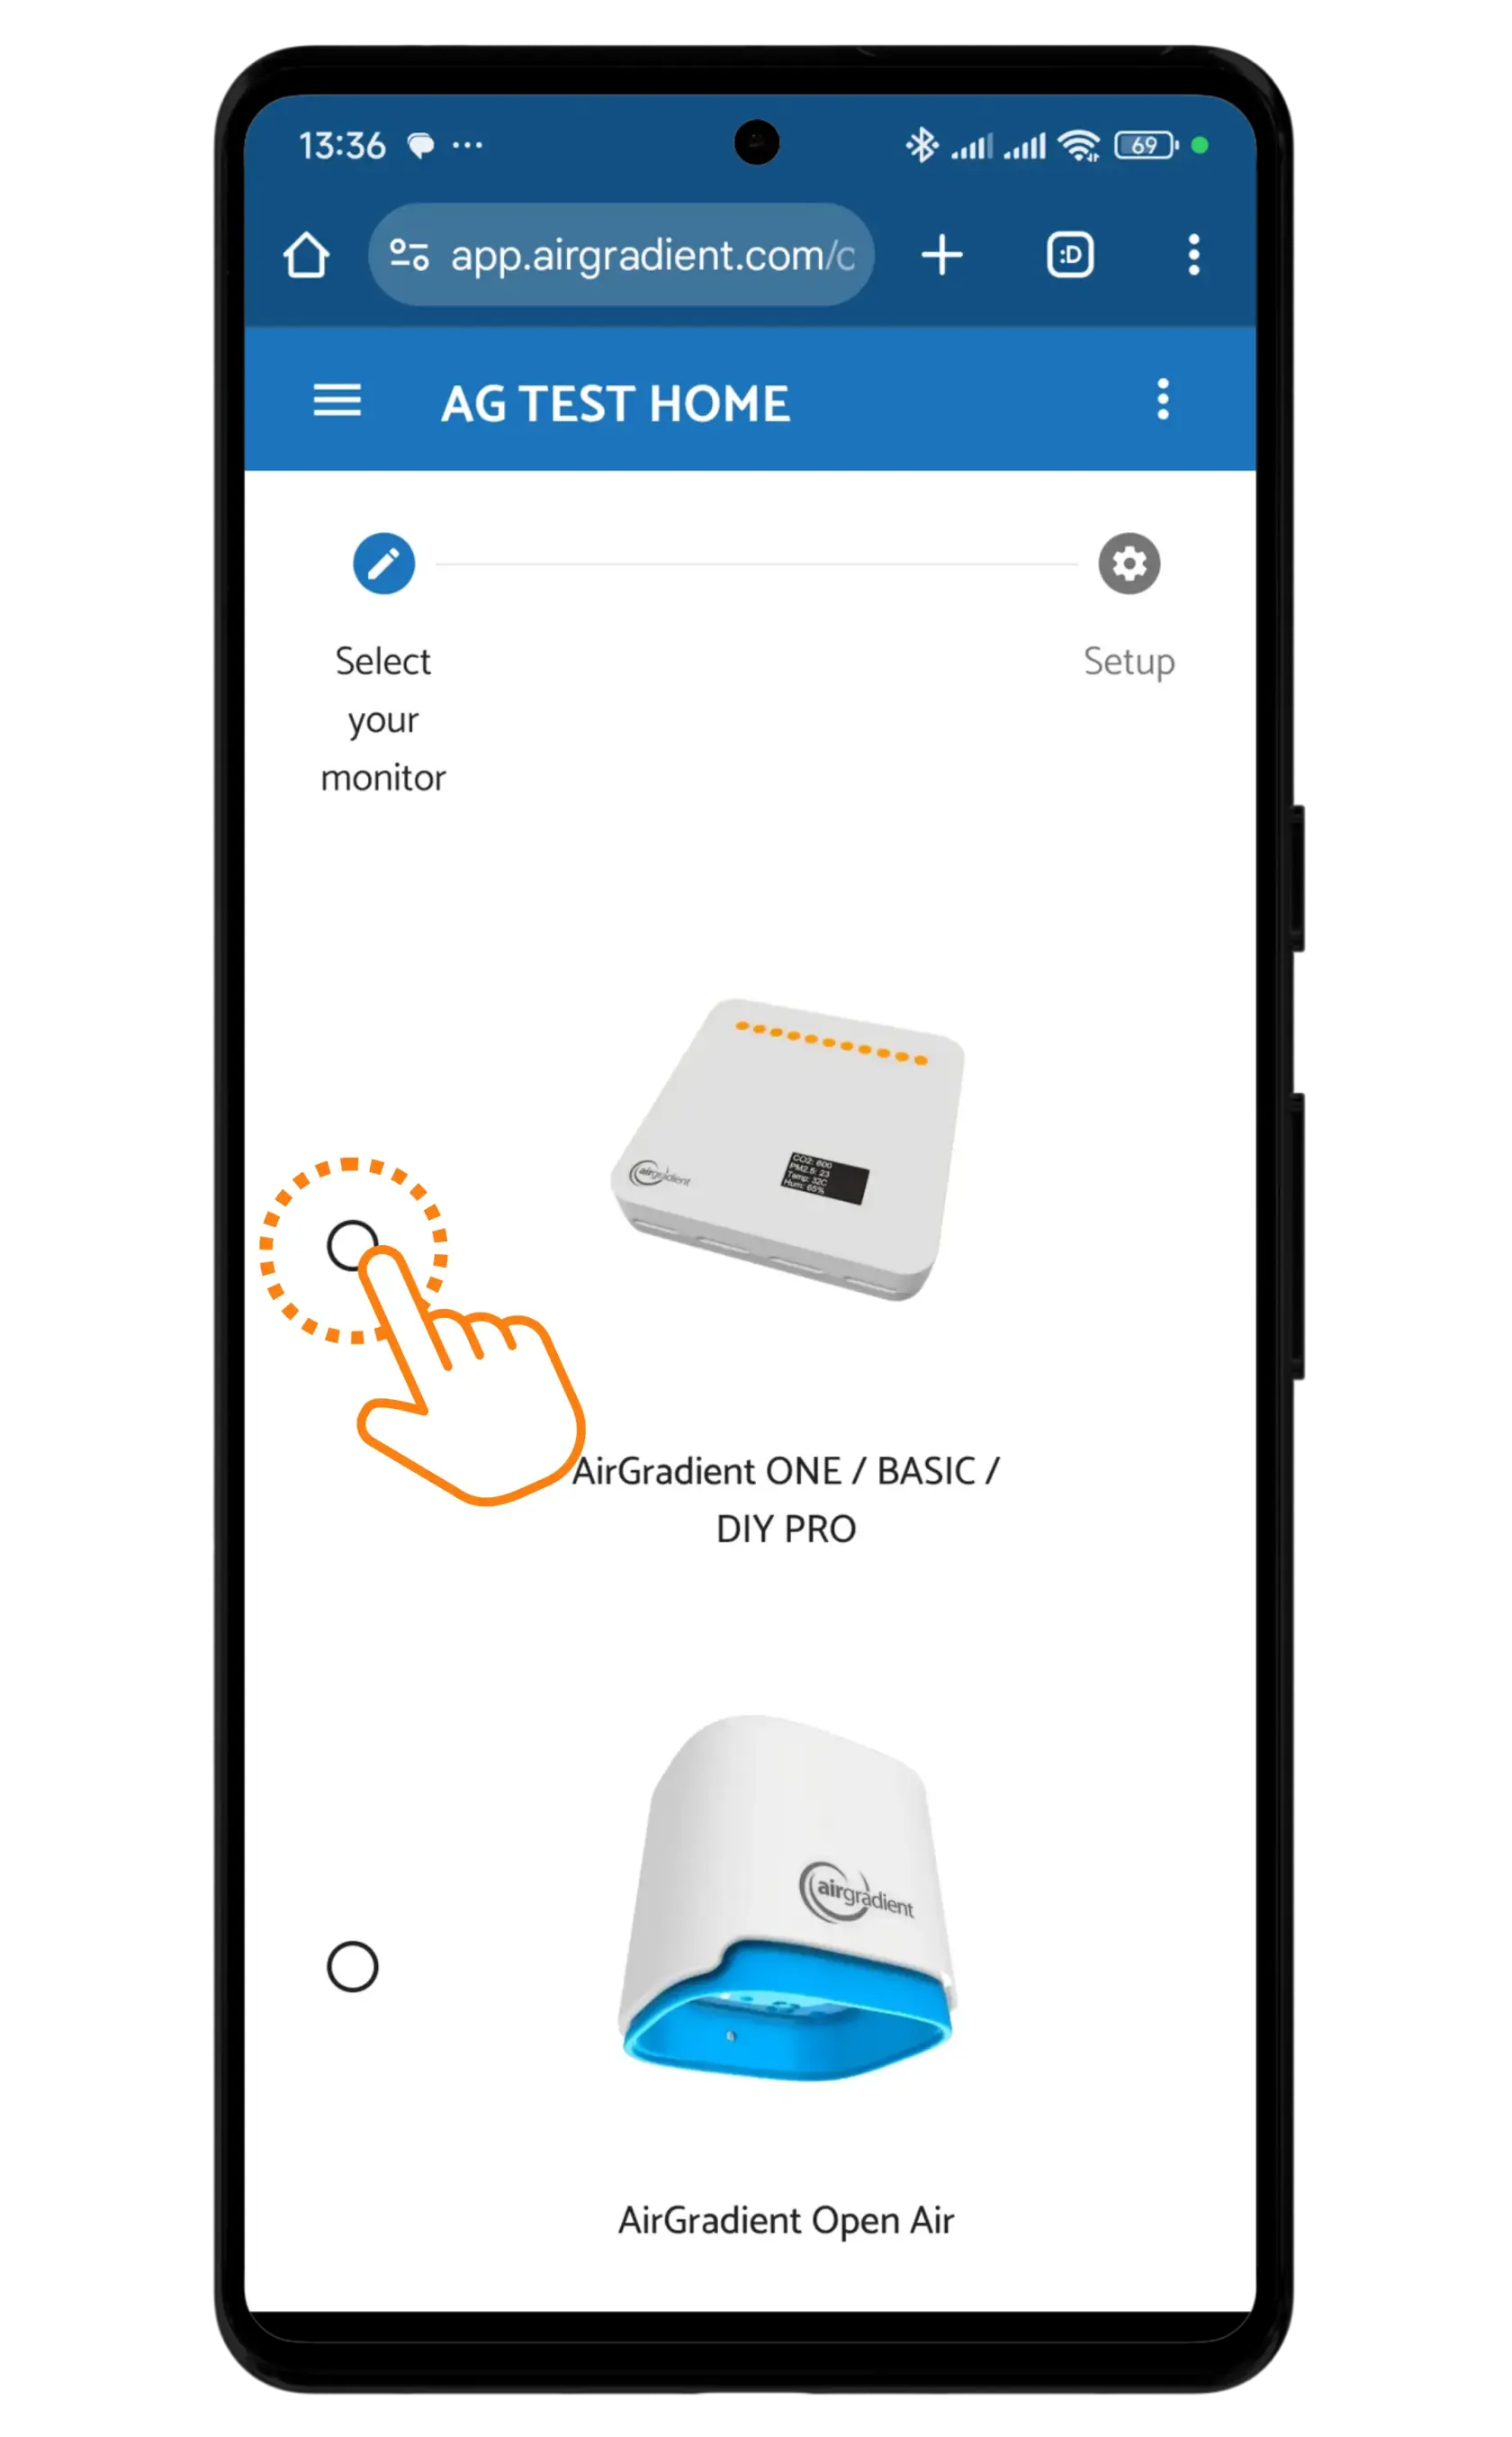
2\. Select the monitor type that you are trying to connect to your dashboard. In this case, you need to select the AirGradient ONE.
3\. Select the exact model number. For assembled monitors, this is printed on the back of the monitor but for DIY kits, it is not. For the AirGradient ONE the latest model number is generally either:
- I-9PSL-DE (Standard Wi-Fi Version)
- I-9PSL-DE-CE (Cellular Version)
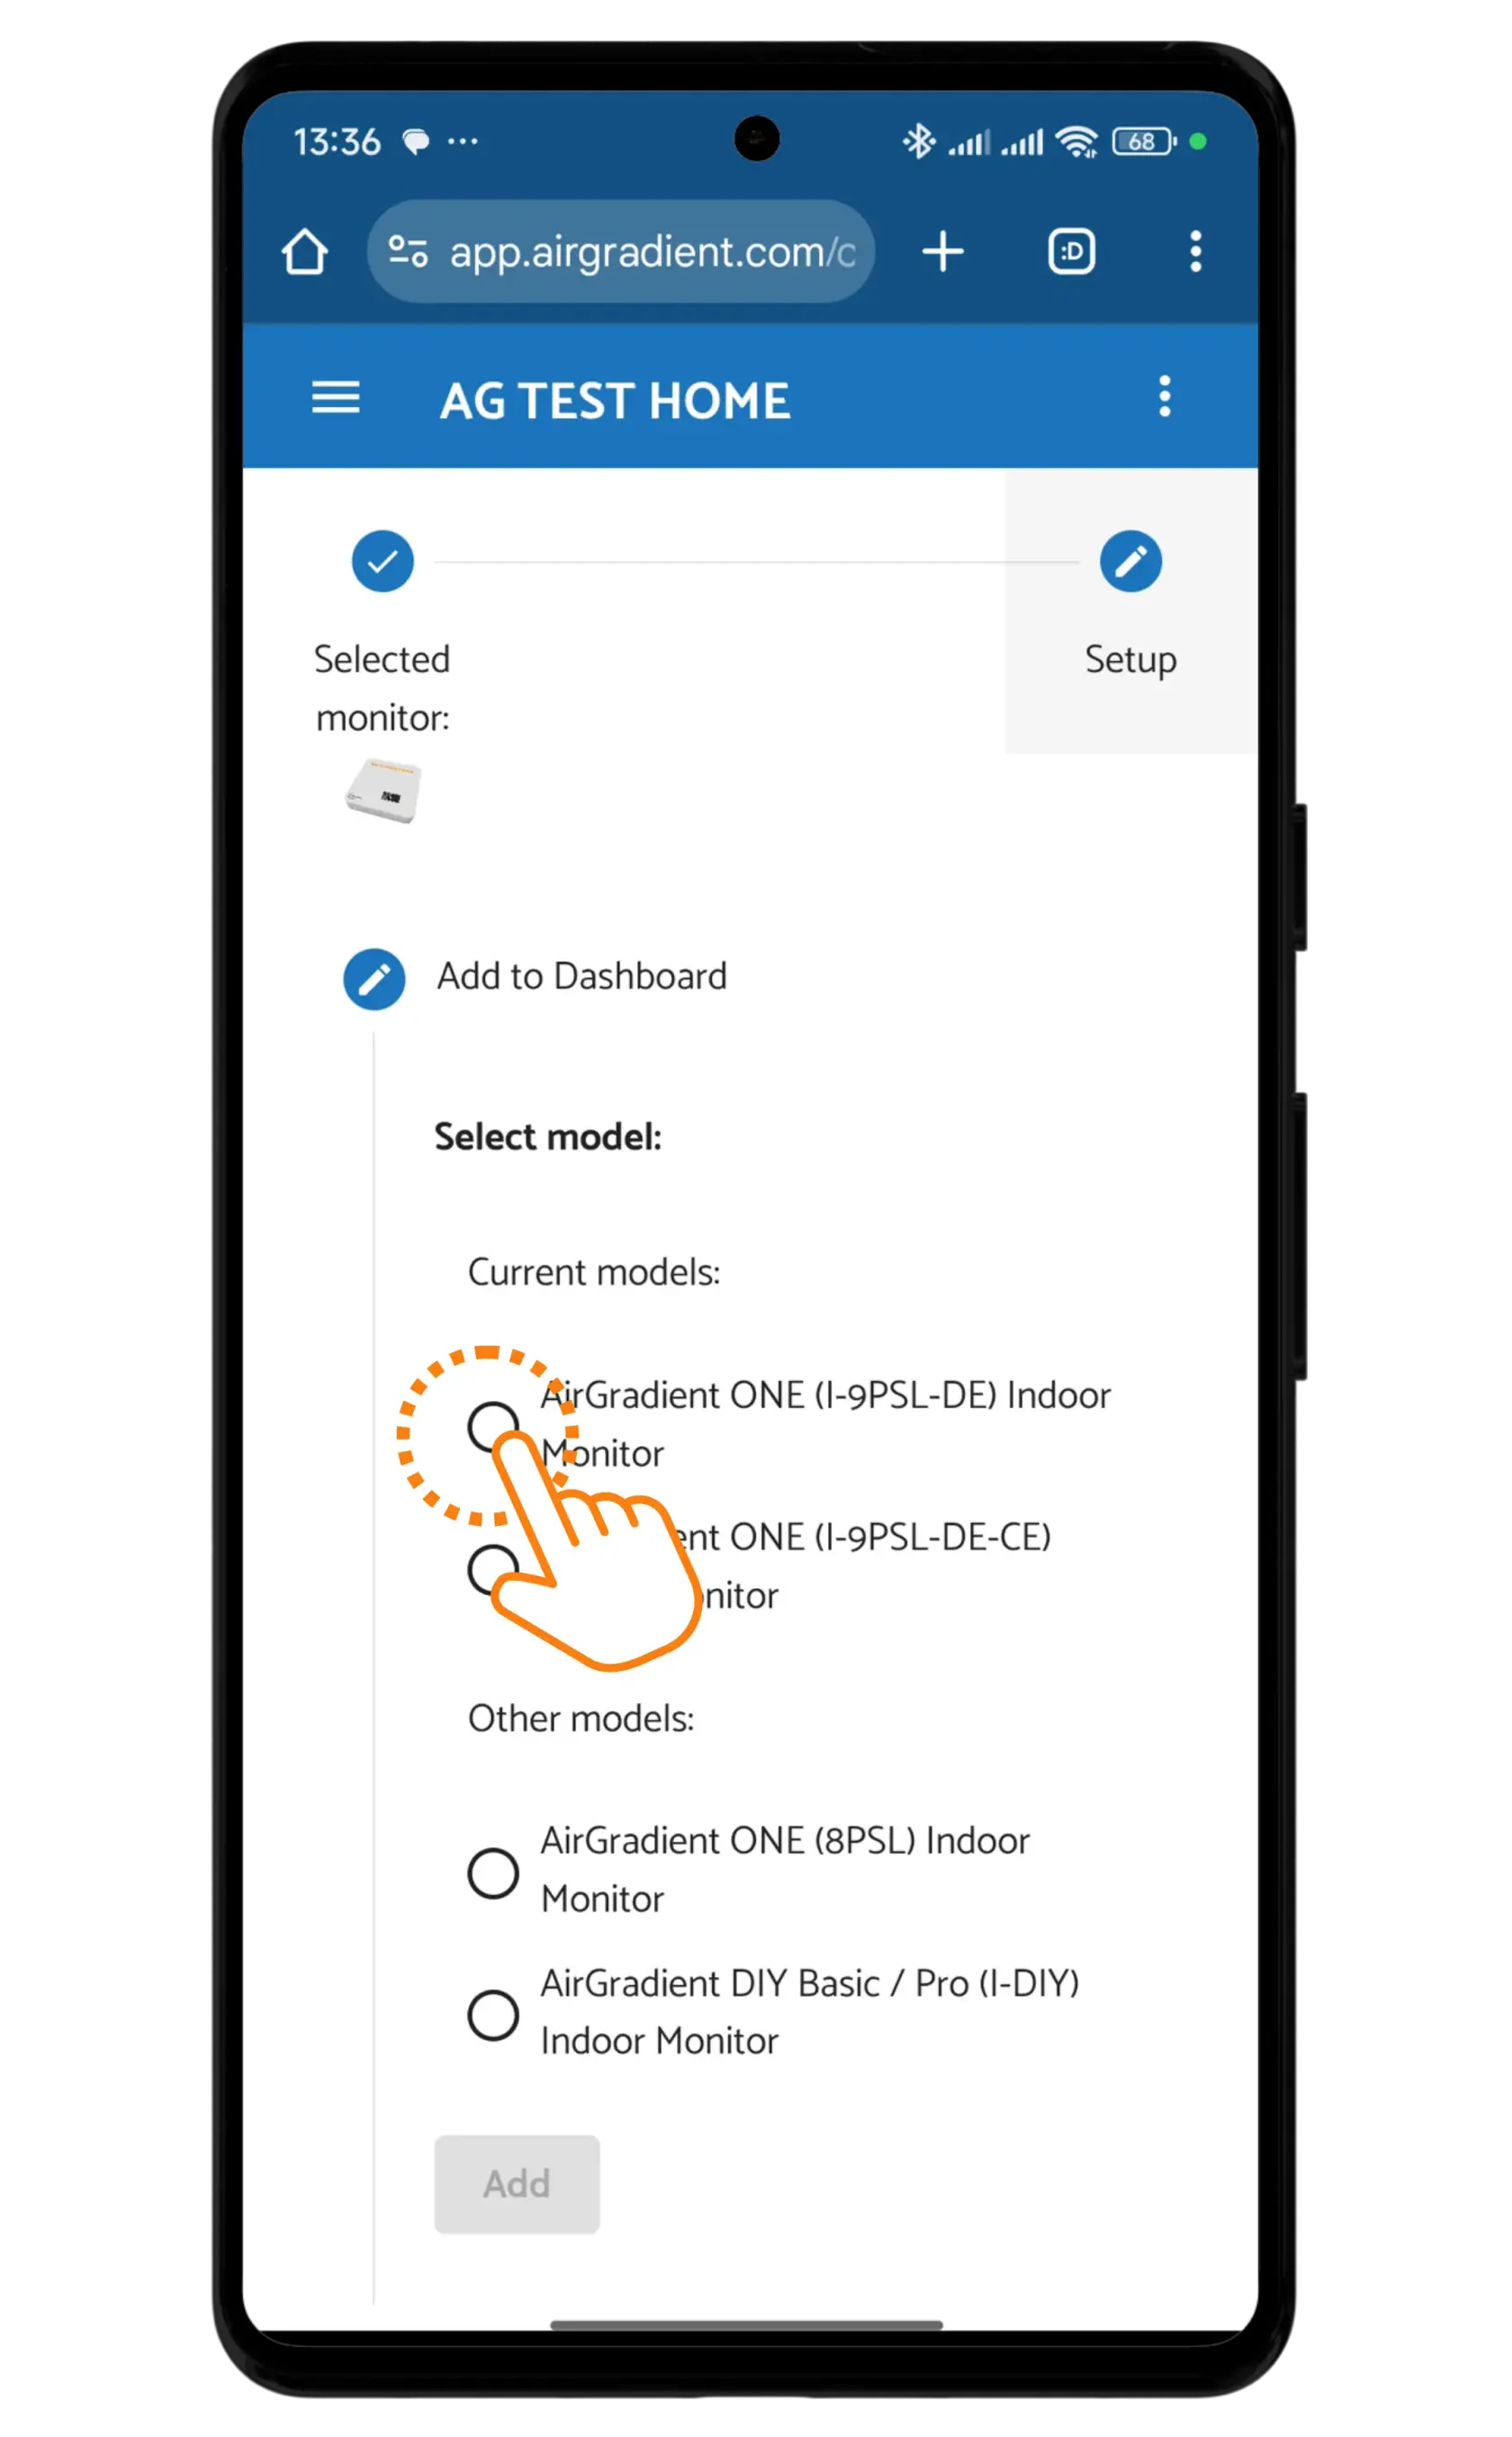
If you’re unsure, see: [AirGradient Models](https://www.airgradient.com/documentation/ag-models/)
4\. Pick which dashboard (Place) you want to associate the monitor with (if you have multiple) or create a new Place (Link to article on difference between Place and Location?)
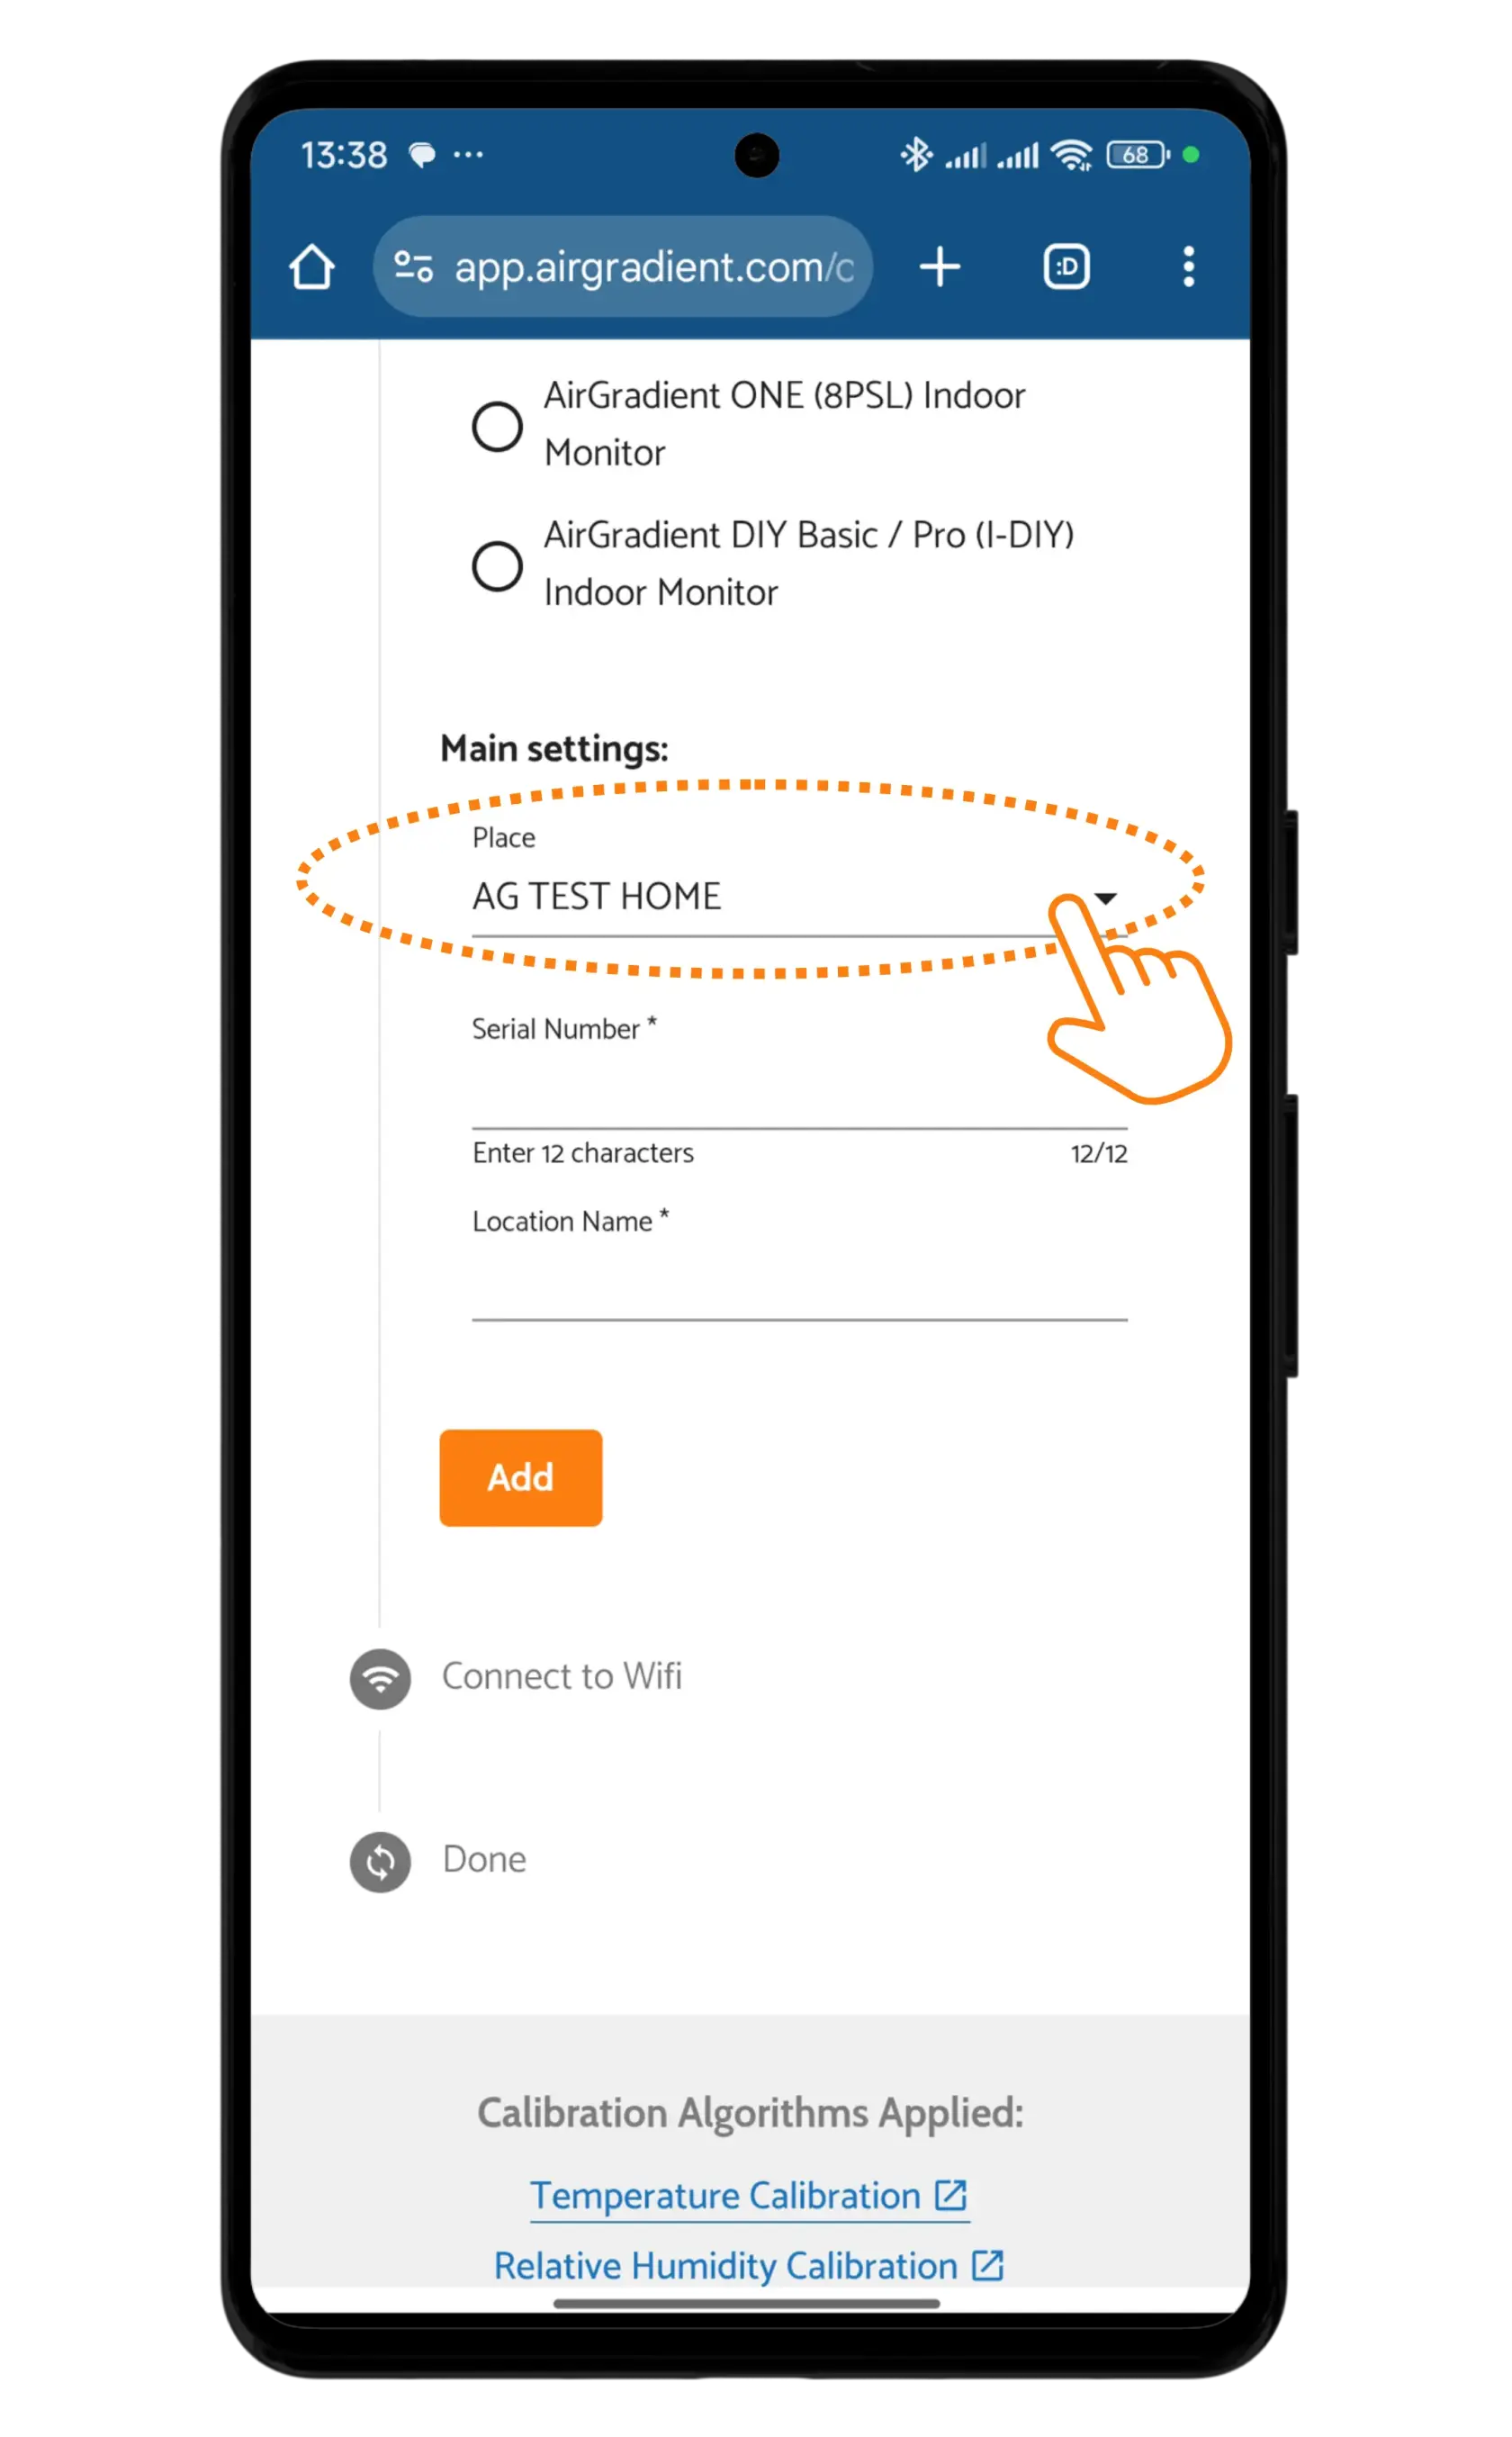
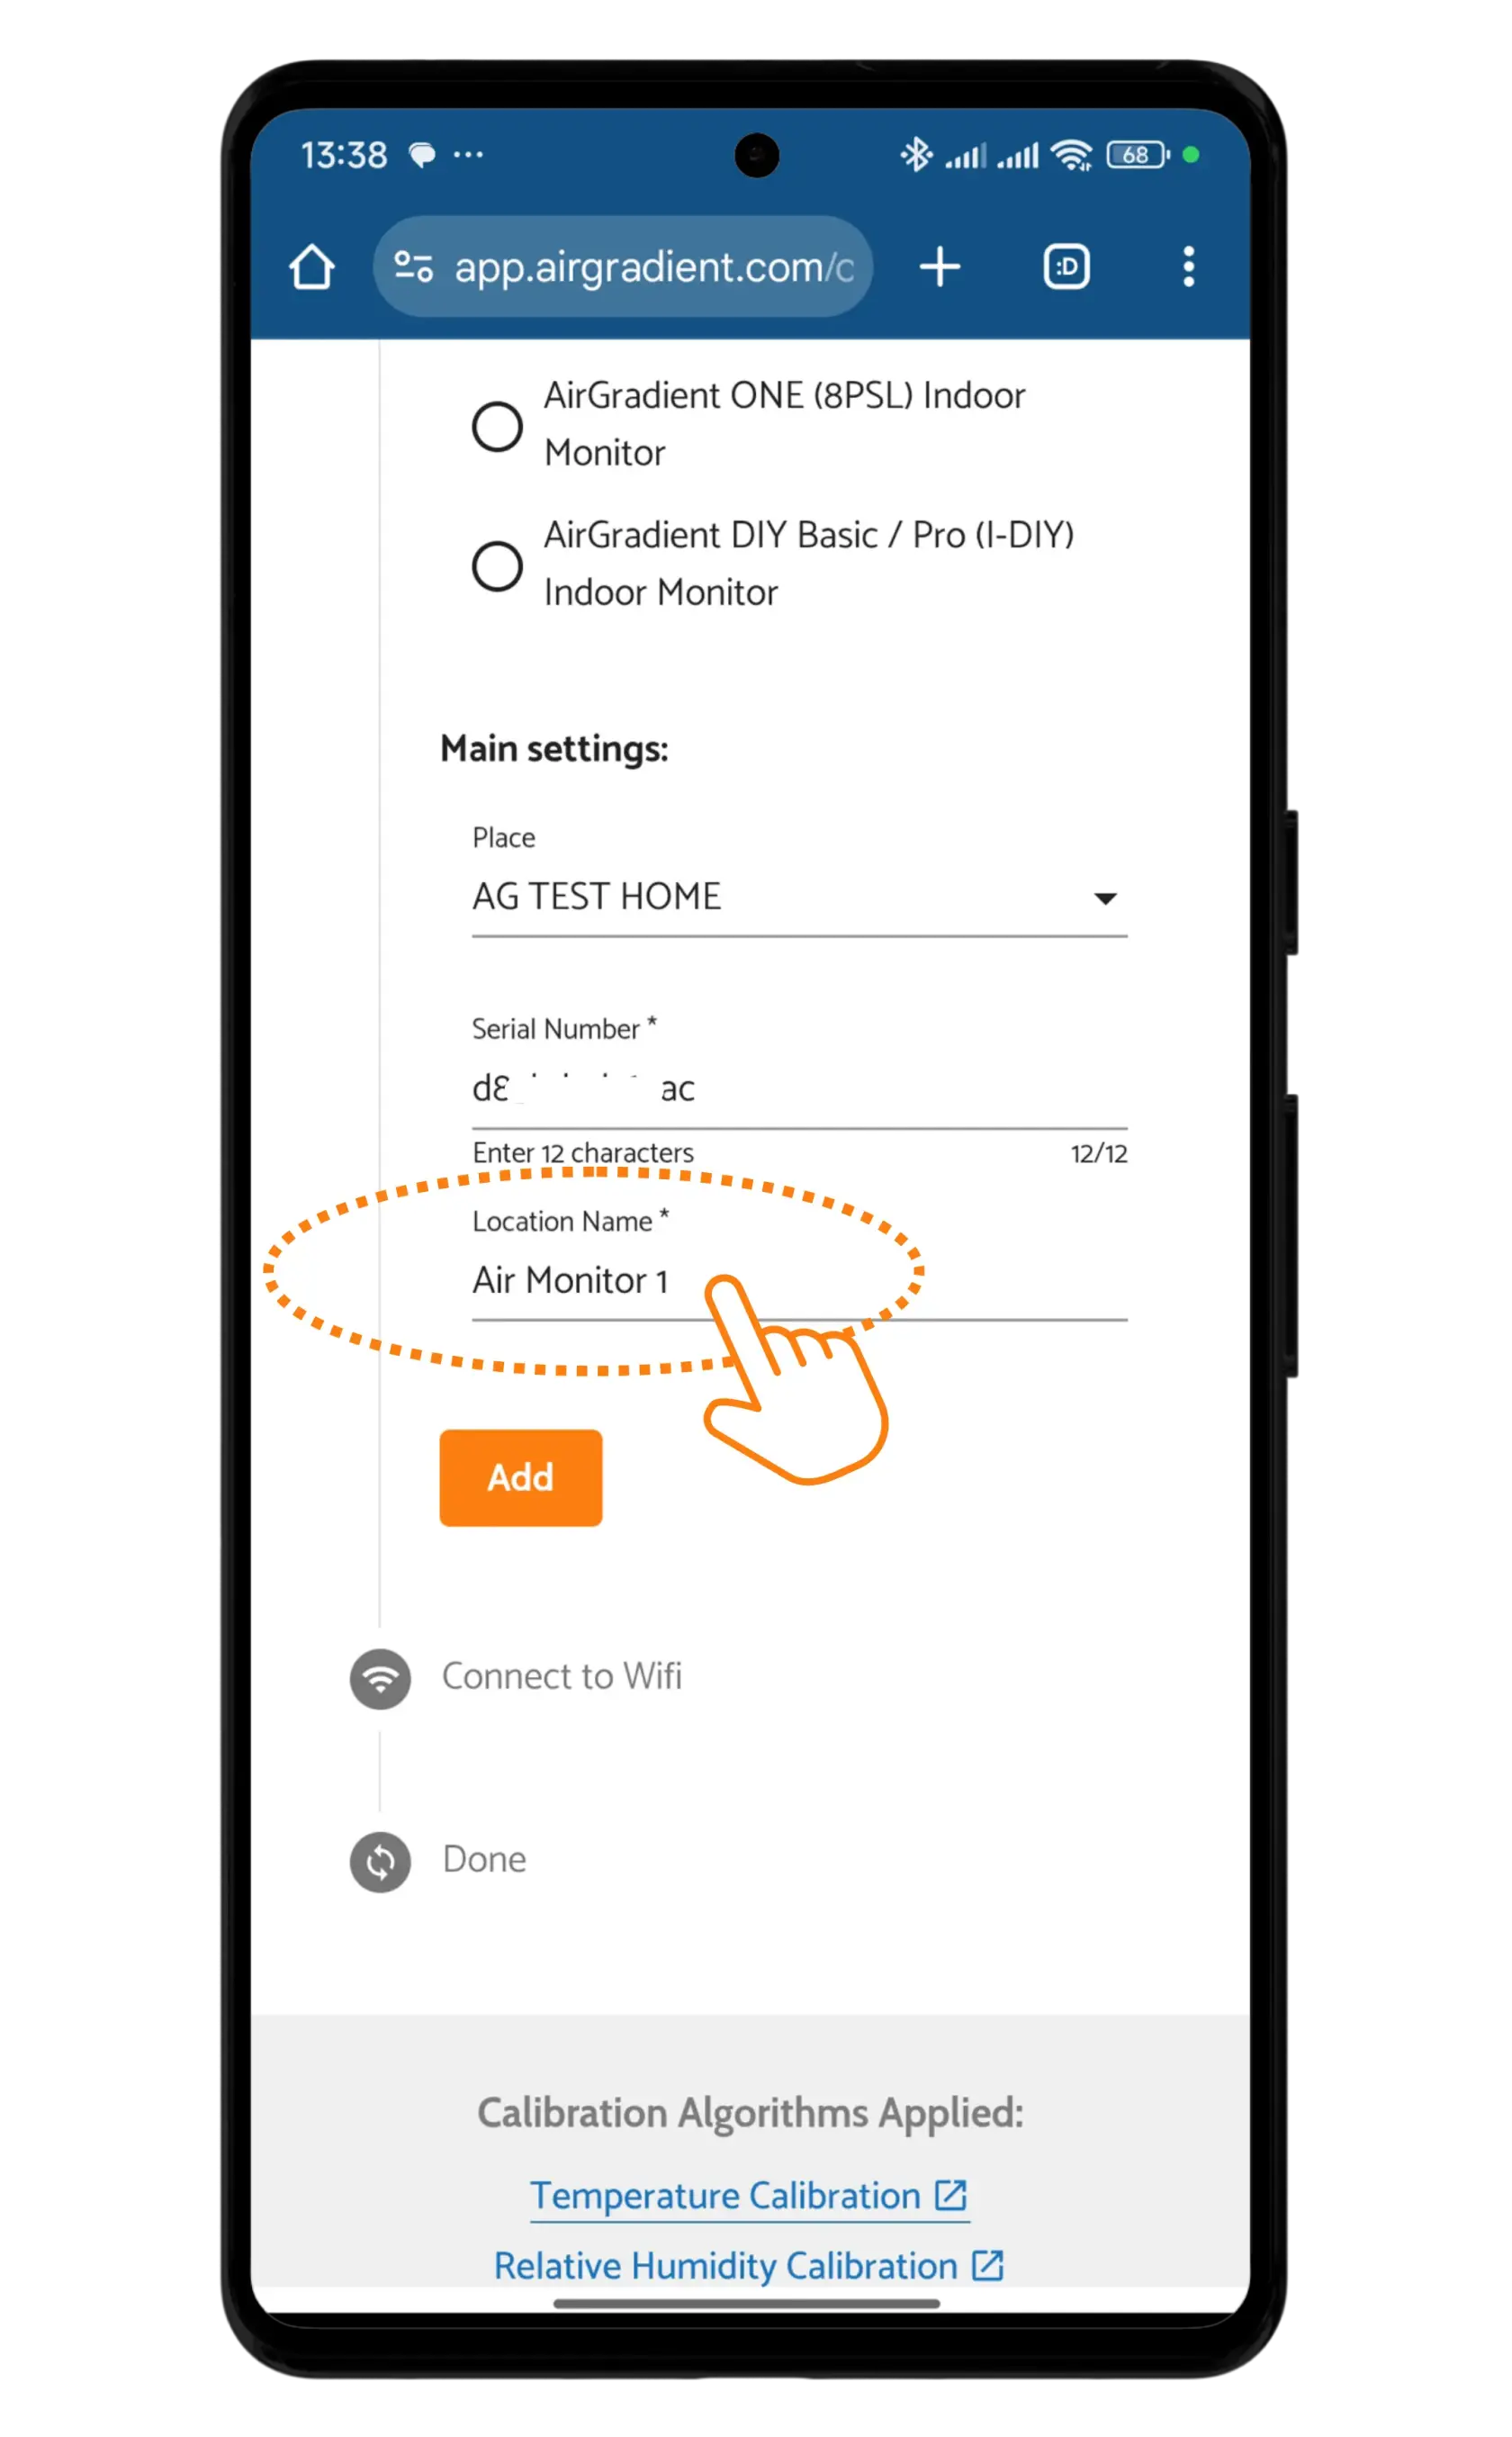
5\. Enter the serial number (SN) of the monitor.
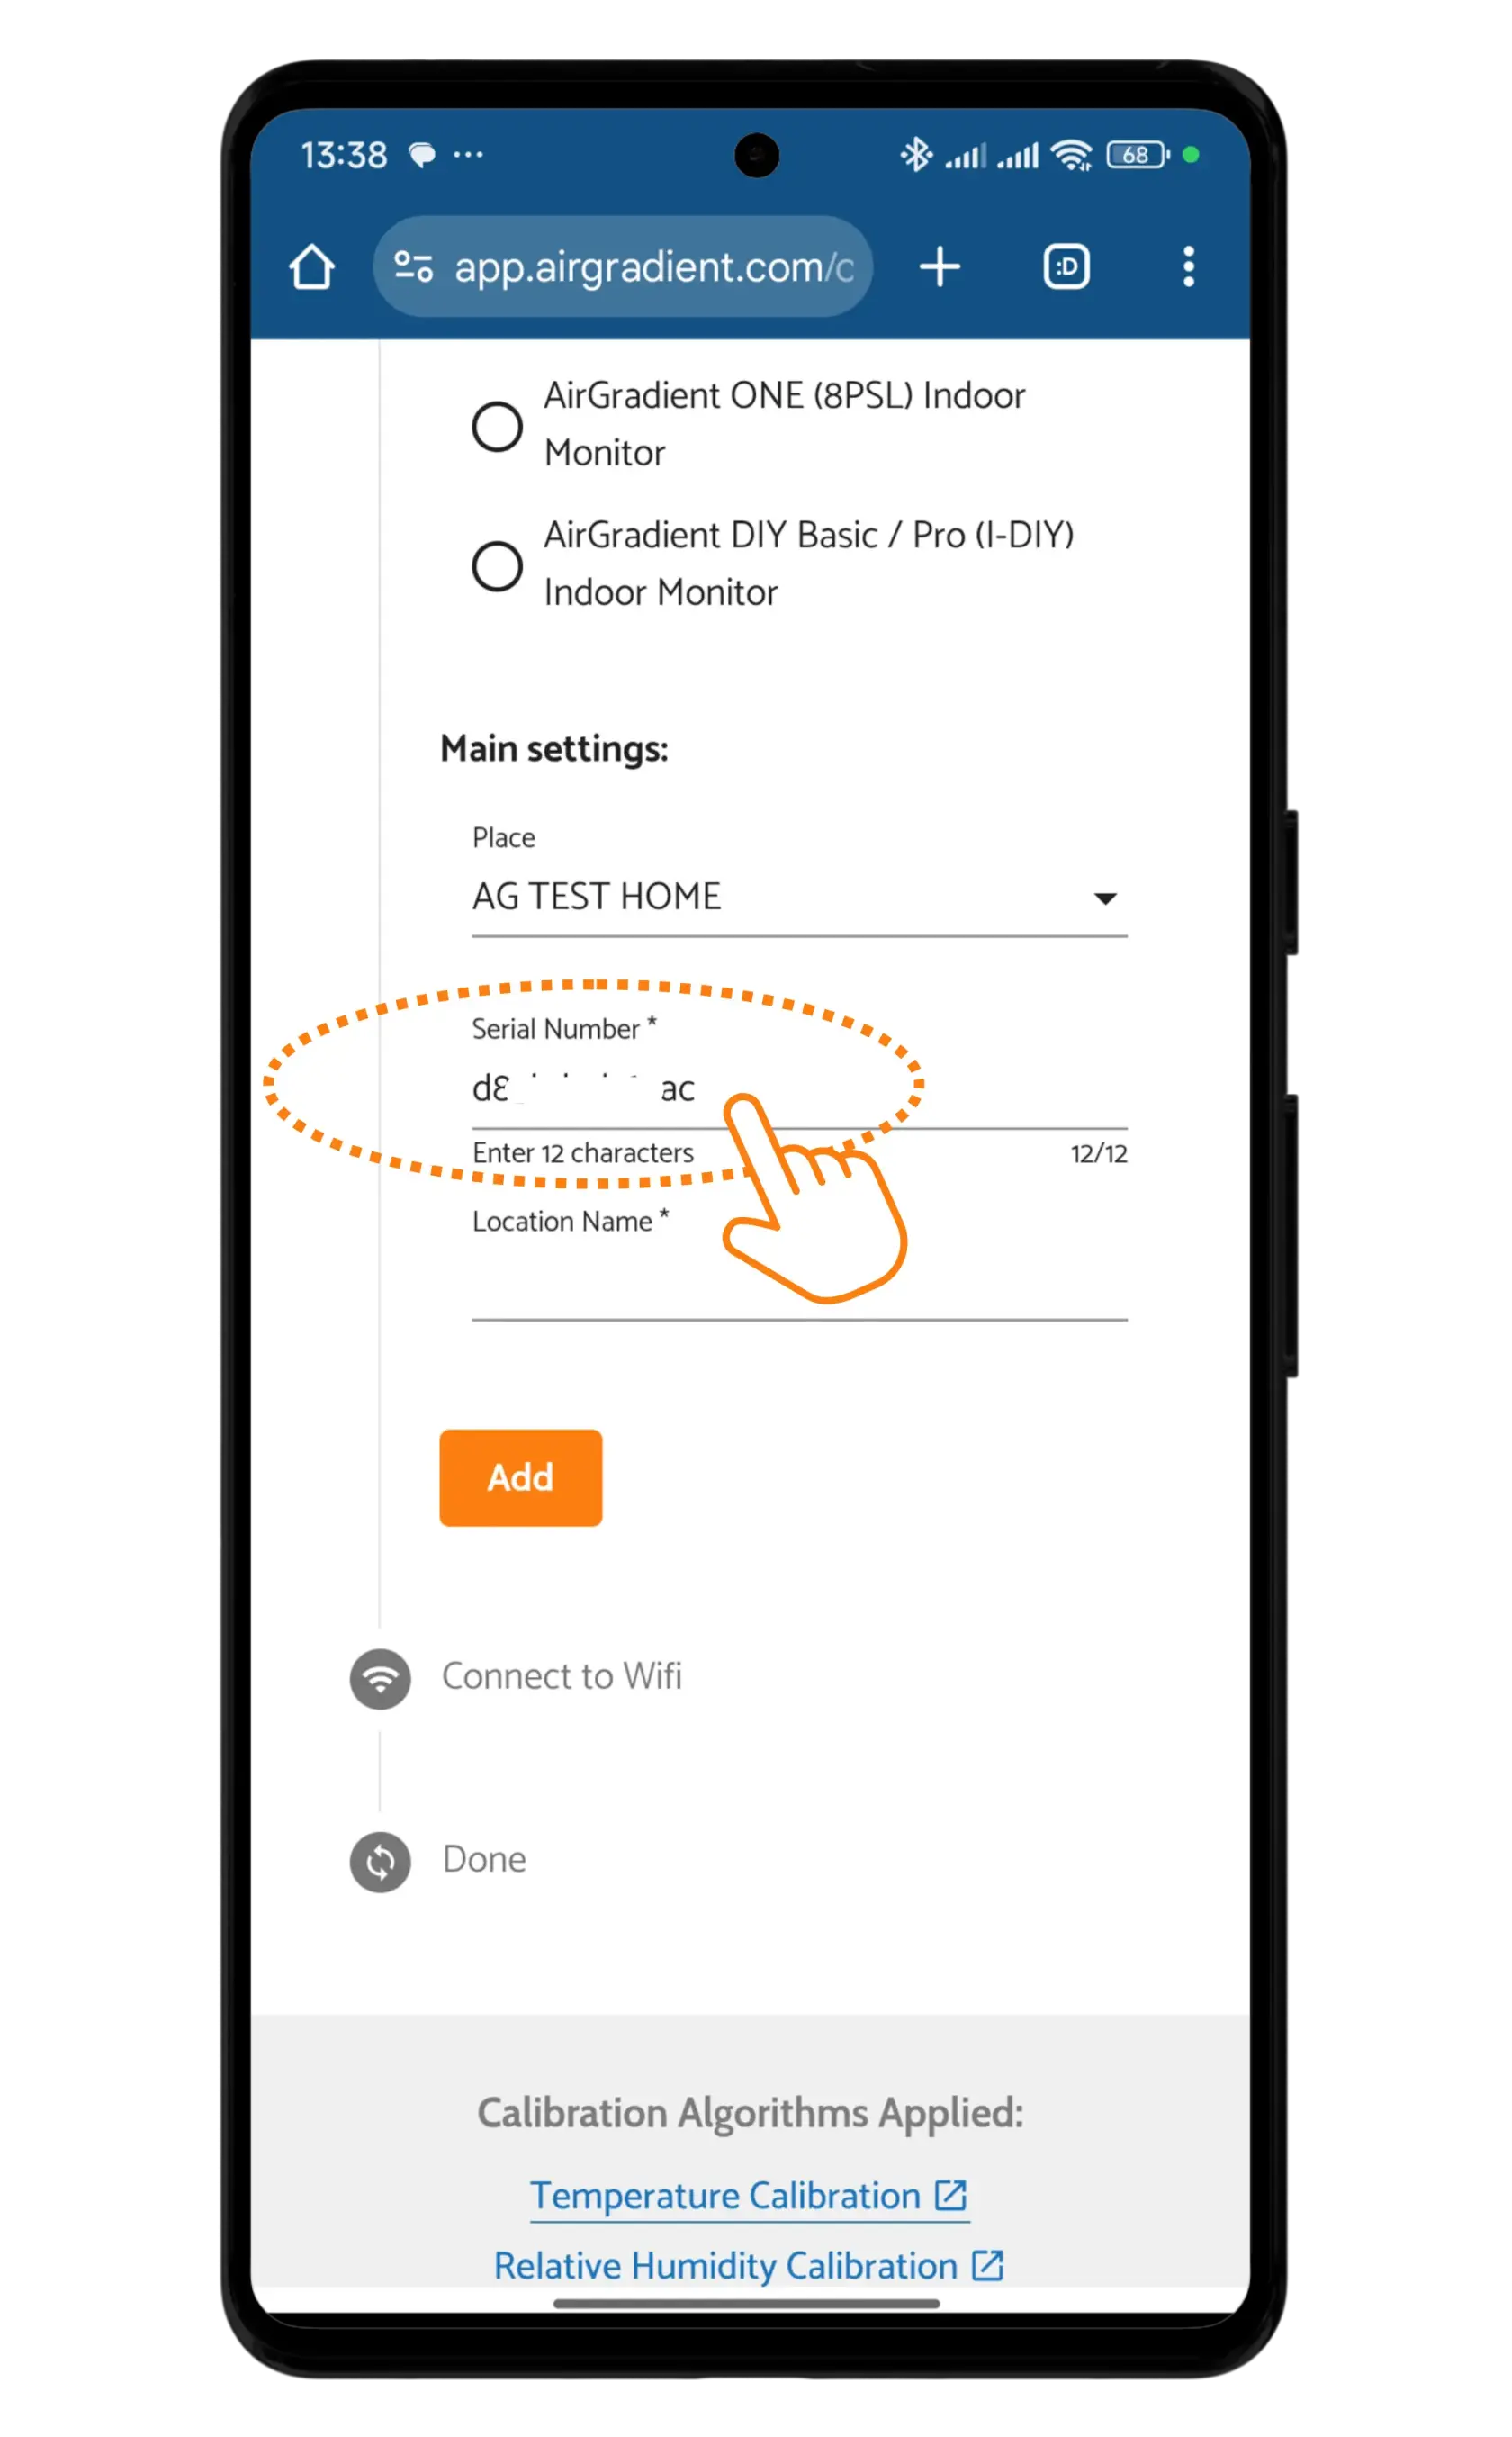
For assembled monitors, the SN printed on the back of the monitor but for DIY kits, it is not. To find the SN for the DIY kits, when you startup the monitor, you can see a message “180s to connect to WiFi Hotspot airgradient-xxxxx”. The xxxxx is the serial number of the monitor. Please make sure that you use it in lower case only and also do not use “airgradient-” which is not part of the serial number. So if for example, the display shows “airgradient-625bf2”, then “625bf2” is the serial number.
6\. Enter a location name for the monitor and click Add
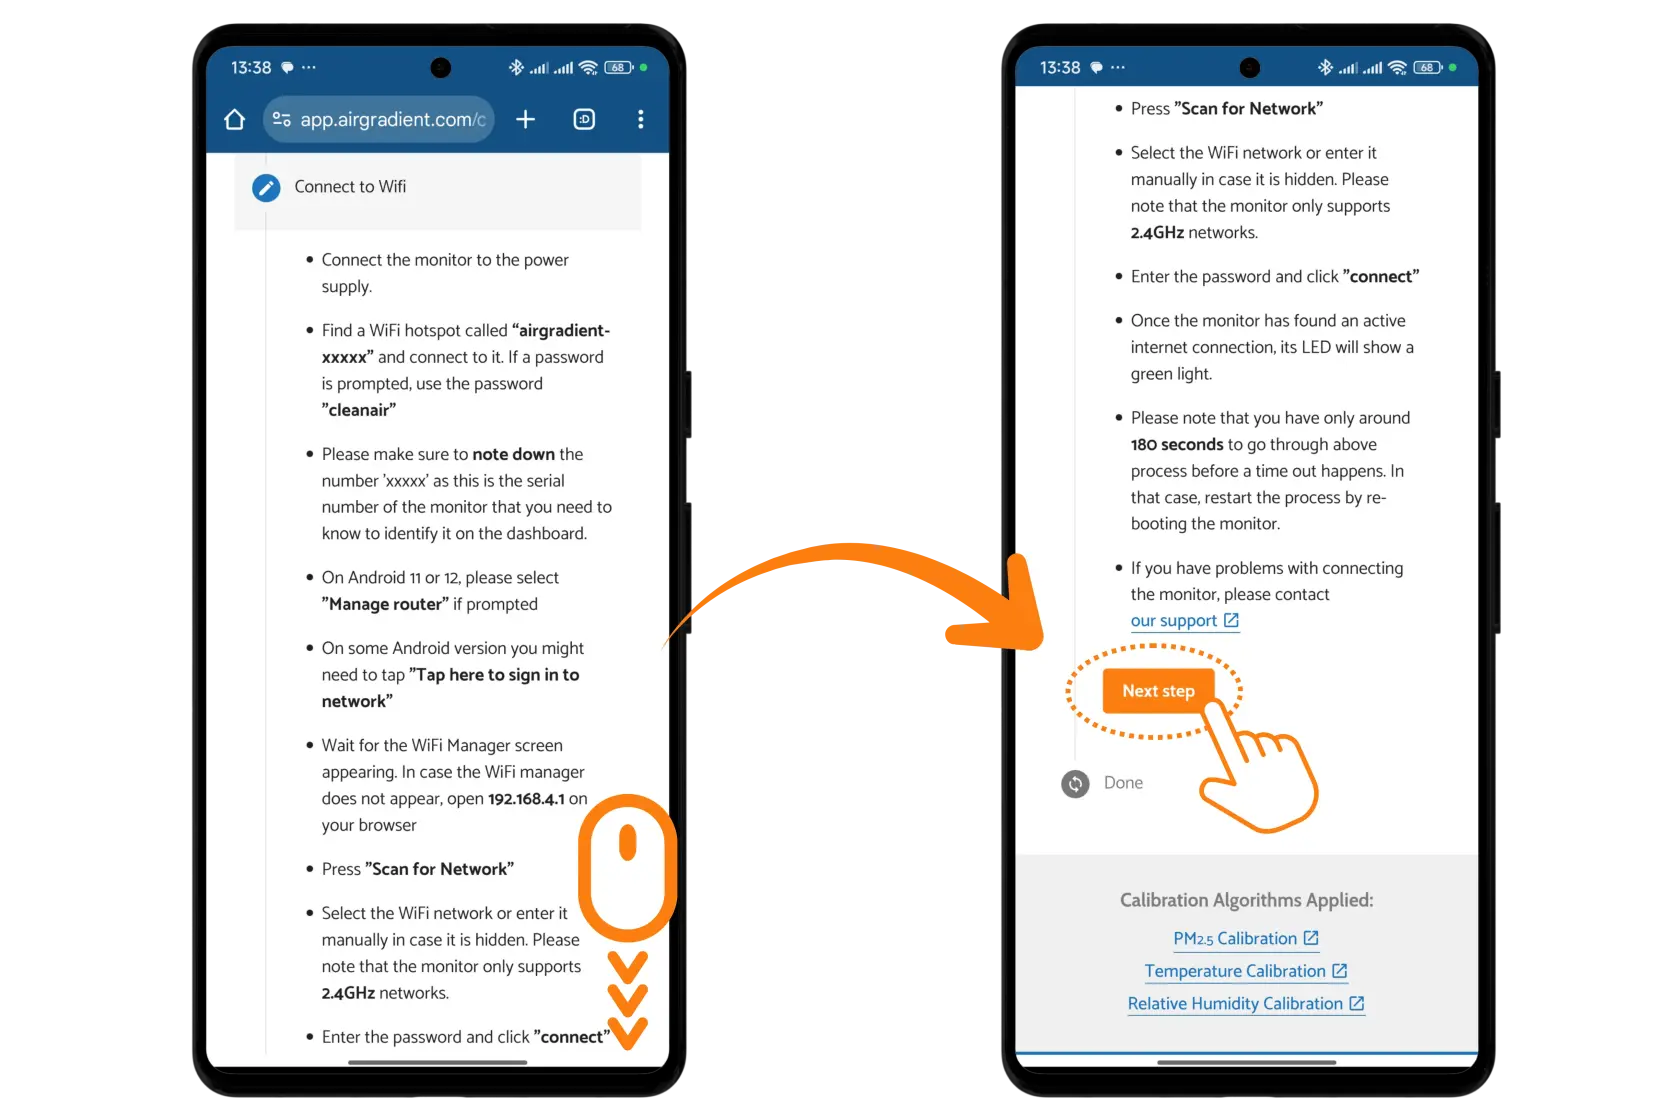
7\. You will next be provided with the steps to connect the device to your WiFi network. If you’ve already connected the device to your network, you can skip this step and click Next Step. Finally, click To Dashboard.
The monitor will now appear in your dashboard. You should see an entry for the monitor on your dashboard, but it will likely show as offline for the first minute or two. Please allow up to five minutes for the monitor to show as online and for the data to begin reporting.
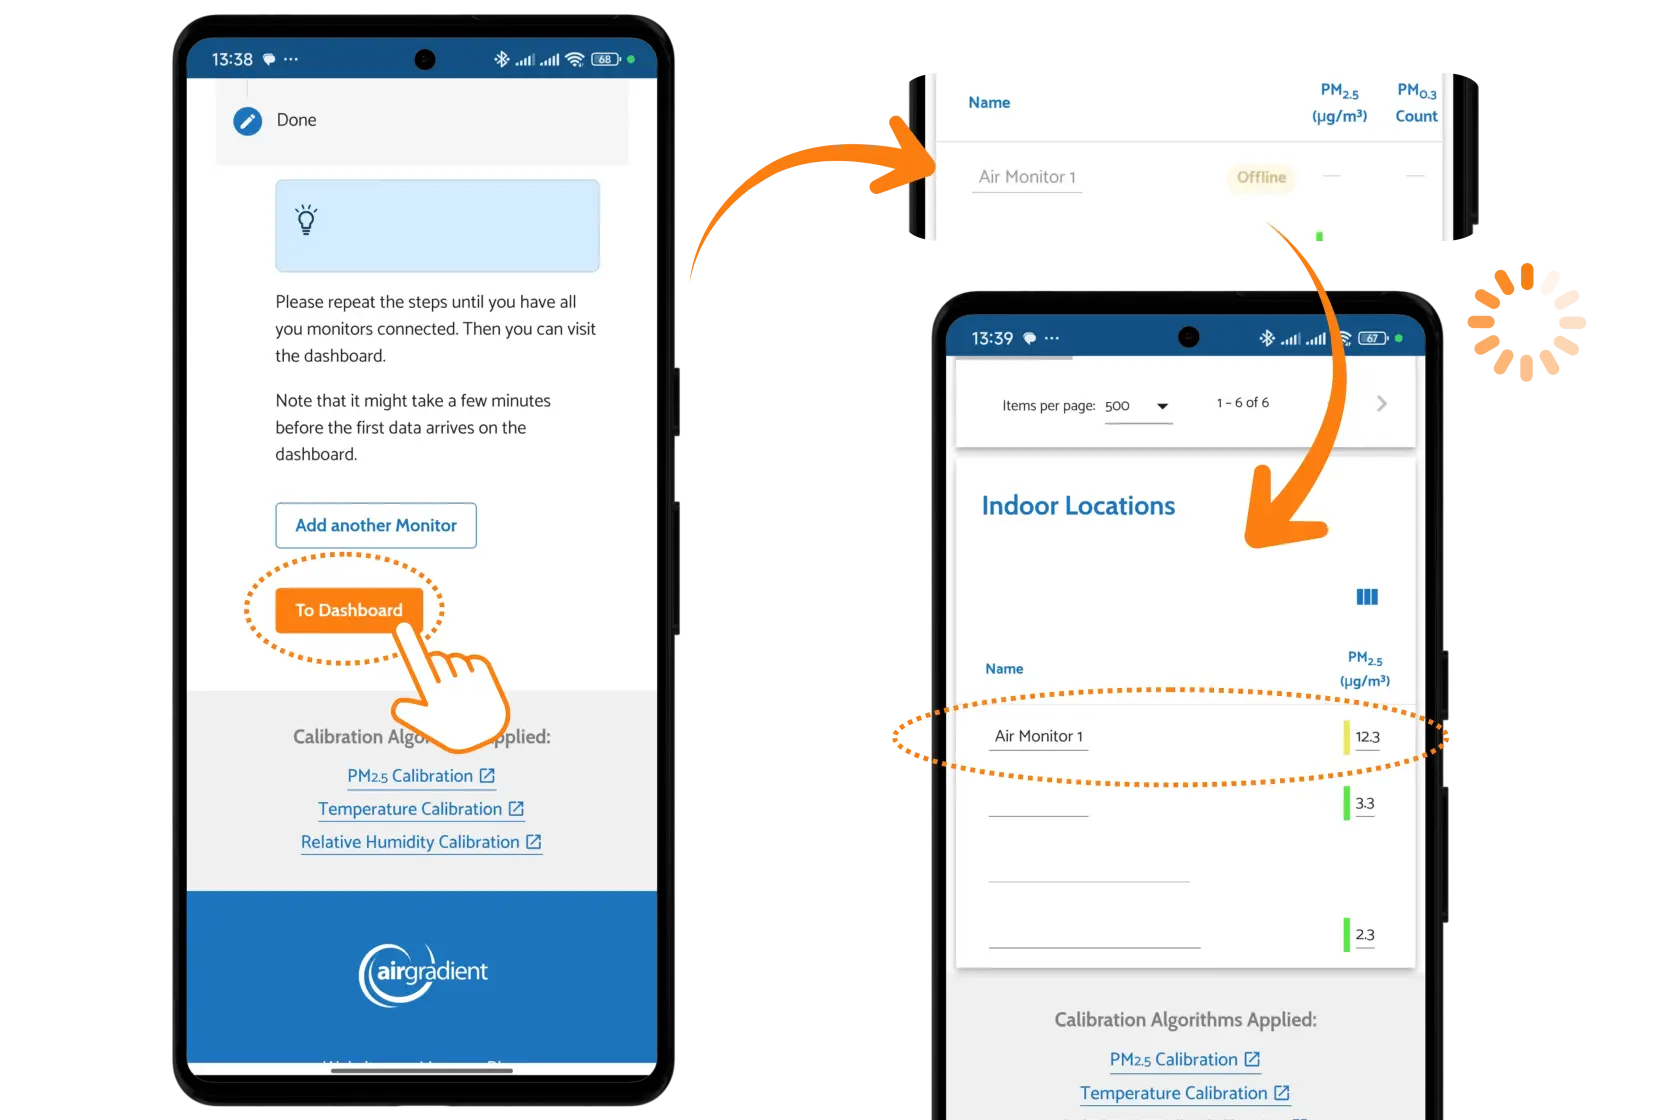
If you don’t begin to receive data after five minutes, please confirm that the serial number
### Adding an additional monitor to an existing dashboard
If you already have an AirGradient dashboard and the device is already connected to Wi-Fi:
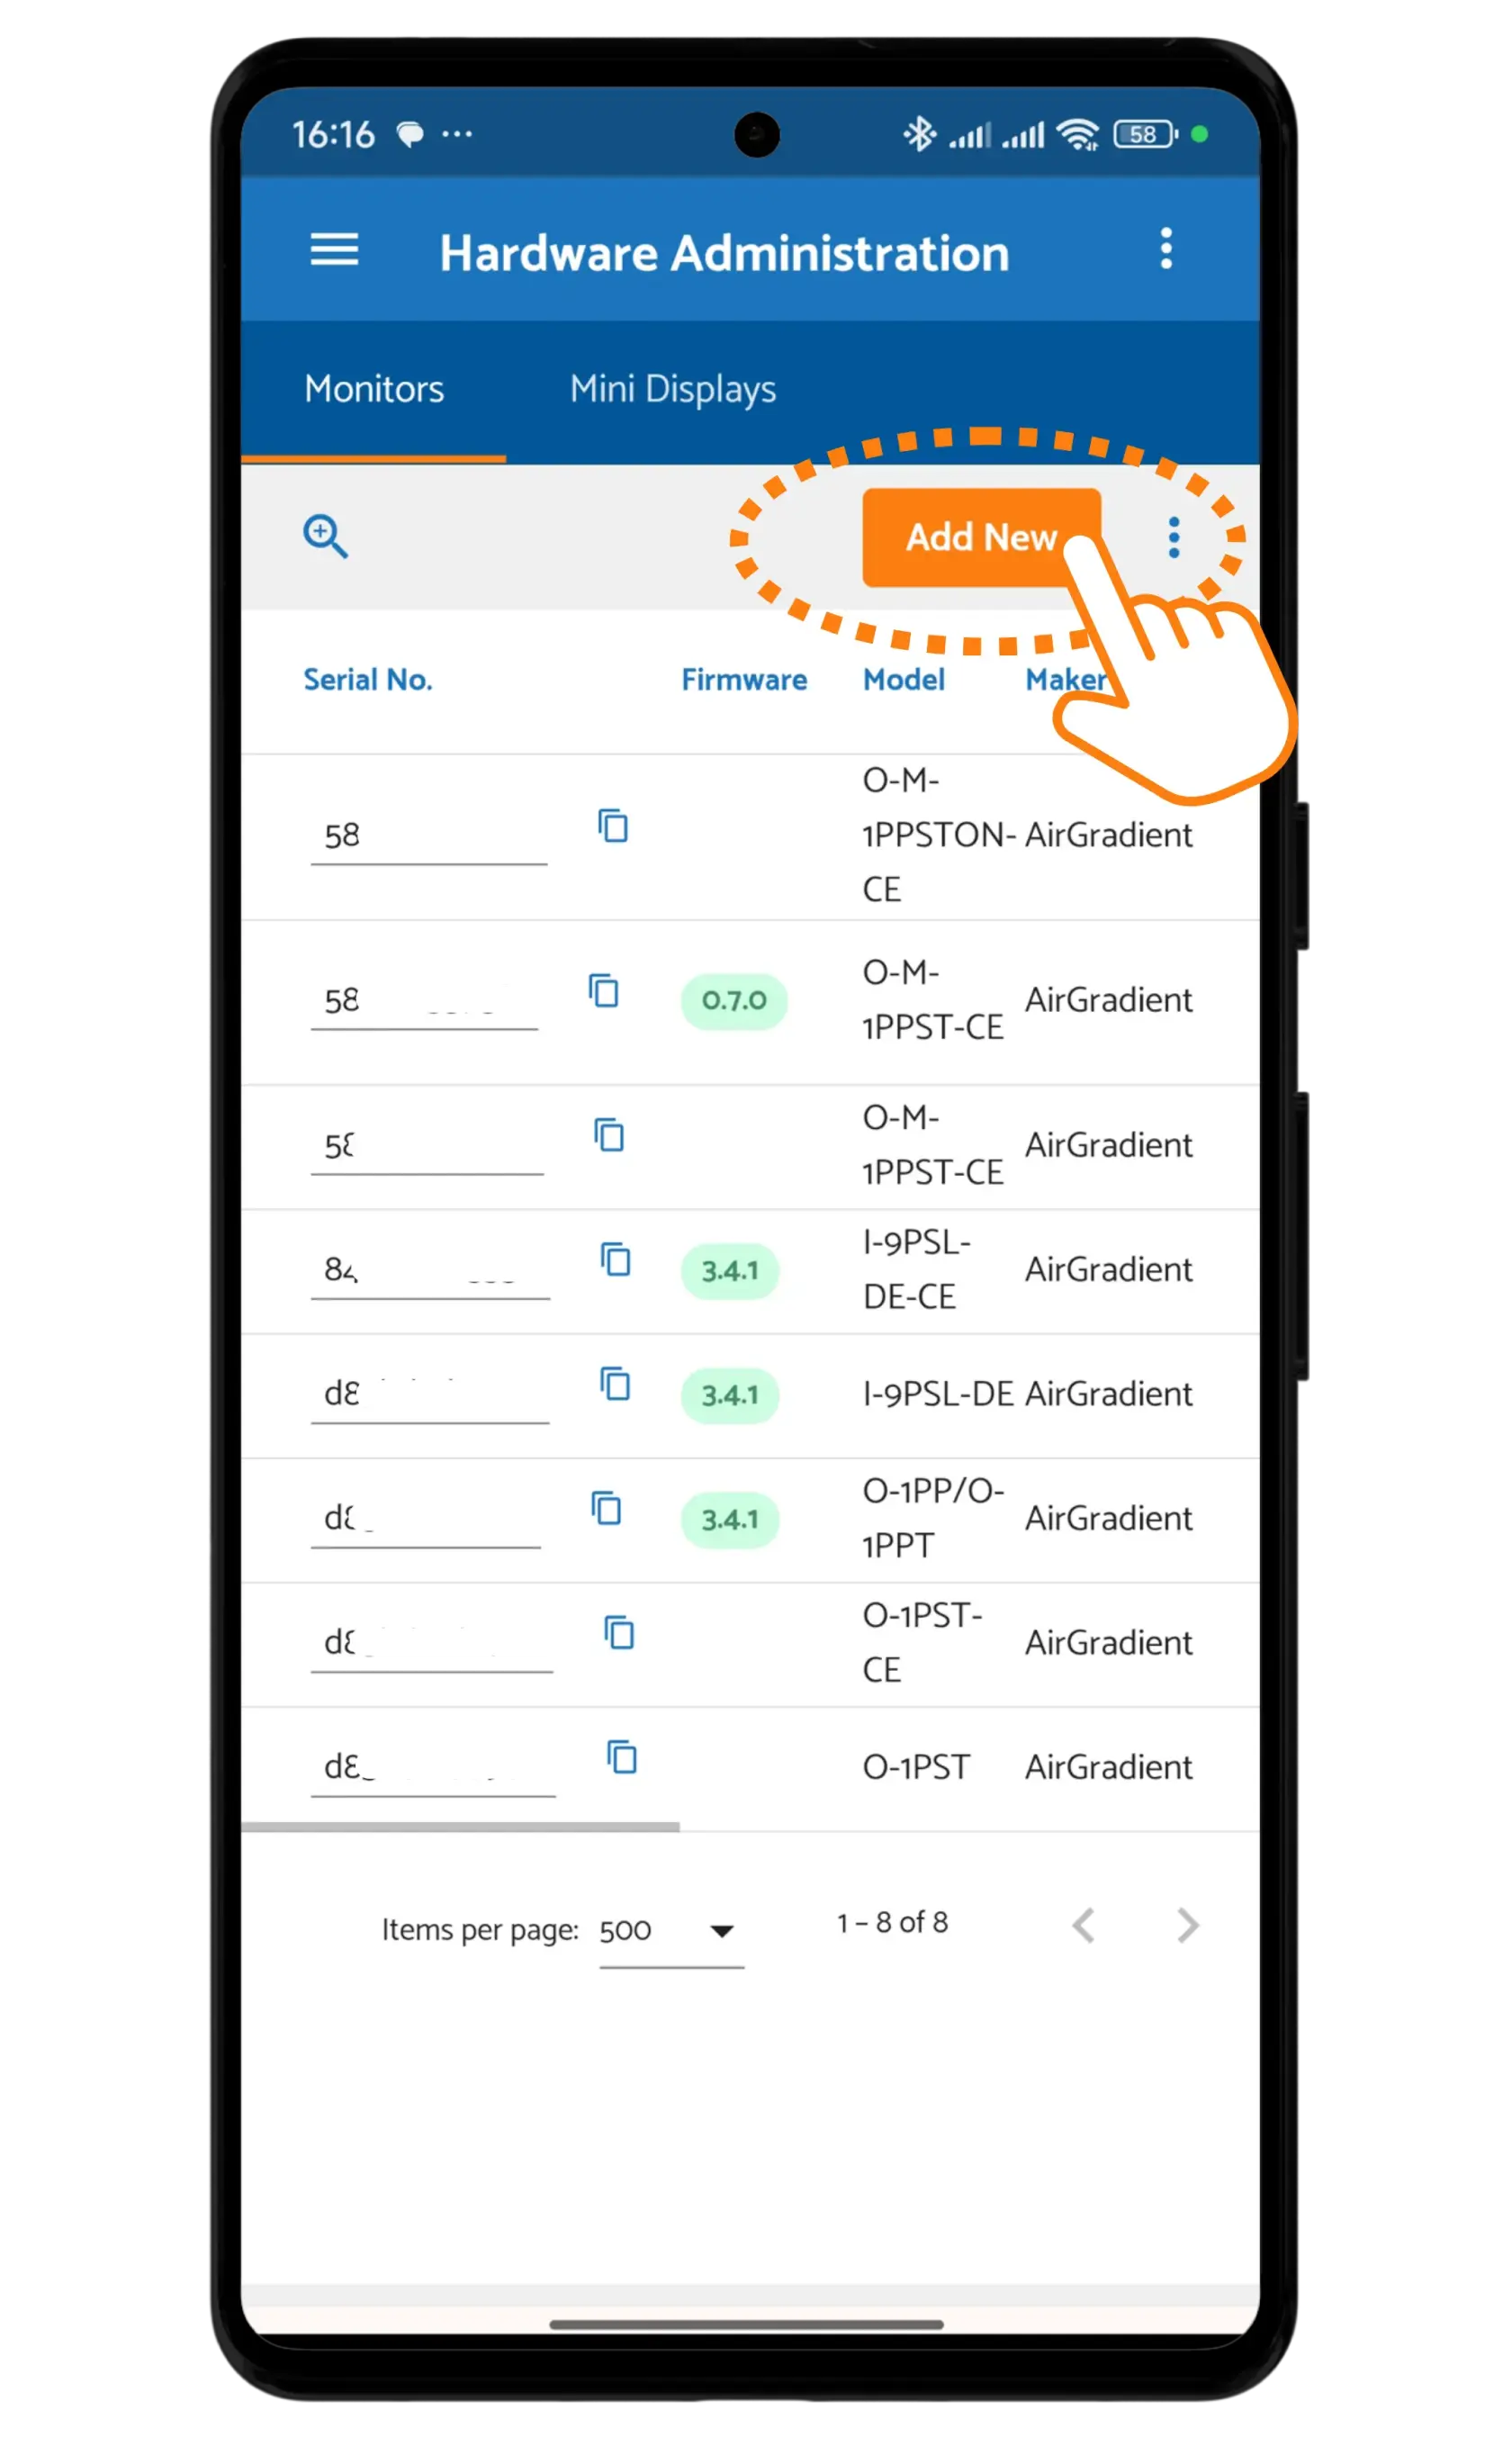
1. Go to Dashboard > Hardware
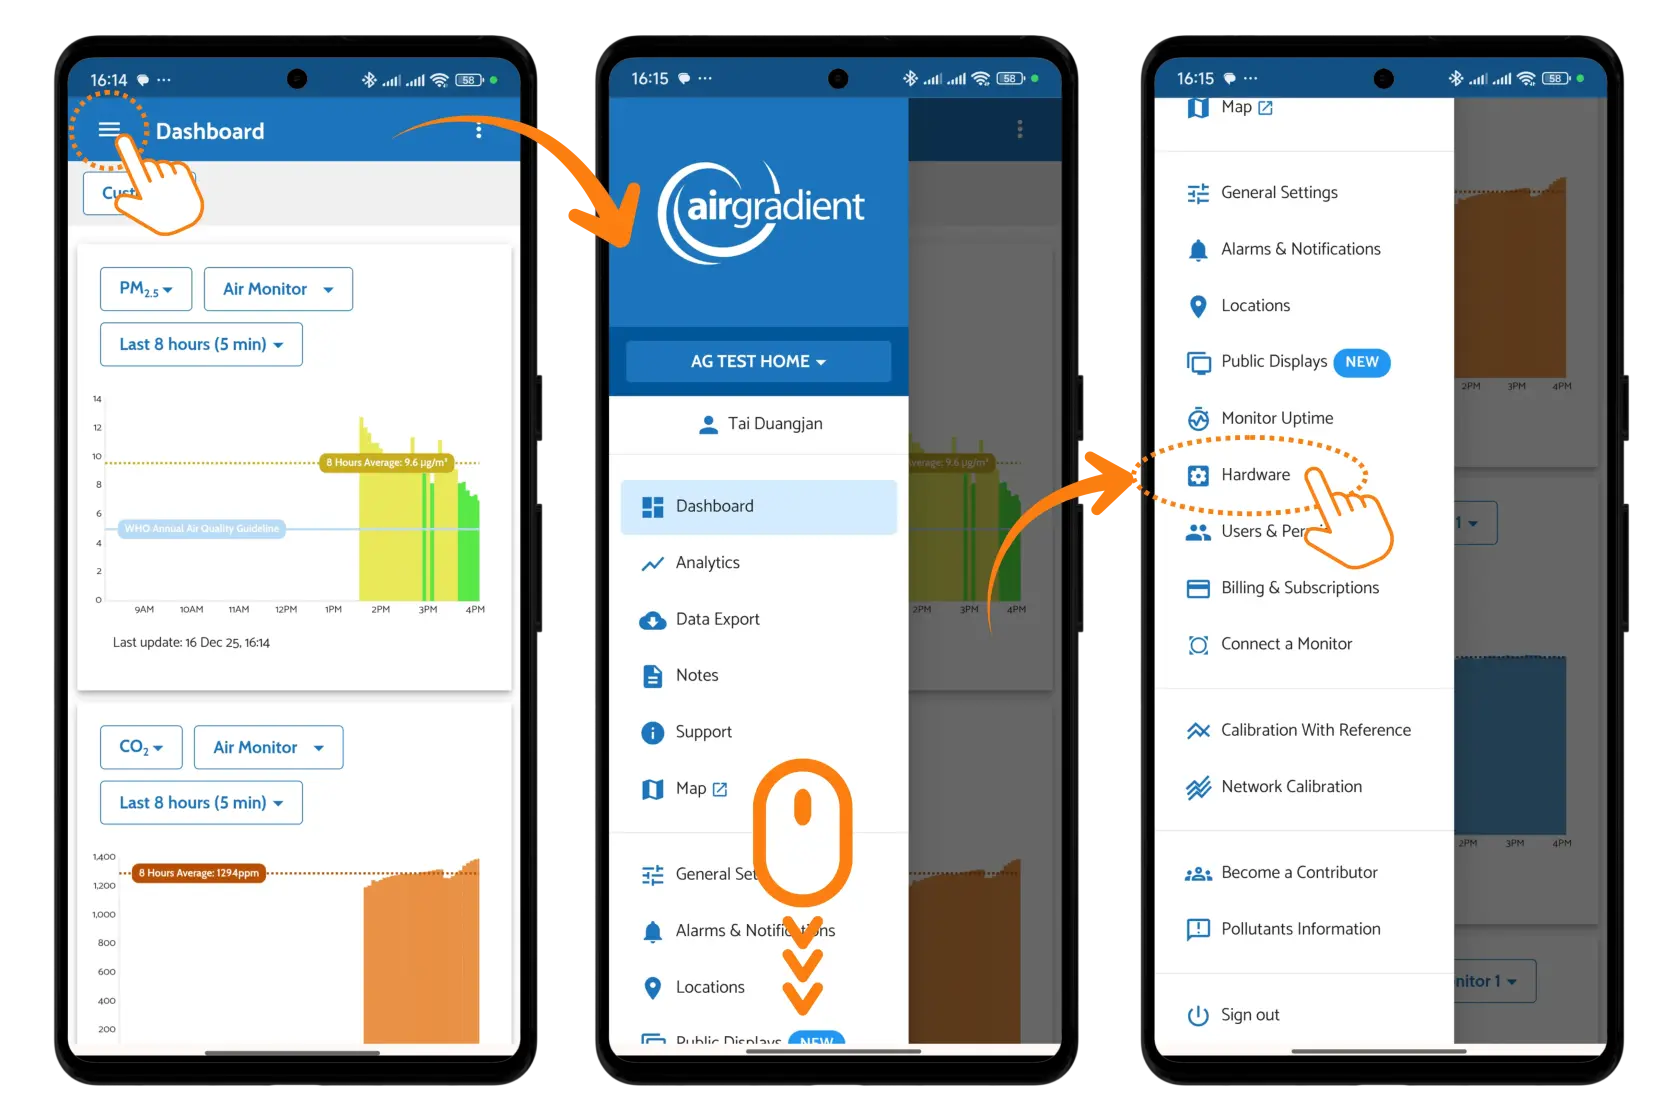
2. Click Add New
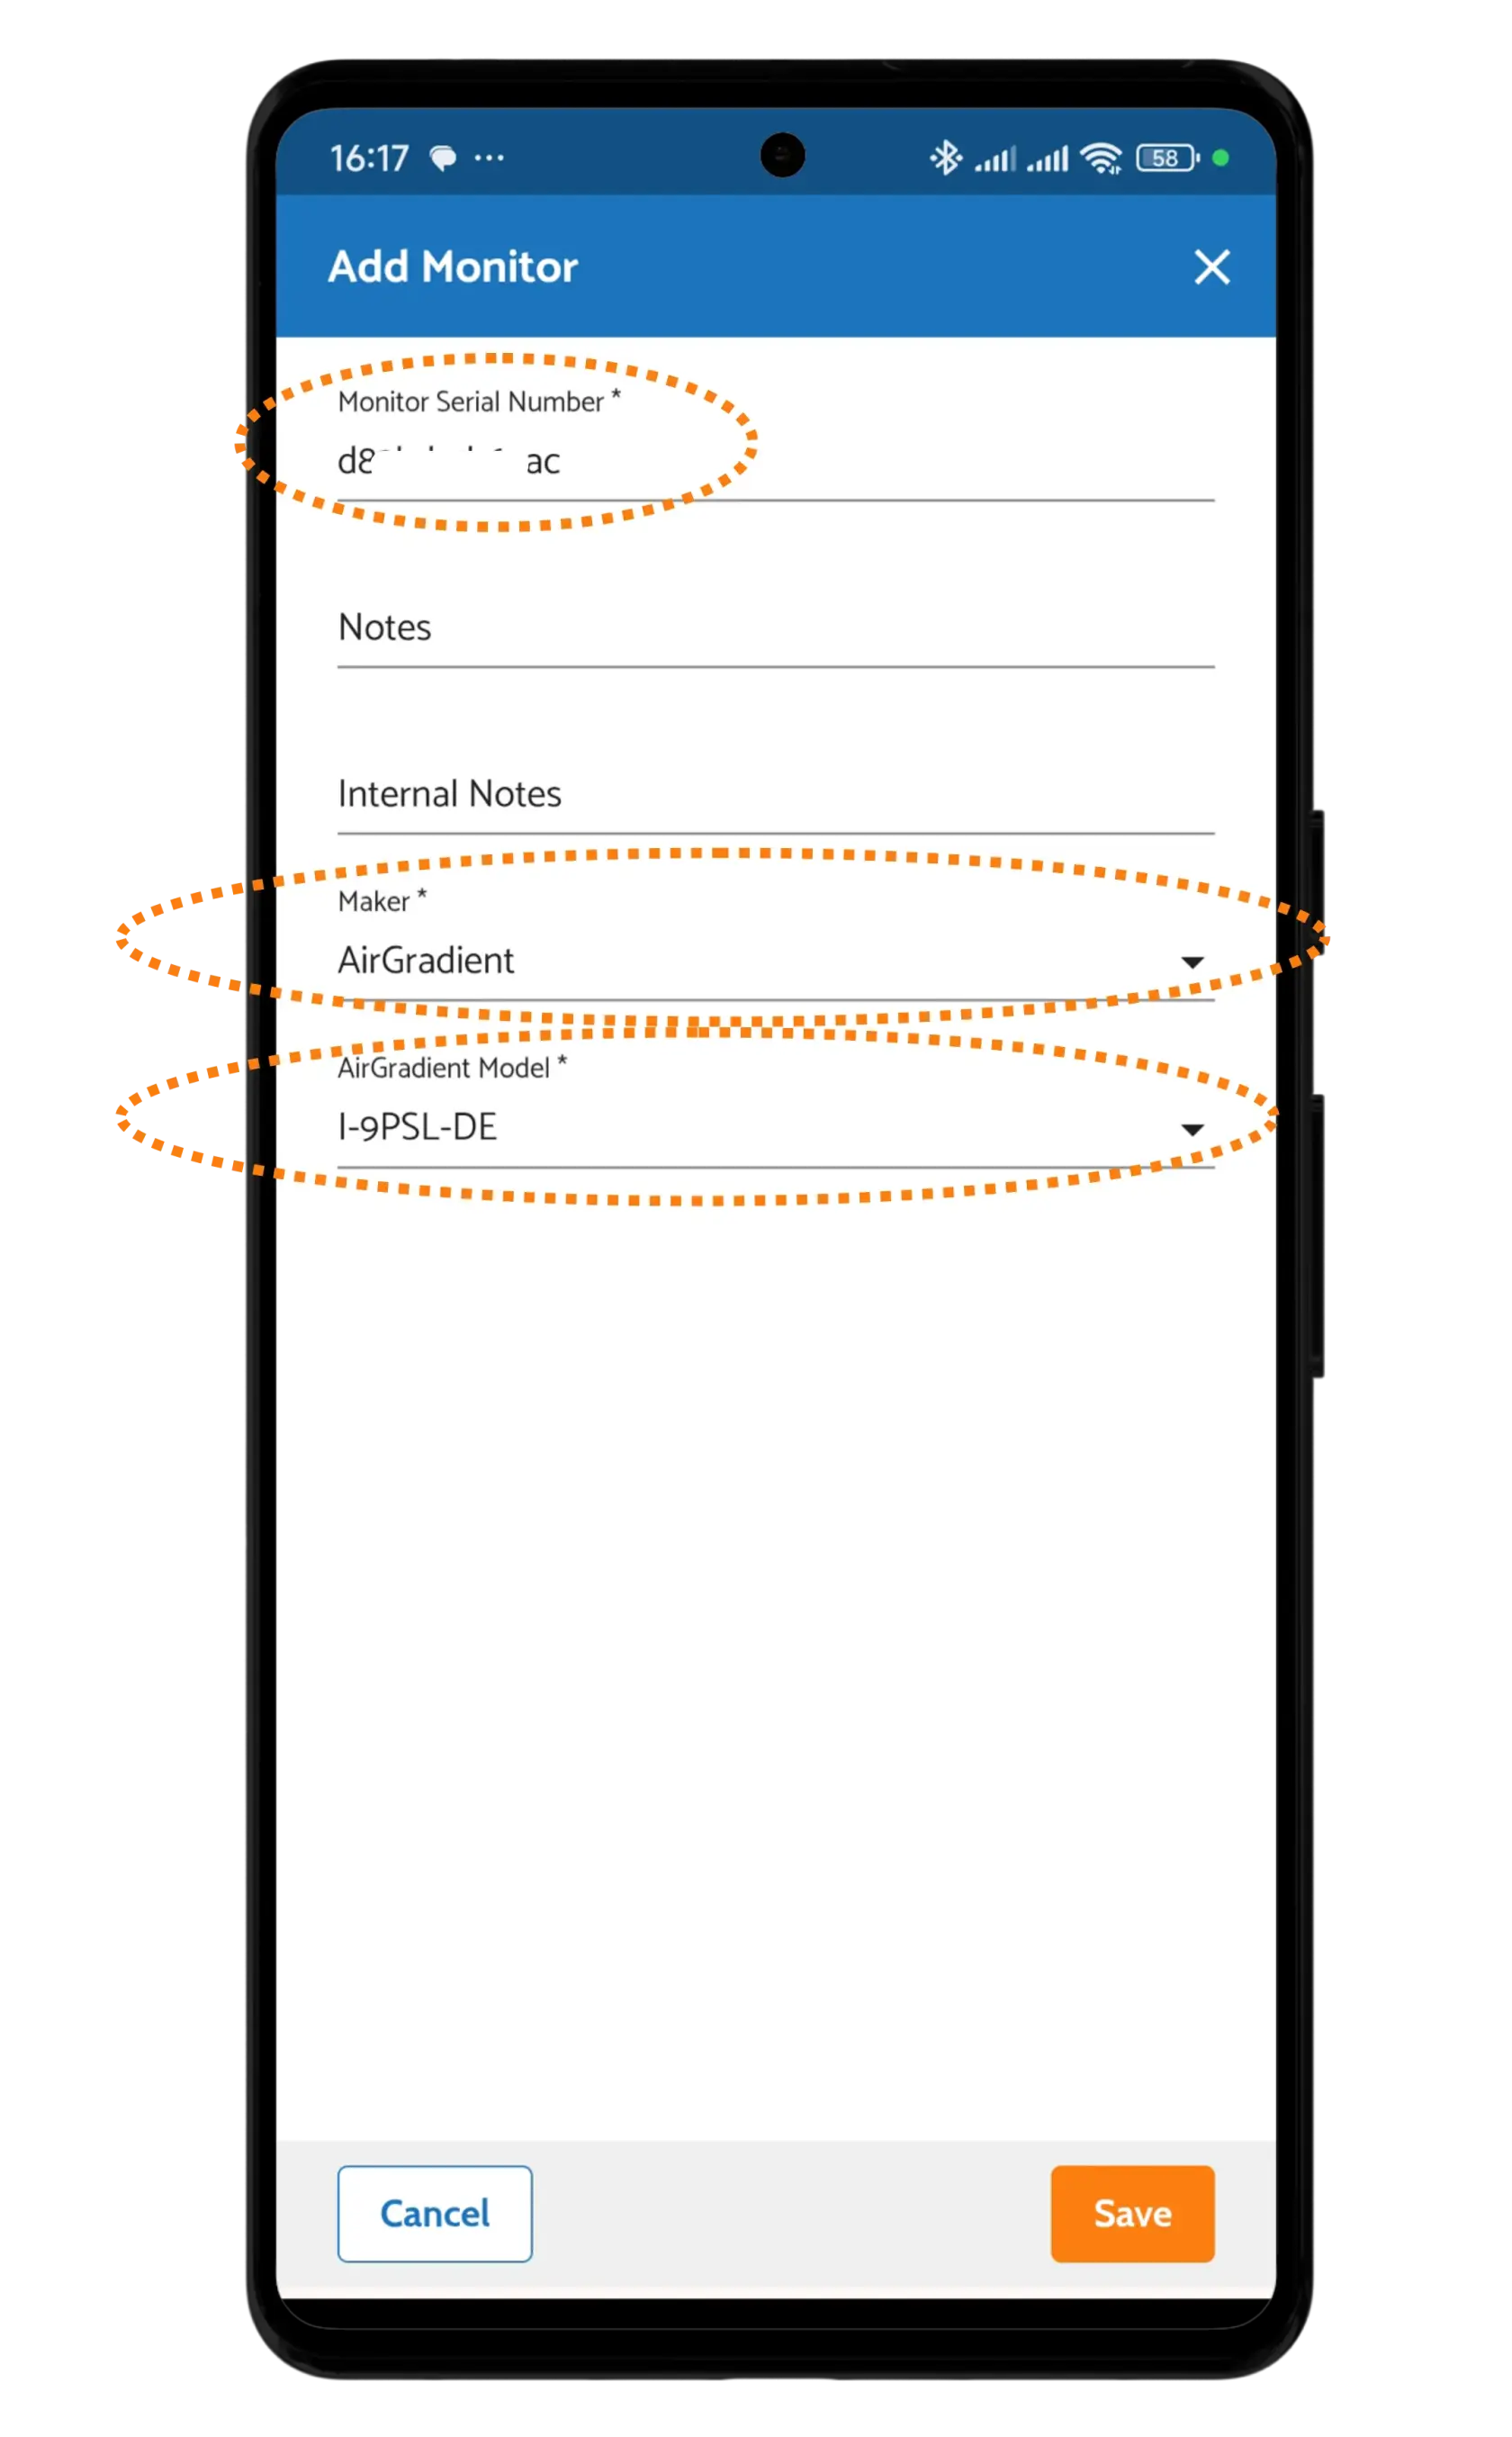
3. Enter:
- Serial number
- Maker: AirGradient
- Model
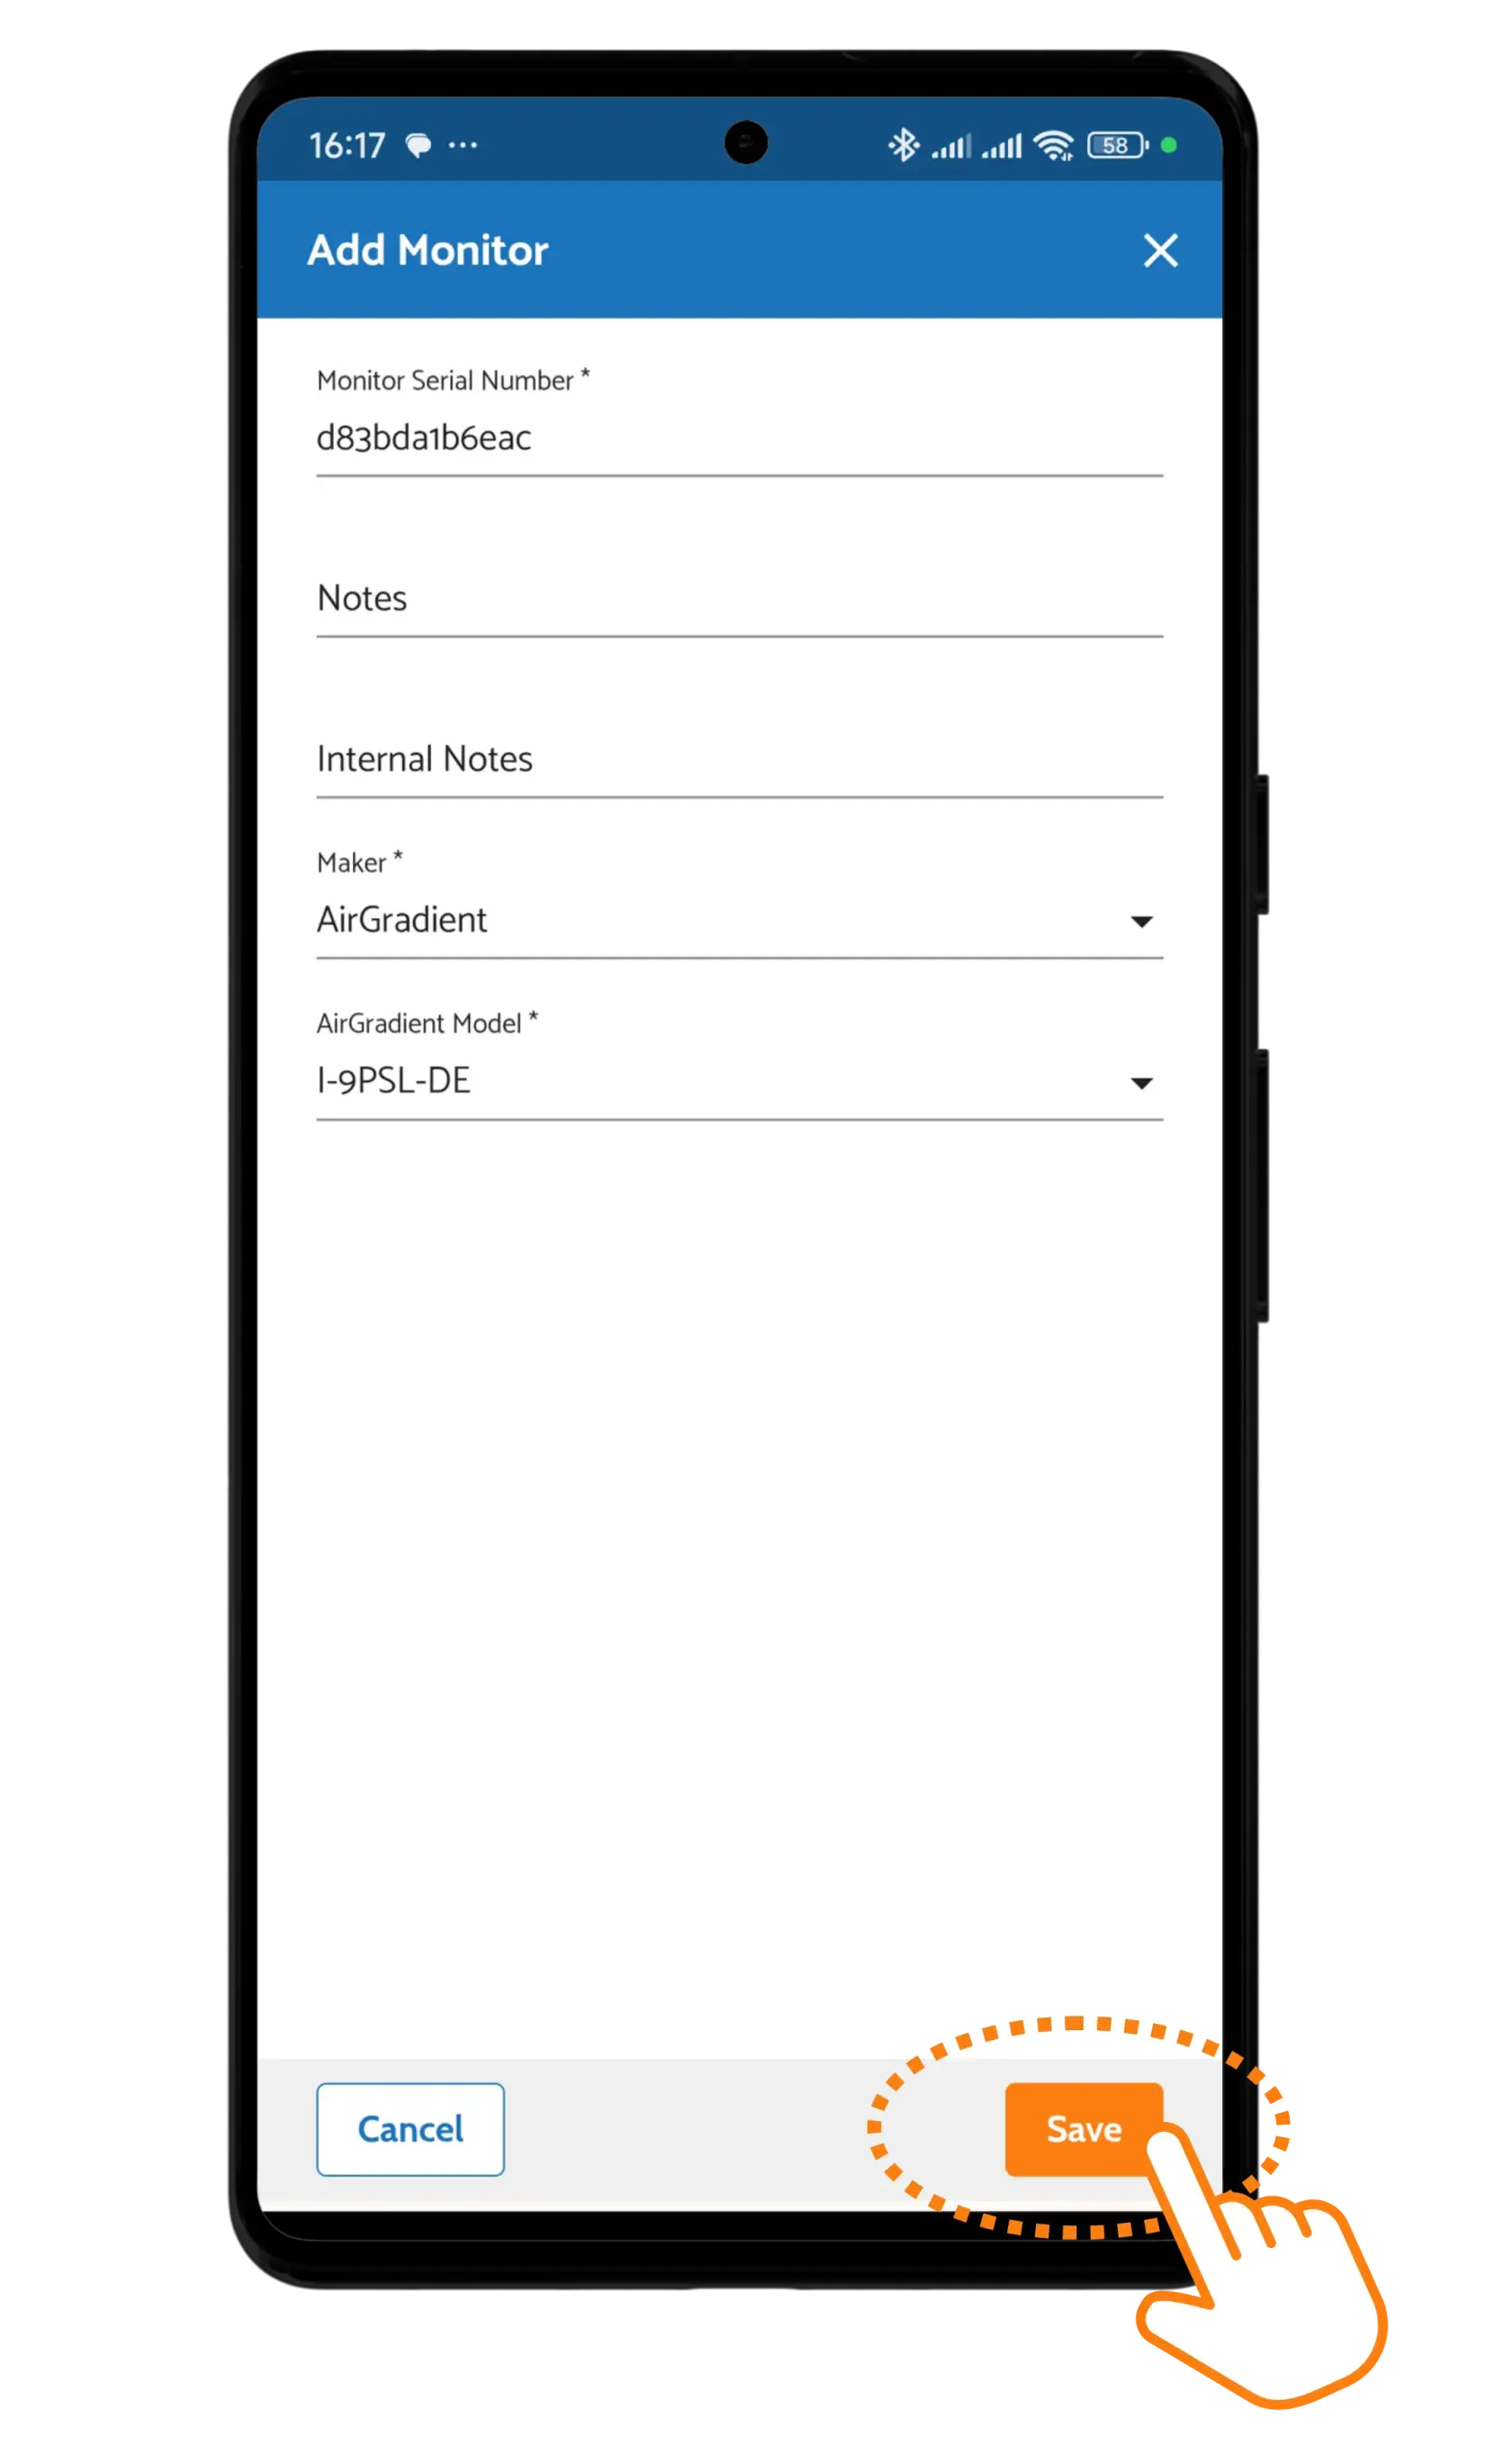
4. Click Save
Please note that adding a hardware entity alone is not enough.
To see data, you must also create a Location and assign the monitor to that location.
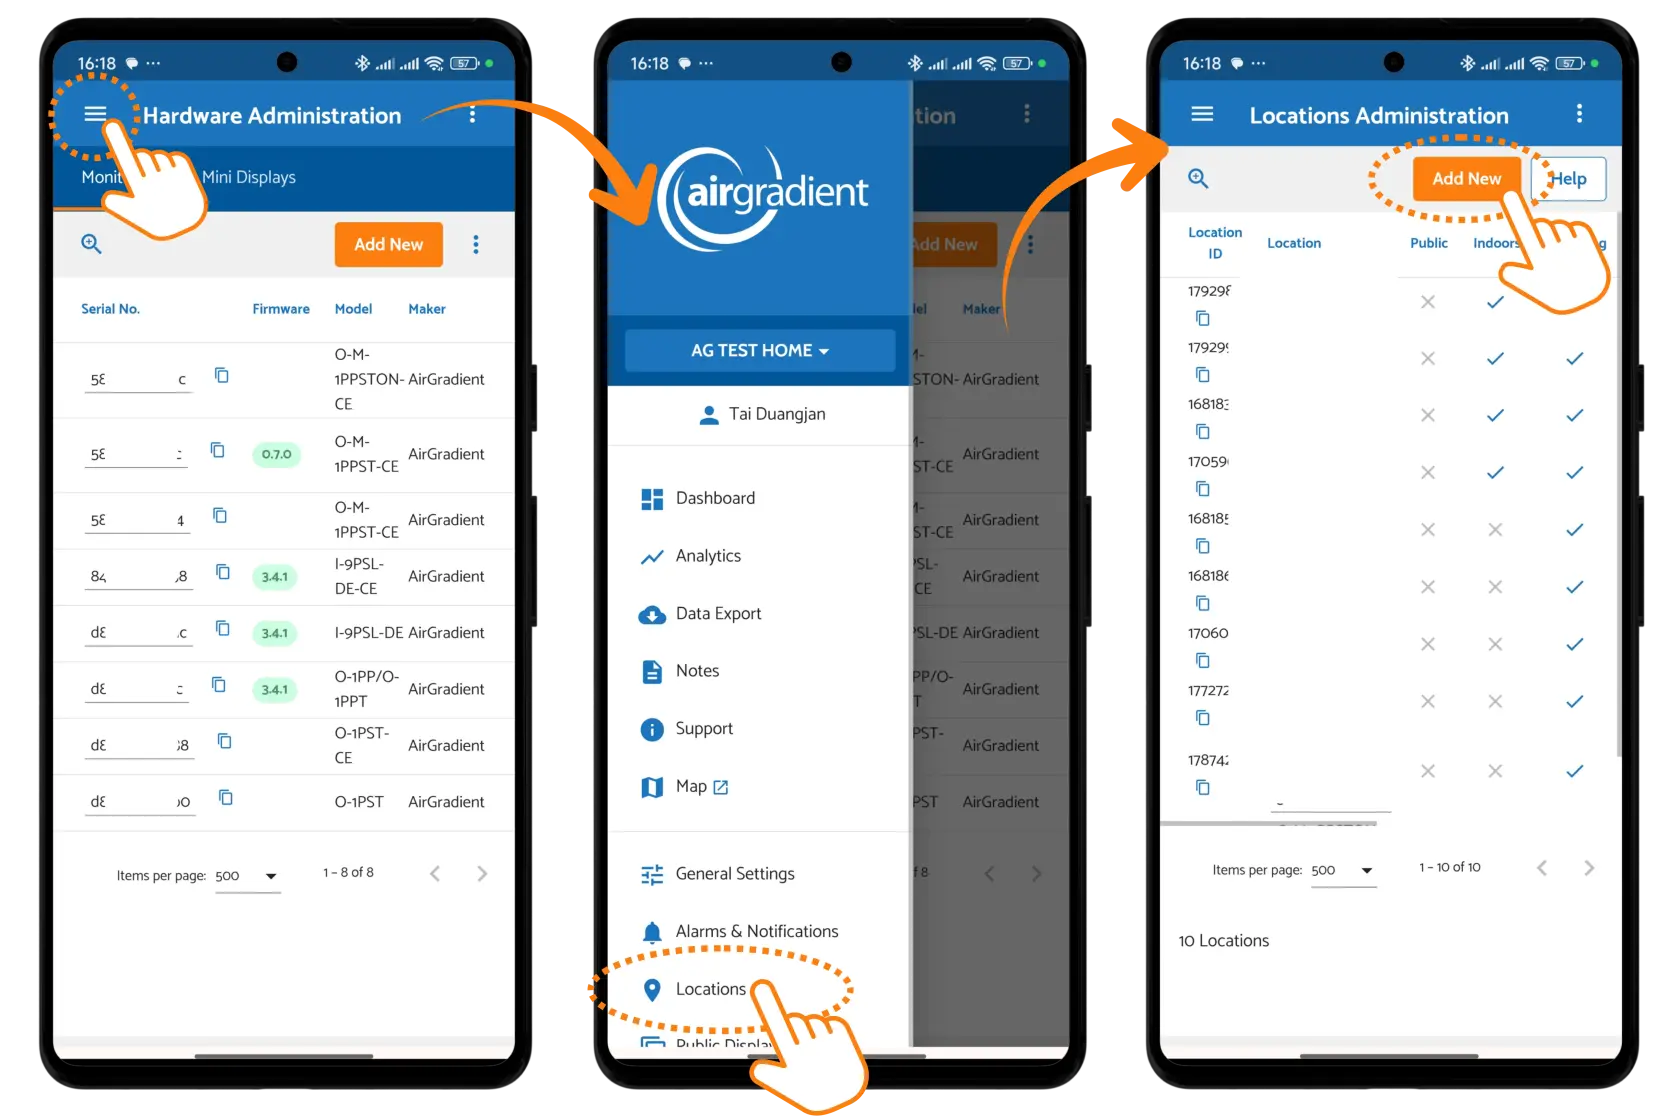
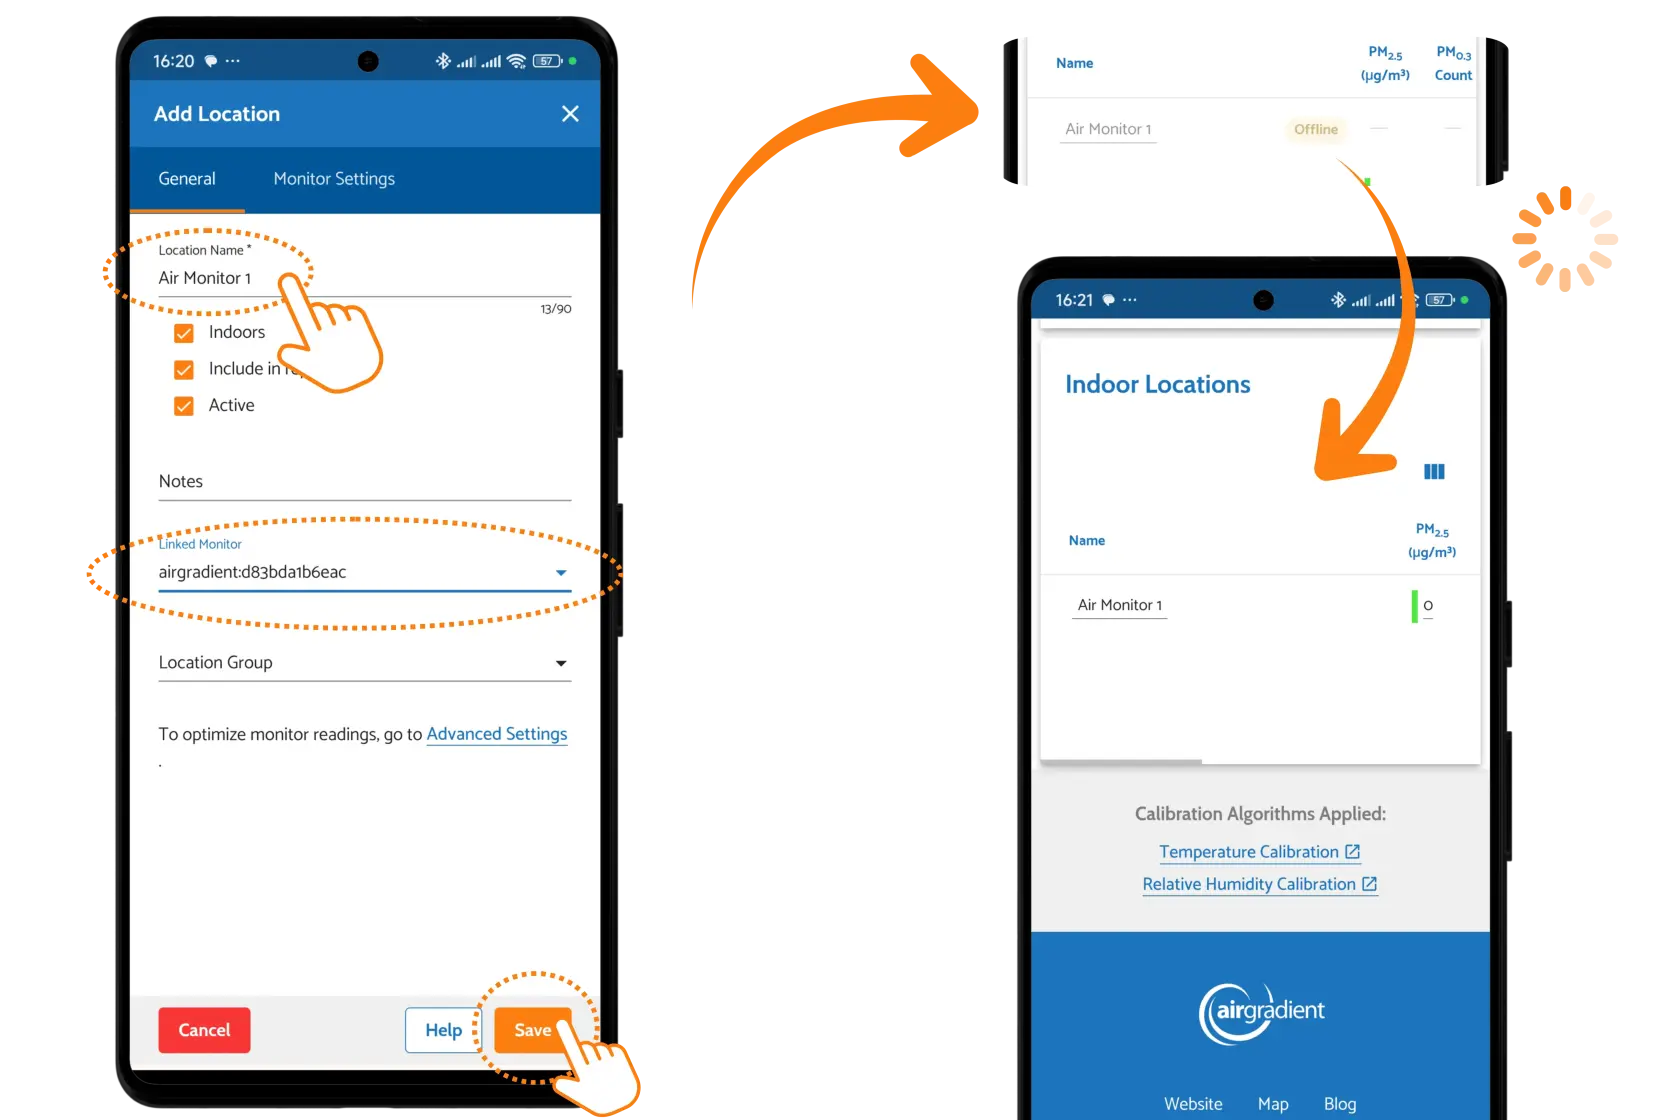
If a location is not created and linked to the hardware entity, the device will appear in the dashboard but you will not see any data until you also create a Location and tie the monitor to that location.
# How do I mount or place the AirGradient ONE properly?
The AirGradient ONE comes with multiple mounting and cable-management options, making it a flexible air quality monitor that can be mounted on a wall or sat on a desk (using the included stands).
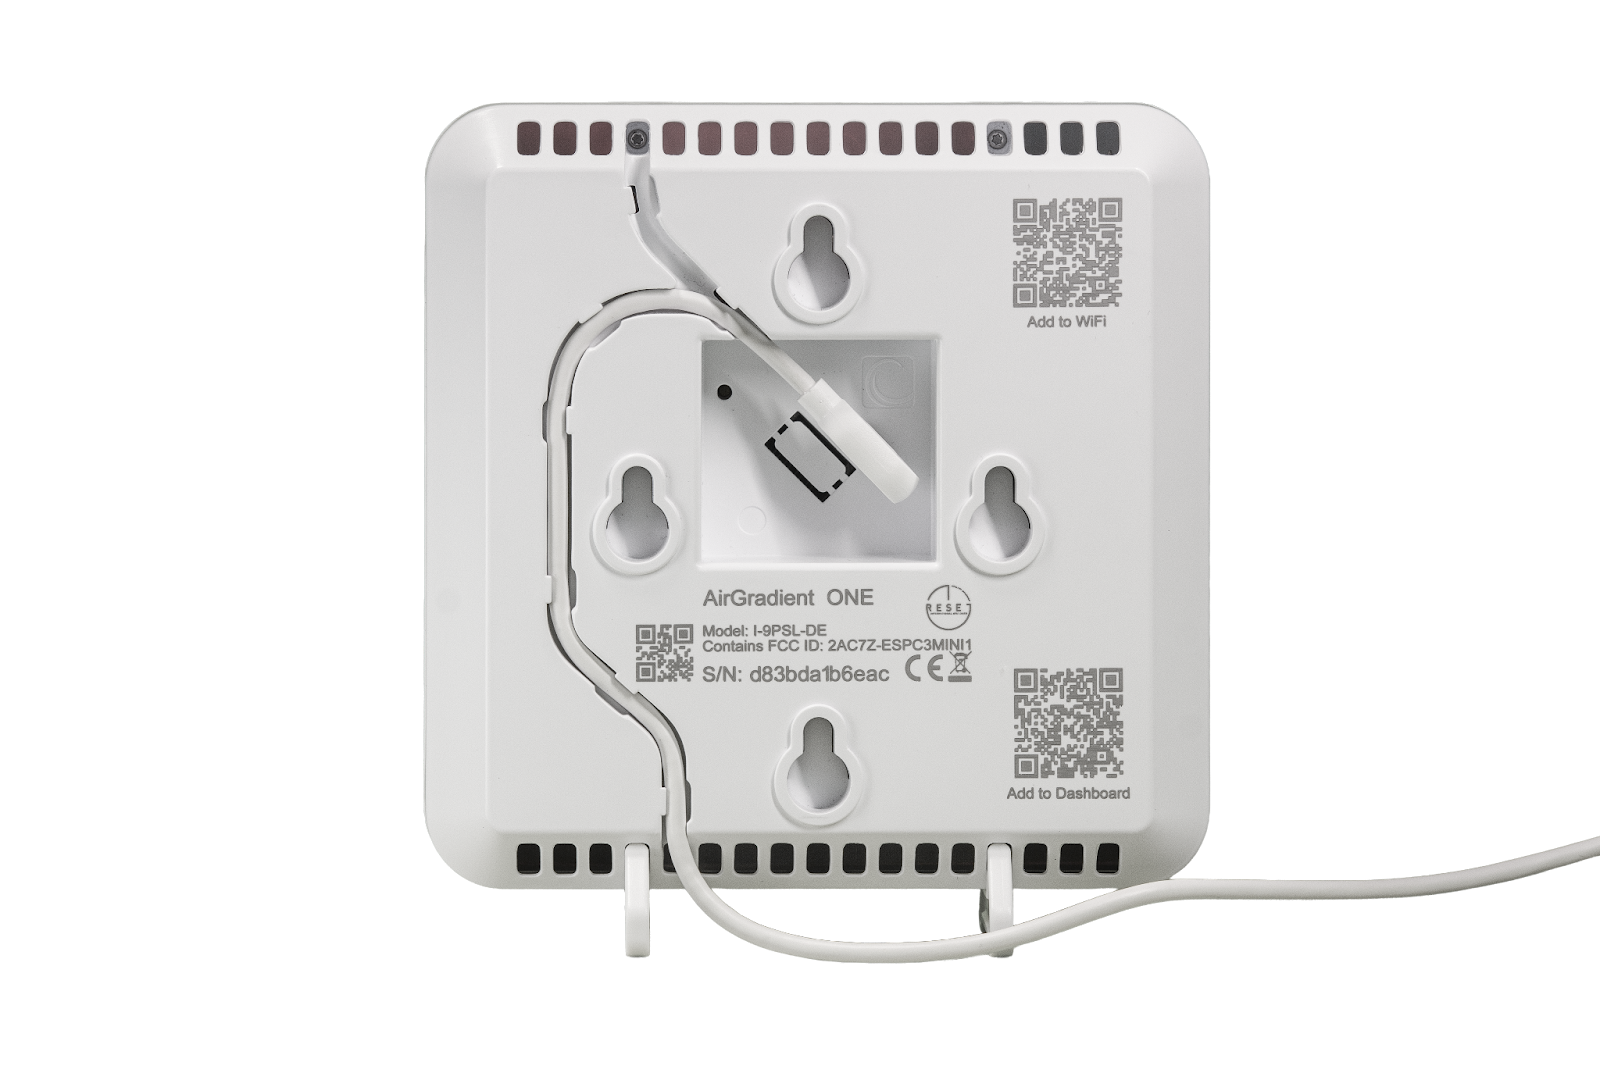
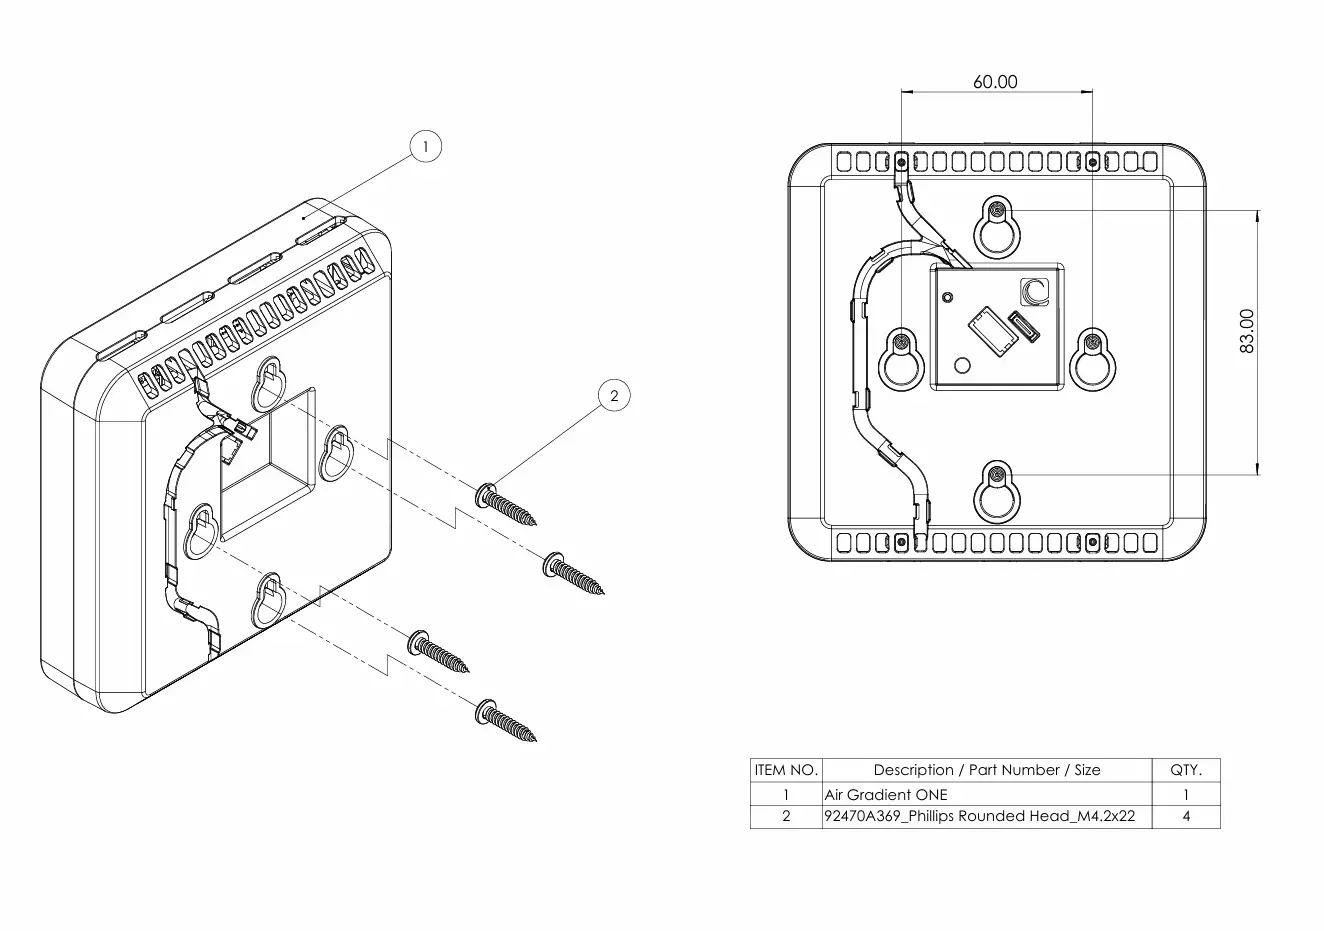
The four holes located on the top, bottom, left and right of the device allow it to be mounted on a wall via a M4 screw or screws. These holes align with U.S. and EU junction boxes. While the device will be secure with just one screw at the top of the monitor, it can easily be tilted or turned off-axis, so we recommend using the left and right mounting holes if possible, preventing any movement of the device.
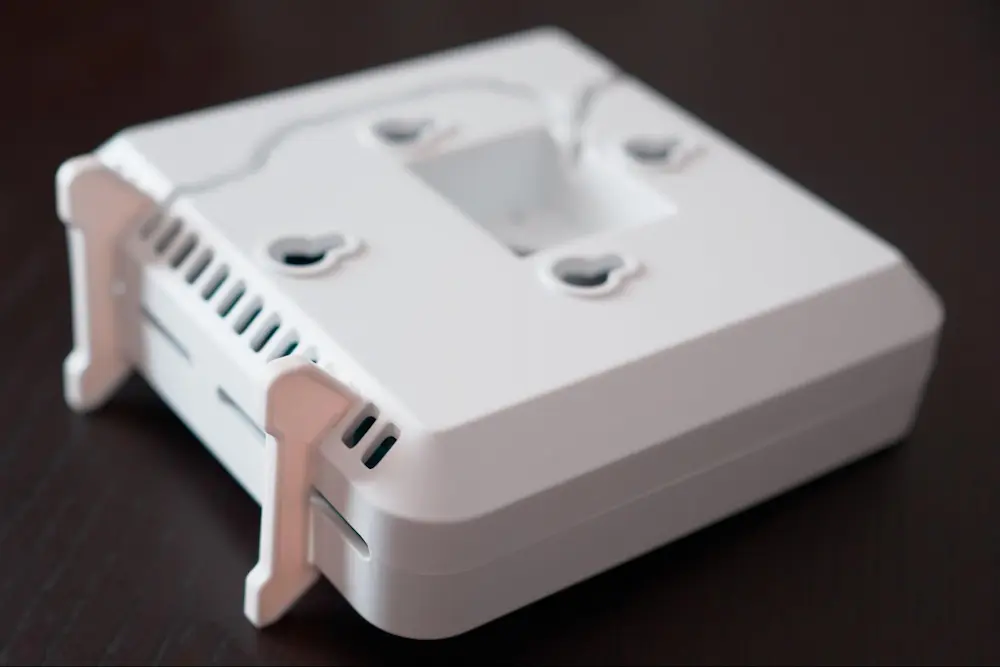
If you want a temporary installation or prefer to have the monitor on a desk or shelf, we also include two plastic stands that can be slid into the vents at the bottom of the device. These feet allow you to stand the monitor on any flat surface easily.
While it depends on the installation, we generally recommend routing the cable downwards through the channel on the back of the device if using the included stands. If mounted on a wall, you can either use the top or bottom channel, depending on your setup.
It’s important to note that while any USB Type-C cable can be used with this device, only the included 2-metre 90-degree Type-C cable allows it to sit flush with a wall or any other surface it’s mounted on. Also, please note that the AirGradient ONE does not come with a USB adapter.
### Wall-Mounting Considerations
**Height:** Please do not place the sensor below 100cm or above 300cm on the wall. Ideally, it should be placed between 150 and 250cm.
**Orientation:** Ensure that the monitor is mounted on the wall in the correct orientation and has unobstructed airflow at the bottom and top of the monitor.
**Walls:** Please ensure that the walls are not hot due to outside exposure, which might negatively influence the temperature sensor.
**Sunlight:** To get accurate temperature readings, please ensure that the sensor unit is not exposed to direct sunlight at any time of the day,
**Doors/Windows:** To ensure stable readings, we recommend not placing the sensor unit close to doors or windows.
**Air Conditioner / Ventilation Outlet:** Please do not place the sensors closer than 90cm to any A/C or ventilation outlet. Furthermore, for the best results, avoid placing the device in front of an AC unit.
**Distance from Pollution Sources:** Avoid placing the monitor too close to direct pollution sources such as ovens, fireplaces, or other localised emission sources that could skew the readings.
**Heat Sources:** If possible, place the device away from heat sources such as large electronics/appliances.
### Desk-Mounting Considerations
### 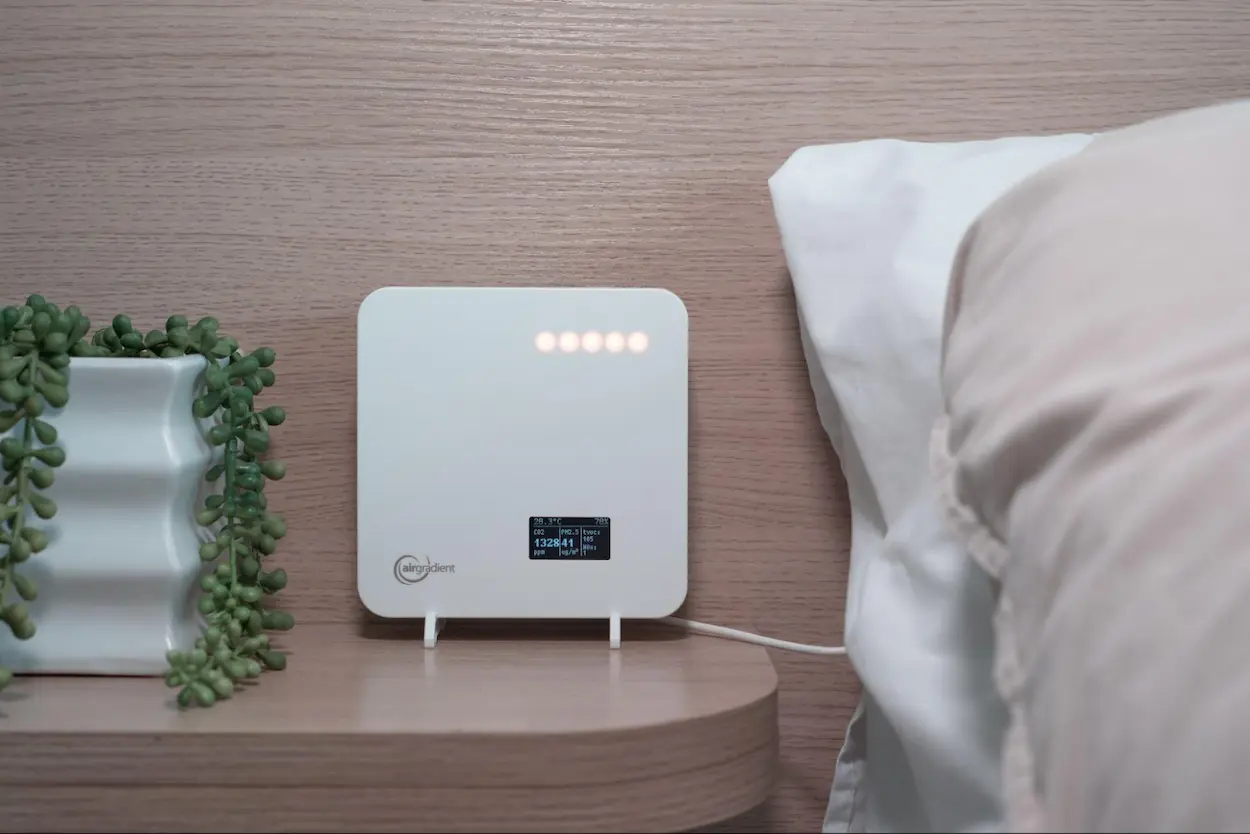
Alongside the above considerations for airflow (avoid proximity to pollution sources, keep the device out of direct sunlight, etc.), there are a few other considerations if you want to use the feet and place the monitor on a desk or shelf.
**Monitor Stands:** Ensure you use the included stands for the monitor. These provide clearance at the bottom of the device, ensuring good airflow despite the venting facing the bottom of the device.
**Ventilation:** Place the device somewhere with space around it. For example, placing the monitor on a bookshelf with only a few centimetres of clearance above the monitor can result in poor airflow and incorrect reading.
You can download the PDF with instructions [here](https://www.airgradient.com/documents/mounting-instructions/AirGradient-ONE-Installation-Instructions.pdf).
# Resetting Wi-Fi Configuration / Connecting to a different Wi-Fi network
You can perform a factory reset by pressing and holding the BOOT button on the back of the device for about 10 seconds.
Here’s a video guide: [How to Perform a Factory Reset](https://www.youtube.com/watch?v=wL77TqpCZAg)
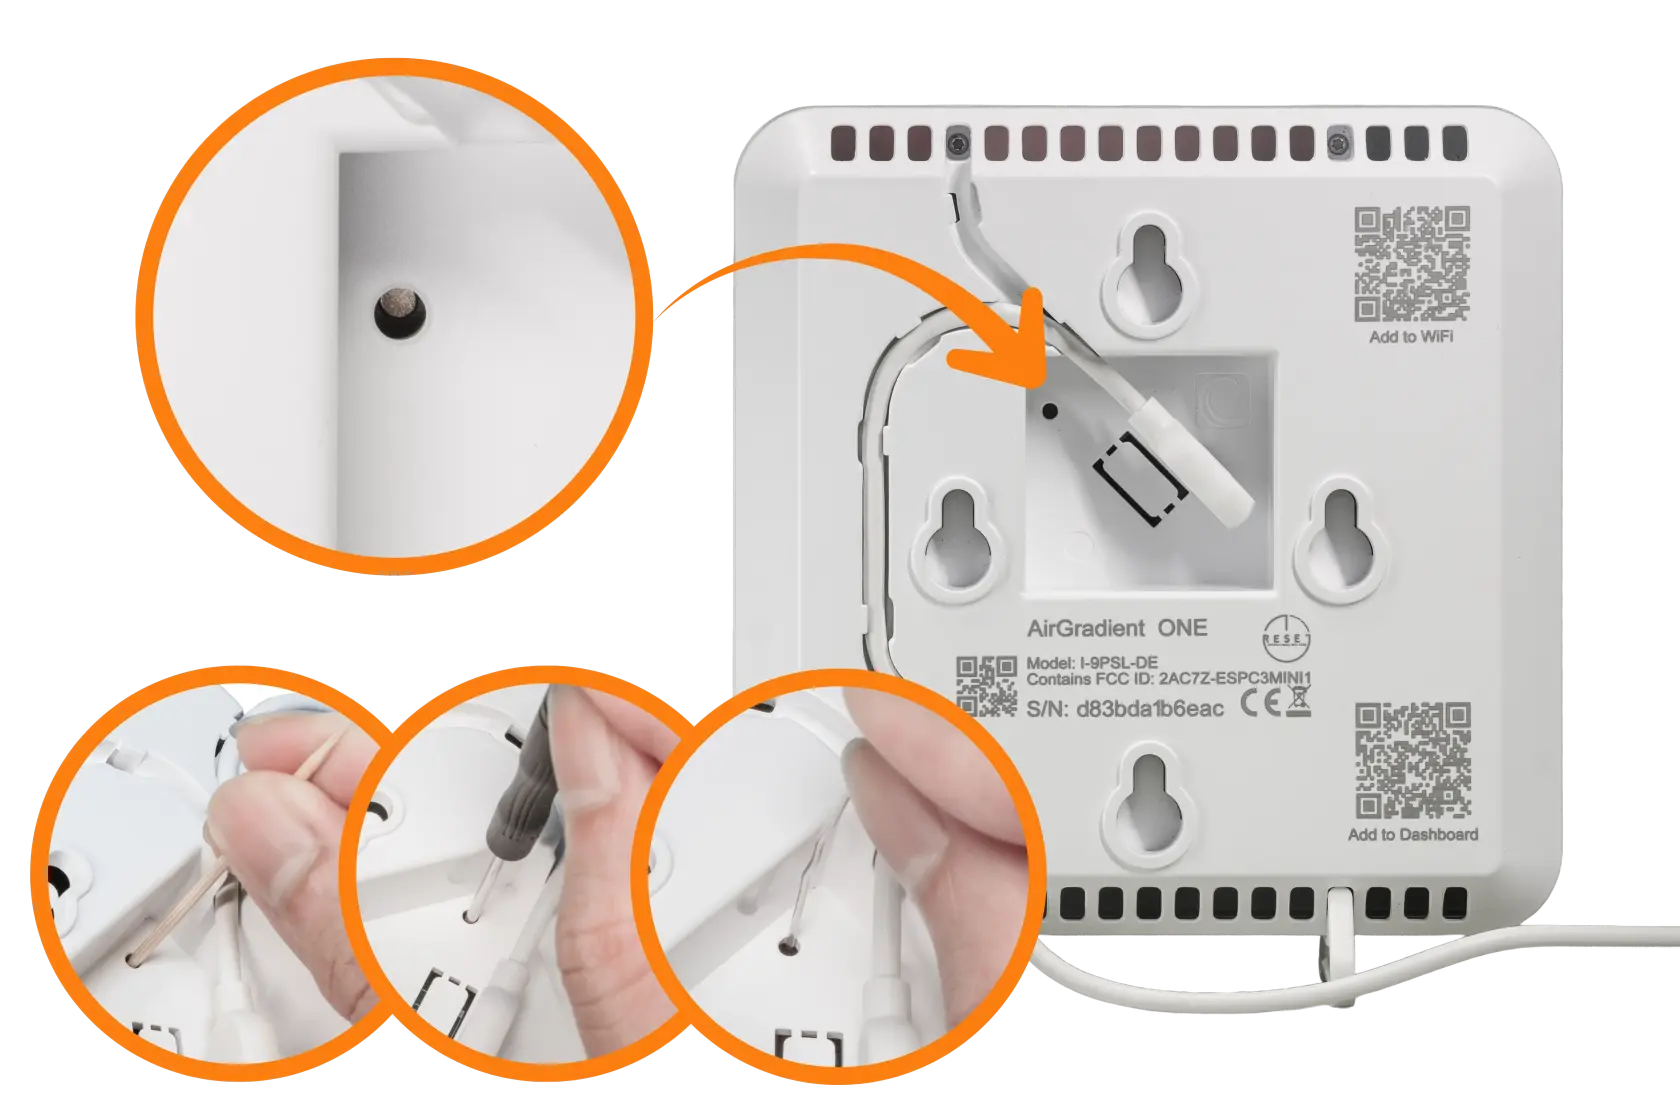
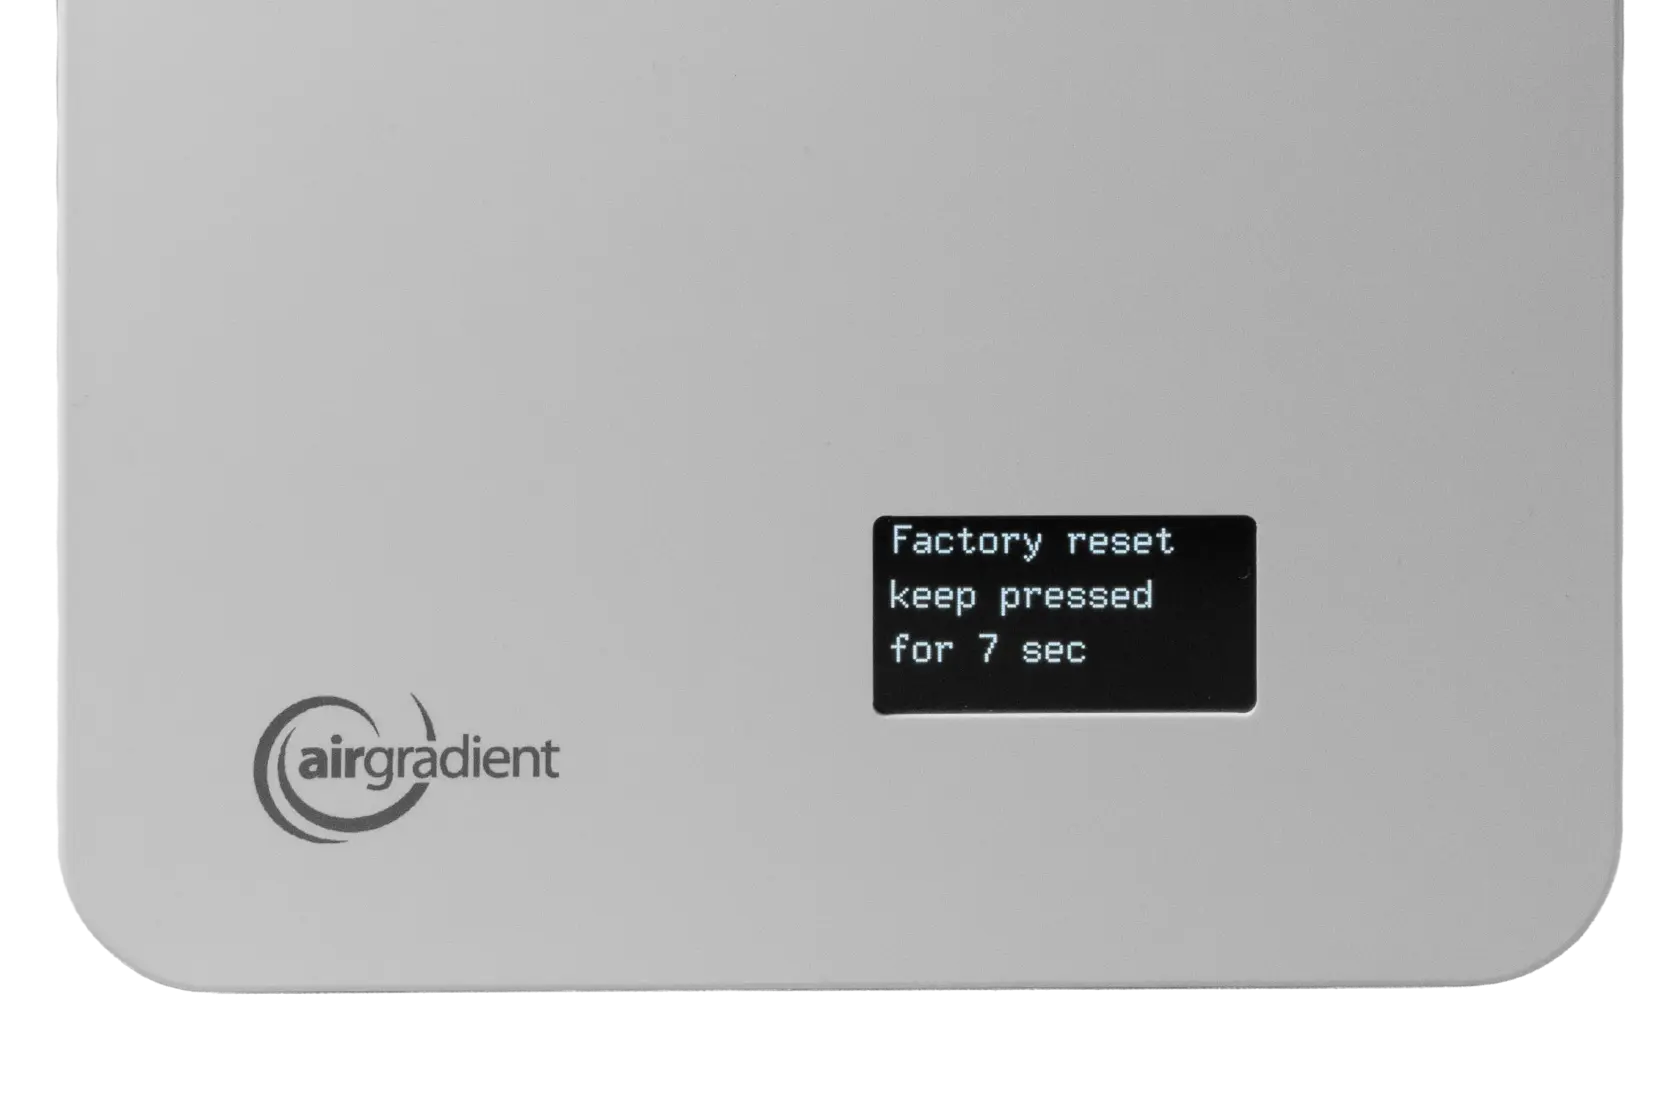
A countdown will show up on the screen.
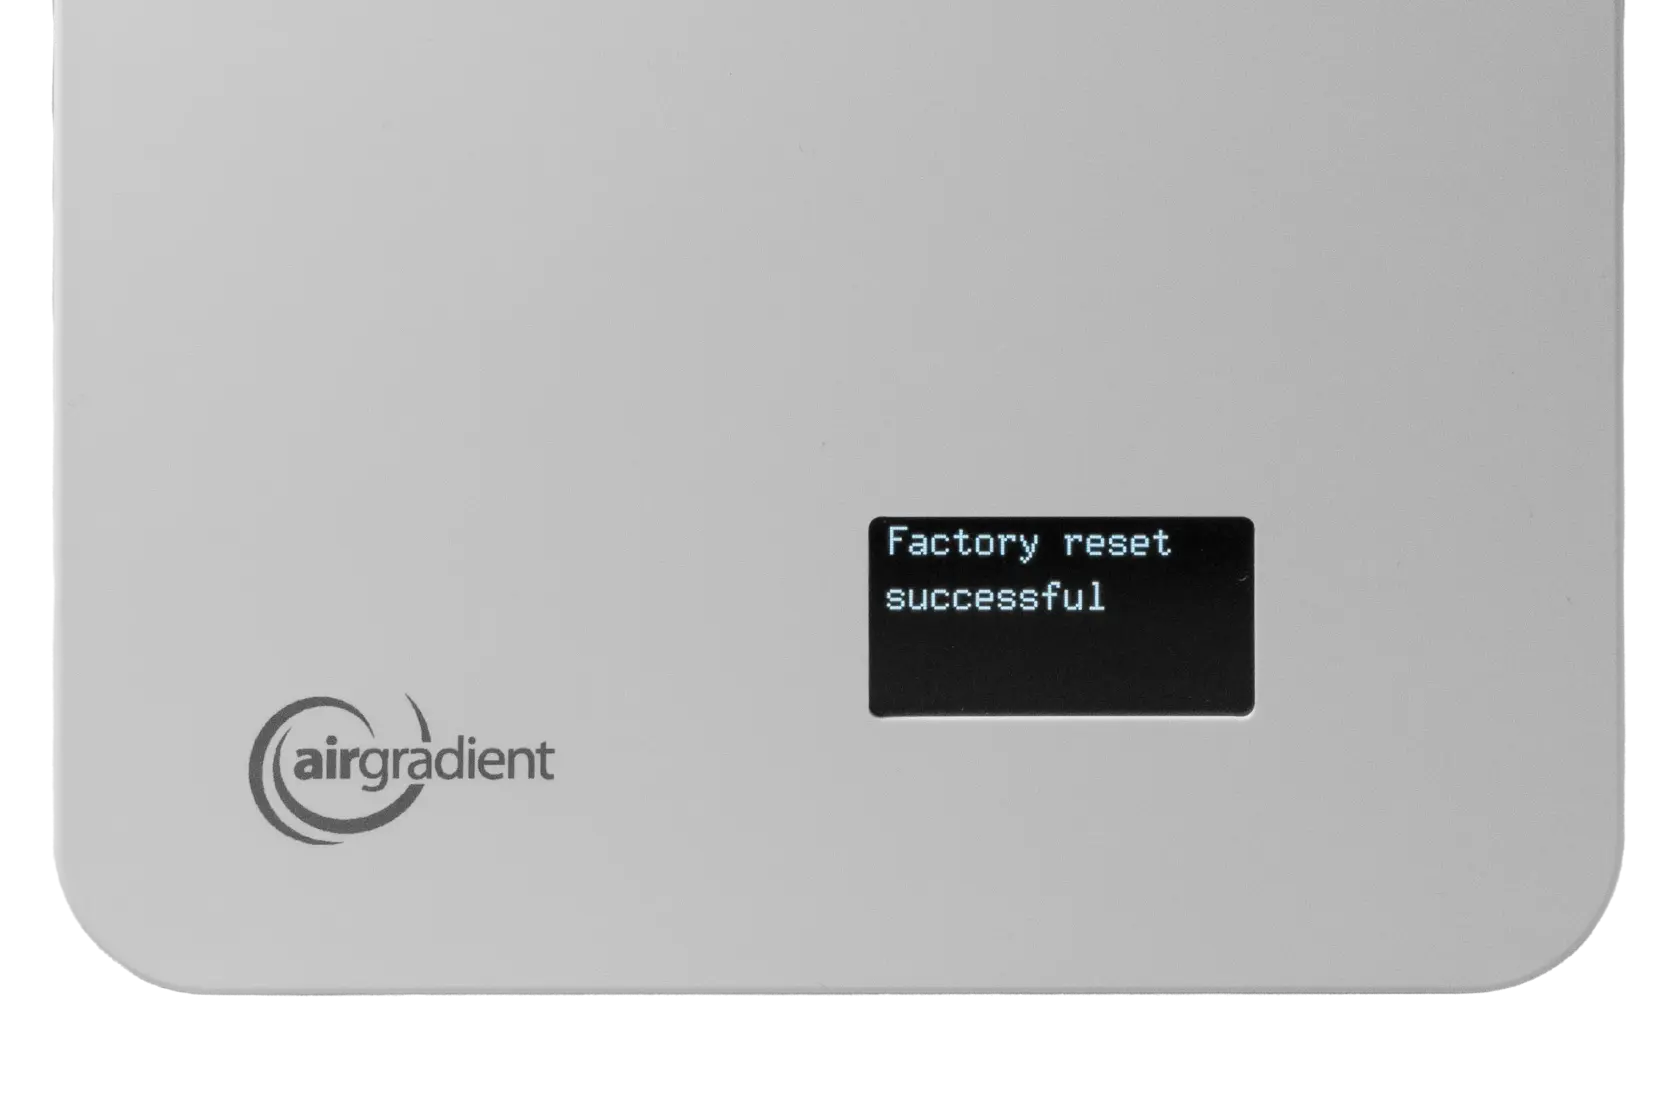
Please note that the data and settings made via AirGradient Dashboard won’t be deleted while performing a factory reset.
Note for non-dashboard users: In case you don’t use your AirGradient ONE with the AirGradient Dashboard (i.e., local only via Home Assistant, Local API), [all configuration](https://github.com/airgradienthq/arduino/blob/master/docs/local-server.md#configuration-parameters-getput) (including correction algorithms) made via these platforms will be gone. You will need to manually reconfigure your AirGradient ONE again on these platforms after the AirGradient ONE is reset and connected to the new Wi-Fi network.
# Troubleshooting Wi-Fi Connection
Before continuing, make sure you have followed the Wi-Fi setup steps exactly as shown in the written instructions or video guides:
[Connecting Your AirGradient ONE to WiFi](https://docs.airgradient.net/books/airgradient-one/page/connecting-your-airgradient-one-to-wifi)
If the setup steps or videos were skipped, incomplete, or done in a different order, Wi-Fi connection issues are very likely.
Only continue with the troubleshooting steps below after confirming the setup guide was followed correctly.
If the WiFi network you want to connect your AirGradient ONE to doesn’t appear in the WiFi configuration settings, or the device fails to connect, it’s almost always due to one of the limitations below:
### 5 GHz Wi-Fi is not supported
AirGradient devices only support 2.4 GHz WiFi.
- 5 GHz-only networks will not appear in the Wi-Fi configuration menu.
- A single (unified) SSID (WiFi name) that combines 2.4 GHz + 5 GHz can cause connection failures. This behavior depends on the router.
Some routers with a single (unified) SSID for both 2.4 GHz and 5 GHz work fine. Others don’t, and may prevent the device from seeing the network or completing setup. If this happens, the best split the Wi-Fi into two separate SSIDs:
- one for 2.4 GHz
- one for 5 GHz
Then, connect the device to the 2.4 GHz SSID
Important Note
- The steps to split Wi-Fi radios vary by router manufacturer. In most cases, you need to disable “band steering”.
### Enterprise / managed networks are not supported
AirGradient devices do not support enterprise or managed Wi-Fi networks, including WPA2-Enterprise or WPA3-Enterprise, certificate-based authentication, captive portals (login pages), or networks that require a proxy.
These types of networks are commonly used in schools, universities, corporate offices, government buildings, hotels, and public Wi-Fi.
If you are on such a network, contact your IT administrator and either connect the device to a standard 2.4 GHz personal Wi-Fi network or deploy it on a separate IoT / sensor-only Wi-Fi network.
### Firewall and outbound traffic restrictions
Some networks block outbound traffic by default. If outbound access is restricted, the Wi-Fi setup may fail during setup or the device will appear “offline” on the Dashboard after setup.
AirGradient devices require outbound HTTPS access only to :
```
91.98.9.143
```
### Test Network Connectivity (Ping Test)
If the device connects to Wi-Fi but shows offline in the Dashboard and the purple LED on the device in on, the network may be blocking outbound traffic.
AirGradient devices require outbound HTTPS access to:
```
91.98.9.143
```
You can test basic network reachability from the same network using a computer. Run in a Terminal (iOS) or Command Prompt (Windows):
```
ping hw.airgradient.com
```
#### Expected Result
You should see replies similar to:
```
64 bytes from 91.98.9.143: icmp_seq=0 ttl=49 time=68.751 ms
```
If you do not get a timeout response:
- The network is likely blocking outbound traffic
- Ask IT to allow outbound HTTPS traffic to 91.98.9.143
### Hidden SSIDs
Hidden networks usually won’t show up in the list. Enter the SSID and password manually in this case.
### Router security settings
Some routers block new or IoT devices by default.
Check for:
- MAC filtering: use the device serial number to set up an exception.The monitor serial number (SN) is the device’s MAC address, formatted without colons. Example: Serial number shown on device / dashboard: abcdefghijkl ; corresponding MAC address: ab:cd:ef:gh:ij:kl
- “Allow only approved devices” settings
### Still not working?
- Power-cycle the router
- Reset the device’s Wi-Fi configuration and try again
- Move the device closer to the router during setup
- Power cycle the monitor itself.
- Reflash the device firmware.
- Contact us via the [Support Form](https://www.airgradient.com/support/) or email support@airgradient.com
# Running the AirGradient ONE in Offline Mode
Offline mode allows the AirGradient ONE to operate without connecting to Wi-Fi. Sensor readings remain active and visible on the display. No data is sent to the AirGradient dashboard while running in offline mode.
### How to enable Offline Mode
1. Locate the **BOOT** button
On the back of the monitor, next to the USB connector, there is a small hole.
Inside is the BOOT button that can be pressed using a small screwdriver or pin.

2. Power on / power cycle the monitor if it was already on.
3. Wait for the prompt
During startup, the display will show the message: “Press now for offline mode”

4. Press the BOOT button
Press the BOOT button through the hole while this message is shown.
4. Confirm Offline Mode
If successful, the display will show: “Offline mode = true”
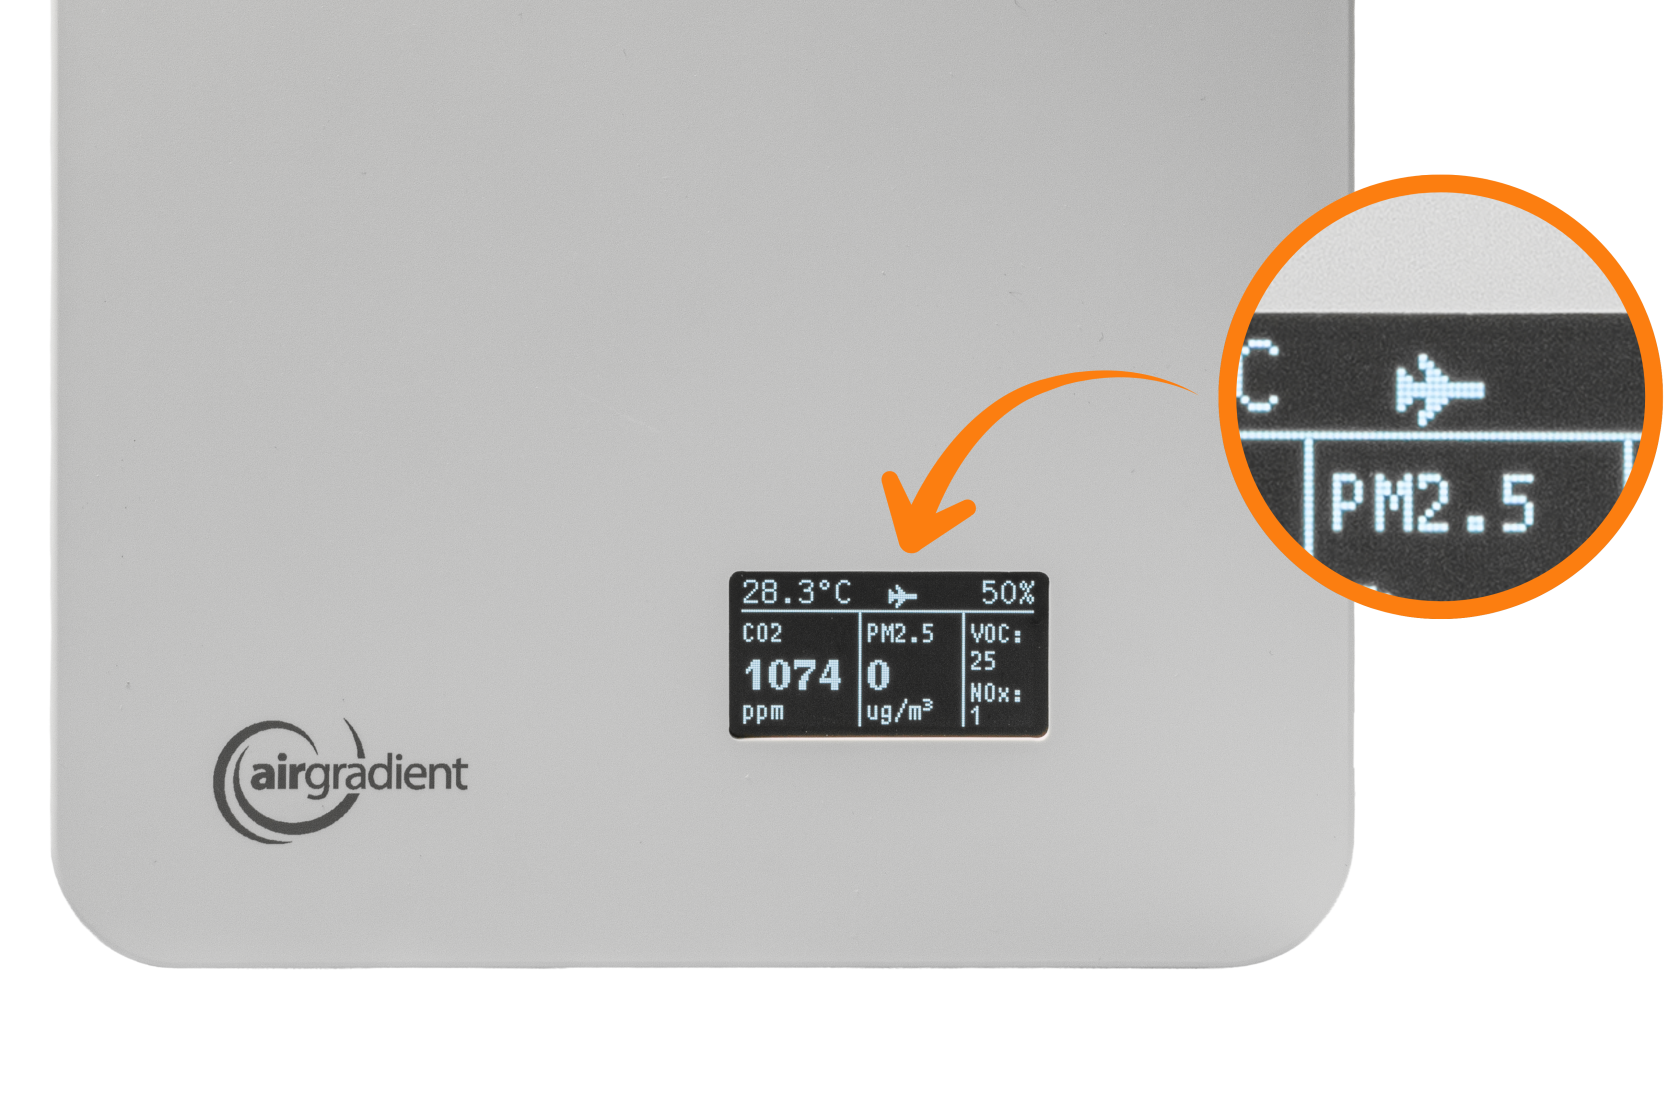
The monitor will now run fully offline. The display will have an airplane mode icon:
### Switching back to Online Mode
To return the monitor to normal (online) operation:
- Repeat the same steps above
- When prompted, press the button again during startup
The display will confirm that offline mode is disabled with the message: “Offline mode = false” and the airplane icon will disappear.